My youngest son & me

My youngest son & me

About me

Hi!
My name is Tanja (Sater) Miller and I'm excited about sharing my journey of converting my favorite recipes to gluten free! I am not a fancy cook - I prefer just a casual, fun meal. I am married with grown children (and have small grandchildren) & 3 dogs. I work full time as a registered nurse & I am a geek. Yes, I love Star Trek, Star Wars, Fringe, Firefly, Farscape and most of the other Scify shows. You will probably see a little of my geek side come out once in a while! Please join me on my journey of cooking, baking & converting every day recipes into yummy gluten free meals that everyone can enjoy (not just those with a gluten allergy!) Don't be shy about checking out my recipes....I have the gluten free version along with the regular recipe that I adapted from!

Sunday, December 30, 2012

Corn Bread Muffins (taste like Jiffy)

Corn bread muffins. It's difficult to eat a great soup or stew without corn bread muffins especially when it is chilly outside! I really like Jiffy brand corn bread muffin mix but since I have went gluten free...well, I just haven't found a gluten free muffin mix or a recipe that I think is tasty so I was on a search for a copy cat recipe like Jiffy brand & planned on converting it to gluten free. Our dear friends Judi & Armando stopped over the other evening and brought a huge pot of scrumptious homemade beef stew with them. Mmmmmm! That gave me an excuse to try out my gluten free conversion for the copy cat Jiffy muffin mix recipe I found. They turned out pretty darn close to the Jiffy muffin mix so I was pleased. The rest of the gang must have liked them too because we scarfed down the entire first batch! :)

I had to share this recipe because corn bread muffin mixes can be used for lots of things besides just corn bread muffins. They can be used in casseroles (like spoonbread) and also as a topper for crustless homemade pot pies & tamale pies, for making homemade corn dogs, spoon on top of sloppy joes or chili and bake for a casserole or dry out crumbs for croutons or stuffing to name a few uses. Well, I just LOVE corn bread and a good recipe is hard to find! I have always preferred a slightly sweet corn bread muffin over biscuits if given the choice. I think I could literally make a meal of corn bread & butter! (Leftover corn bread muffins sure taste great with a drizzle of honey & a cup of coffee the next morning!) Usually, I prefer homemade anything over packaged foods but I will admit that I really used to enjoy the taste & convenience of Jiffy corn muffin mix. I missed it...a lot! Now, I have my own version of this delicious corn bread which can be made gluten free! (Of course if you don't have a gluten allergy, you can just use regular flour!)

I used to make a really good baked chicken that had corn bread stuffing spread on top and it was baked. My family really liked it. I plan on making a batch of these corn bread muffins and drying them out  and turning it into homemade stuffing to make the chicken corn bread casserole recipe gluten free. I will post it sometime in the near future.

Corn Bread Muffin Recipe (Copy cat for Jiffy brand)
1.5 cups of the mix = 1 small box of Jiffy corn bread muffin mix.
(Recipe below is equivalent to 1 small box of Jiffy corn bread/muffin mix)
  • 2/3 cup flour (I used my gluten free flour blend, see recipe below but if you don't have a gluten allergy then you can just use regular flour!)
  • 1/2 cup yellow cornmeal (I prefer using 1/4 cup corn flour + 1/4 cup polenta but cornmeal works fine too)
  • 1/8 cup sugar (you can add a little less if you don't care for sweet muffins or add a smidge more sugar if you prefer them slightly sweeter. You can also substitute raw sugar or stevia. If using Stevia you will need to check box for how much to substitute. I am not sure if it is equal amounts).
  • 1 tbs. baking powder
  • 1/4 tsp. salt
Mix ingredients together with a fork or spoon. If you are not using it right away, you can store it in a ziploc bag, glass jar or rubbermaid container. I like to double or triple the recipe so I have it on hand when I need it. 1.5 cups of the mix = 1 small box of Jiffy corn bread muffin mix.

To prepare muffins, combine 1.5 cups of the mix with 1 egg, 2tbs. oil or melted butter and 1/3 cup milk by hand and let stand for about 5 minutes before putting into either greased muffin cups or paper lined muffin cups. Bake in pre-heated 350 degree oven for approximately 13-18 minutes or until lightly golden on top and muffin springs back when gently touched or toothpick inserted comes out clean. 

Gluten Free Flour Blend Recipe:
  • 1 1/2 cups brown rice flour
  • 1 cup white rice flour 
  • 1/2 cup glutinous rice flour or soy flour
  • 1 cup potato starch (not flour)
  • 1/2 cup nonfat dry milk, make sure it is very fine in texture
  • 1 cup corn starch or tapioca starch (I used corn starch for this batch)
  • 3 tbs. xanthan gum
Combine all ingredients together well. I store mine in a glass container and use it in place of regular flour in most of my recipes. *Glutinous rice flour does not contain gluten, it is made from sticky rice. 

Yummy, moist & fluffy corn bread muffins


My gluten free corn bread muffin mix I keep on hand


Enjoy some homemade comfort food on a chilly evening!
Tanja
Gluten Free Casually


Saturday, December 29, 2012

New York Style Cheesecake

New York Cheesecake. Yummy! I absolutely love cheesecake. I think my kids would protest if I didn't make this for Christmas day. This year however, I really wanted to enjoy eating the cheesecake so I decided to make it gluten free. I took my original recipe (that I cut out from an old box of graham cracker crumbs years ago) and basically just substituted gluten free graham cracker crumbs and that was it. It turned out just as elegant and tasty as the original version. Baked cheesecakes are really not difficult to make but they sure look like you spent a lot of time preparing them. They always look elegant! I personally prefer cherry pie filling on mine but you can serve them plain or use melted chocolate or fresh fruit. My friend Jackie makes a delicious cheesecake topped with lemon curd. (I have not mastered lemon curd yet so I don't usually attempt that topping!) You can also add other things to the batter (like chocolate chips, candies, flavorings, etc) but I just like the traditional version best.

New York Cheesecake Recipe (Baked Cheesecake):

For crust:
  • 2 cups of graham cracker crumbs (I substituted the gluten free version that I found at Sprouts market. You could also substitute any type of gluten free cookie crumbs instead OR you can make the nut shortbread crust from Rosemary's Dessert Squares posted on this blog on 1/14/13 instead)
  • 3/4 stick real butter or margarine, melted
  • 2 tbs. sugar
Toss the graham cracker crumbs (I used gluten free ones!) with the melted butter and 2 tbs. sugar. Press into a the bottom and about 2" up the sides of a 9" springform pan.
(GF graham crumbs I used)

For filling:
  • 4 pkgs (8 oz. each) cream cheese, softened
  • 1 1/3 cups sugar
  • 2 tbs. cornstarch or tapioca starch
  • 3 eggs
  • 1 cup sour cream or plain yogurt (I used fat free plain greek yogurt today)
Beat cream cheese on medium speed until fluffy and smooth. Add sugar, corn starch (or tapioca starch) and beat until smooth and well combined. Add eggs one at a time. Add sour cream. Pour into crust and bake in pre-heated 325 degree oven for 75 minutes or until center is almost set. Turn oven off and leave cheesecake in oven with door ajar. (This will help prevent the top from cracking as it cools. I leave it in there for a couple of hours. I was in a hurry to bake other items today so I did not let it cool in the oven so the top cracked on my cheesecake - but no worries - I just added a can of cherry pie filling to the top and it still looked great!) Refrigerate at least 3 hours before serving - but make sure it is completely cool before you put it in there or it will sweat. Store in refrigerator. (I put foil on top of my pan when it is cool and store in the refrigerator until I am ready to serve it and then I remove it from the pan and place it on a glass serving plate or cake stand). You can serve it plain or with any flavor pie filling, lemon curd or pour melted chocolate on top. The possibilities are endless!


Cheesecake with Cherry Topping (Gluten free)

Cheesecake close up (See how well the gluten free crust looks!)
Made with GF chocolate cookie crumbs instead of graham crumbs

The piece I am getting ready to enjoy eating! Yum! :)


I hope you enjoyed my version of a gluten free New York Style Cheesecake. 

Happy Holidays!
Tanja
Gluten Free Casually


Saturday, December 22, 2012

Old Fashioned Peanut Butter Fudge


OLD FASHIONED PEANUT BUTTER FUDGE! This recipe for peanut butter fudge came from an old friend that has since passed away. I misplaced this recipe and tried finding it on the internet but I was not able to find the EXACT recipe. I tried a similar recipe from the internet and the results were not great. It was a waste of time. Luckily, I found my old recipe and was very happy. I made a batch today for my holiday cookie plates because it is always a favorite. I have several peanut butter fudge recipes and they are all really good but this by far is my favorite recipe. This makes a HUGE batch. I love the flavor and texture of it. It is made with brown sugar so it has a fabulous rich flavor. I will admit that I have other recipes that are easier to make but this recipe is worth the effort. If you can make no-bake cookies then you can make this recipe. The procedure is about the same. I would invest $3 in a candy thermometer from Walmart because you wouldn't want to waste the ingredients and time making this if it doesn't reach the soft ball stage because then it won't "set". (However, if that does happen... then just use it as a "frosting" for brownies or cupcakes. No since in wasting it!)

Fudge isn't just for Christmas either. You can make fudge for any special occasion like Valentine's day, Mother's Day, Father's day, family picnics, weddings, baby showers, etc. I like making fudge because you can make it in advance and store it in tins or sealed containers and it keeps for a couple weeks which is very convenient during the busy holiday season or if you are preparing for a wedding! Fudge looks very elegant when placed on beautiful plates, tiered platters or even in decorative jars. I will share some of my easier fudge recipes in the near future as well. (Microwave fudge recipes that are super easy!)

Old Fashioned Peanut Butter Fudge Recipe:

  • 2 pounds of brown sugar
  • 4 cups of granulated (white) sugar
  • 12 oz. can of Milnot Canned Milk (you can find Milnot Milk next to the evaporated milk at most grocery stores. It is harder to find out west so you can substitute evaporated milk if you can't find it. I will say that Milnot brand works best but I have used Carnation evaporated milk in a pinch and it turned out fine)
  • 1 stick margarine (make sure it has at least 65% fat or it won't set correctly. I use Kroger brand 80% fat or Gold & Soft brand or Fleishman's brand). 
  • 32 oz. Jif creamy peanut butter (I personally think Jif brand works best. It has the most flavor for this fudge. I never use anything else. I have had people use other brands and later tell me the fudge just didn't taste the same. Spend the extra money and get Jif - it is worth it for this recipe!
my inexpensive candy thermometer 


Mix the brown sugar, white sugar, canned milk and margarine in a large heavy duty pan. Stir until smooth and bring to a full boil. Boil until soft ball stage (I recommend using a candy thermometer but if you are not using one they usually recommend boiling for 5 full minutes stirring constantly). Remove from heat once you reach the soft ball stage and stir in peanut butter quickly! (I have my peanut butter opened and spoon/spatula ready to scoop it into fudge). Pour into two foil lined 9x13 pans or a foil lined 12.5"x17.5" cookie sheet with edges. I recommend putting foil in the pans before pouring the fudge. It makes it easy to just lift the foil out and then put it on a cutting board or countertop to slice the fudge + makes for an easy cleanup! You don't need to butter the foil first. I use a pizza cutter to quickly & easily cut the fudge into squares. This fudge sets up quickly so you don't need to refrigerate it to set it.

Recipe I tried off internet that DID NOT work. I will be making this into a "frosting"


Packing up fudge for goody plates


Fudge cooling in my foil lined 12.5" x 17.5" cookie sheet with edges

Cutting fudge with my pizza cutter


Merry Christmas!
Tanja
Gluten Free Casually


Saturday, December 15, 2012

Butter Crumb Bars

Butter Crumb Bars. Super easy! I came up with this recipe many years ago when I used to work at General Mills. Employees were able to purchase a case of cereal and a case of Betty Crocker cake mixes for a $5 donation several times a year. Needless to say, I had to find creative ways to use up all those cake mixes! The inspiration was the lovely butter crumb bars with jam/fruit filling that we enjoyed while visiting my mom's family in Germany. The buttery crumb topping would just melt in your mouth.  I love visiting Germany and these bars remind me of the wonderful times I have spent with our family there. My mom would make them once in a while from scratch but they were a lot more work. I began experimenting with cake mixes one Christmas season years ago when we lived in Ohio because I had so many cake mixes + I was out of flour and was housebound with sick kids. I let the creativity begin! These buttery bars were the result of my experimenting. (Yes, there were many batches of bars that I ended up throwing away before I got this result!)  I also have several other varieties that I make that are similar using cake mixes. (Will post them in future).

Since this basic recipe is SOOOO EASY, I was able to adapt it to Gluten Free by using Betty Crocker Gluten Free cake mix (or if you are a diabetic, you can substitute the Sugar Free Pillsbury cake mix). There are other brands of cake mixes that are gluten free as well and any of them should work just fine. Of course, if you don't have a gluten allergy you can just use the regular yellow or butter yellow flavor cake mix which are very inexpensive and very convenient! You can also make homemade yellow cake mix (recipe size for a 9x13 or two round cakes) and just don't add the wet ingredients so it would be the same as a store bought mix.

My dad and Grandma Goldie really liked raisin or date cookies so one year I cooked down some raisins with a little water to make a paste to use instead of the jam which they really liked. (I used the yellow cake mix with the raisin or date filling). I have also made a chocolate version using chocolate cake mix but used a mint filling or a chocolate/caramel filling in place of jam. I love this recipe because it is so versatile and you can use any flavor of cake mix and whatever filling you want to make it customized. I have noticed that Home Goods Store, TJ Maxx and Ross for Less stores carry gourmet gluten free and sugar free cake mixes frequently at a bargain price compared to specialty stores. (I have seen red velvet, lemon, carrot cake, poppyseed, etc. cake mixes in gluten free there) I happen to like the yellow cake mix or the chocolate cake mix so I usually stick with the Betty Crocker Gluten Free cake mixes that I can find at most grocery stores. (But I am thinking about trying a red velvet version with a cream cheese filling this year!)

Butter Crumb Bars:
  • 1 box of yellow cake mix (I used Betty Crocker Gluten Free yellow cake mix for today's recipe but I have made them for friends and family using the regular cake mix or the sugar free cake mix for the diabetics). 
  • 1 1/2 sticks of real butter, melted (I have used margarine in a pinch but honestly it doesn't have the melt in your mouth flavor that real butter does).
  • Jam, Jelly, Preserves or Apple Butter, pie filling or canned fruit that has been drained so it won't get the crust soggy (I usually use homemade jam or filling but I wanted to make peach flavor today so I just bought a jar of peach preserves at the Dollar Store. They have a great selection of nice jam for $1 and the cute little chubby jars are great to up-cycle. I take off the labels and paint the lids with chalkboard paint to store herbs, seasonings, craft items, etc.) If you are baking for a diabetic you can use sugar free jam/jelly or Comstock has a sugar free pie filling. My mom takes crushed pineapple and combines with a couple tablespoons of corn starch or tapioca starch and cooks on the stove until thickened in place of jam which is also DELICIOUS! I added about 6 oz of preserves (about 1/2 jar) to my batch today. If you like it thicker, feel free to add more!
  • If you want to add some extra creamy richness to this lovely dessert you can add 4 oz. of softened cream cheese with  2 tbs. of sugar. (I have made this dessert with and without the cream cheese. It is a lovely addition to the bars but the bars are delicious without it too. If you want to keep it simple then I would just leave this out.
Pour the dry cake mix and melted butter into a mixing bowl. (Yep, that is it. No eggs, no liquids, just the melted butter!) Hand mix with a spoon until it becomes coarse crumbs. Press about 2/3 of the mixture into the bottom of a greased 9x9 or a spring-form pan. If you are using the cream cheese/sugar mixture then spread it directly onto the crust and the jam on top of the cream cheese. If you are leaving out the cream cheese/sugar mixture then just spread the jam/filling directly onto the crust. Sprinkle the remaining 1/3 crumb mixture onto the top of the jam. Bake in pre-heated 350 degree oven for about 20-25 minutes or until top and crust is lightly golden brown. Cool completely before cutting.

These are a great addition to holiday cookie plates. I like to bake them in disposable pans with lids to give away with a small bag of coffee as a gift to friends. I have also baked them in individual tiny ceramic loaf pans that I get at Michael's Crafts for about $1 each (makes about 6 single tiny loaves) and wrap them in clear cellophane treat bags with ribbons for holiday favors or stocking stuffers.

This is what the batter should look like: coarse crumbs
$1 Store peach preserves I purchased for today's batch then "up-cycled" empty jar as a craft storage jar

Butter Crumb Bars baked in disposable pan for gift giving!

Butter Crumb Bars baked in a small single serve loaf pan

Ready to eat! (Peach Jam Version)

Up Close peek at the delicious buttery bars! (Peach Jam version)


I hope you find this recipe to be quick, easy & delicious. It is a recipe that my kids could enjoy helping me make when they were growing up because it was so simple. It is a great fast treat to make for last minute company, pot lucks, bakes sales or just because you are craving something sweet...because it only takes a few minutes to throw together and quick cleanup!

Enjoy!
Tanja
Gluten Free Casually

Wednesday, December 12, 2012

Peppermint Patties

Homemade Peppermint Patties! If you like peppermint and chocolate...you must try to make these! The holidays wouldn't be the same at our house without these minty little bites. These have a very firm but creamy peppermint filling - similar to a York Peppermint patty but even better! The filling is firm & crisp yet creamy on the tongue. It is a lovely mix of crisp peppermint flavor with the delicate flavor of chocolate coating. The only problem with making them is you can't stop eating them! I do not recommend making these if you are on a diet or love mint! This is another one of my old favorites because you don't have to alter the recipe or buy special ingredients to make them gluten free. (These are also quite delicious dipped in white chocolate or milk chocolate instead of dark chocolate too!) If you don't really like peppermint flavor you can substitute other flavors like strawberry, maple, lemon, orange or whatever flavor you like!

These are scrumptious little treats to make for Valentine's Day, Weddings, Birthdays, Baby Showers or just because you want to do something nice for your family and friends. I like these because you can make them weeks ahead and store in containers with wax paper between layers. They don't need to be refrigerated & they don't go stale like cookies. You can also add food coloring to the filling to make it customized for the occasion. (Pink or blue filling for a baby shower, etc). These are also more fun to make with a friend or two because it will go faster and you can enjoy visiting while being productive. I had the pleasure of making mine with my dear friend Judi this year. We whipped out a double batch in less than an hour. (Of course we had her fancy Kitchen Aid mixer which is a heavy duty one so the mixing was easy!) It was fun visiting while we worked together making these yummy little bites of heaven. I wish the holiday season wasn't so crazy and hectic and I made more time for doing things like this more often with friends during the holidays. (That will be my New Year Resolution for 2013!)

Don't let the ingredients fool you. These contain cream cheese but you will not be able to taste cream cheese at all! Everyone is always so surprised that these contain cream cheese. I have been making this recipe for many years after I saw it in a Taste of Home magazine. (Of course I have tweaked the recipe just a little!)

Ingredients

Peppermint Patty Recipe:
  • 1 package (8 oz.) cream cheese, softened
  • 4 tsp. peppermint extract (sometimes I add an extra teaspoon or two if I think it needs to be stronger - we like our peppermint patties very minty at our house. You can add a little less if you don't like strong mint flavor. You can also substitute a different flavor other than peppermint if you prefer). NOTE: Be sure it is peppermint extract and not spearmint extract.
  • 8 cups powdered sugar
  • 1 bag of semi-sweet chocolate chips (I have had the best luck with Nestle brand melting the smoothest for dipping. I used the Hershey brand this year and it was thicker and harder to dip the patties for proper coating).
  • 3 tbs. Crisco (if necessary to thin the chocolate when melting it for a smooth thin dipping chocolate
In a large bowl, beat the cream cheese and extract until smooth and creamy. Gradually add the powdered sugar one cup at a time, beating well with each addition. Shape into 1" balls (I make mine into about 2" balls most of the time) and place on wax paper lined baking sheets. Flatten into patties. Cover and refrigerate for 1 hour or until chilled. (This prevents them from falling apart when you dip them into the hot melted chocolate). 

In microwave, melt the chocolate chips in a glass bowl, stirring every 30 seconds until smooth and melted. If your chocolate is thick and difficult to use for dipping, add Crisco and stir until melted and smooth. (This should thin your chocolate). Dip patties into melted chocolate allowing excess to drip off. Place on waxed paper until set. (You may need to reheat chocolate to thin it down again sporadically. Adding cold patties to the warm chocolate will chill it causing it to thicken). You can use a double boiler instead of microwaving the chocolate to melt it but just be sure that the steam from the double boiler or the water does not get into your chocolate or it will not be smooth. After these are dry and set, I melt some white chocolate or almond bark and drizzle over the top of the peppermint patties just to dress them up but you don't need to do that.

Note: These are not difficult to make but you need to have a decent mixer or food processor because the inside filling is very thick and you don't want to damage your appliance. You may have to hand mix & knead the last cup or two of powdered sugar for the peppermint filling if your mixer is struggling.


I hope you enjoy the recipe for a great gluten free treat! Make a double batch. One for your family & one batch to share with friends during the holiday season. They are great hostess gifts and compliment a cookie tray nicely. Happy Holidays! (These are also a great treat for Valentine's Day!)

Tanja
Gluten Free Casually


Friday, December 7, 2012

Cheese Crisps

Cheese Crisps! Seriously...baking can't get any easier than these! I had these for the first time at a very upscale brunch and fell in love with these crispy cheesy bites! The chef shared his culinary secret with me: baked shredded cheese. Yep, that is it! This takes the place of those little cheese crackers that are wonderful with dips and with a glass of wine. These are low carb and gluten free. You can change it up with flavored cheeses. Two of my favorite cheeses to use are Mediterranean herb or Chipotle Chile Pepper Cheddar cheese. The traditional standby Cheddar, Co-Jack, Gouda, Pepper Jack or Swiss cheeses work great too. They are also fabulous salad toppers in place of croutons and a great replacement for the french fried onions on top of green bean casserole.

Everyone loves these crisps and anyone with a gluten allergy or those watching their carbs can eat them so they are a must for happy hour or holiday appetizers. They also make a great hostess gift paired with a bottle of wine! They are so SIMPLE to make! (It is also a great way to use up any leftover cheeses from party trays). They spread as they bake so each one will have a lacy snowflake pattern. You can also customize the flavor by adding seasonings like rosemary, basil, pepper, Italian seasonings, etc. that will bake into the cheese as it melts.

Cheese Crisps:

Your favorite shredded hard cheese or semi-hard cheese

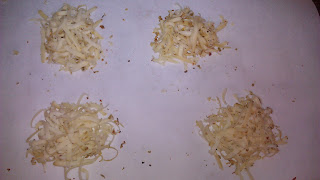
Place small piles of shredded cheese (you want to make sure they are in mounds because they will flatten when baking) onto a parchment paper lined baking sheet. Bake in preheated 375 degree oven for about 7-12 minutes or until brown and crispy. (These should be crispy like a potato chip). You can make them bite sized or larger for dips. You can also sprinkle shredded cheese evenly onto the parchment lined baking sheet rather than making mounds and then break them into pieces later which works fine as croutons or topping for casseroles but doesn't look quite as elegant as the lacy round patterns when making the mounds for individual crisps. I remove the crisps from the parchment paper and place on a brown paper grocery bag or newspaper to let the grease drain off so they get crispy as they continue to cool. (The cheese has fat in it so it will drain out as they are baked).

Shredded cheese on parchment paper prior to baking
One of my favorite cheeses to use for cheese crisps

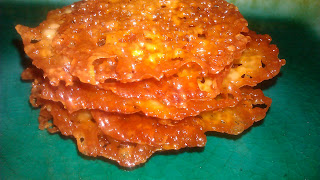
Stacked Cheese Crisps

Nice Lacy patterned cheese crisp

Pile of yummy deliciousness! :)

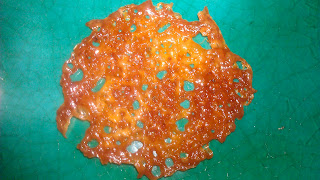
Up close look at a larger cheese crisp. Nice lacy pattern.

I hope you enjoyed this super easy but delicious recipe. Gluten free doesn't mean it has to be expensive or difficult.

Tanja
Gluten Free Casually

Monday, December 3, 2012

Pistachio Cookies

Pistachio Cookies. A friend of mine used to give us a cookie plate every Christmas with these cute little green cookies that were similar to a sugar cookie but with a hint of pistachio flavoring. She never shared the recipe. Well for some reason I had a hankering for these cookies so I begged for her recipe. She finally caved in and shared the recipe. It was a pre-packaged sugar cookie mix with a pistachio dry pudding mix combined with a couple other ingredients. Well...that wasn't going to work for me. I needed a basic recipe that I could tweak and make it gluten free. (I guess I could have purchased a gluten free cookie mix but they are so expensive and some of them are not real tasty). So off to the drawing board I went. I decided to just experiment and make up my own recipe until it worked and I had the cookie taste & texture I wanted. I did end up using a few drops of green food coloring to give it a little more green color but you don't have to do that. If you don't have a gluten allergy, you can just go ahead and use regular flour for the gluten free flour blend. My husband is a die hard chocolate chip cookie lover and doesn't usually eat cookies without chocolate...but he actually liked these!

Pistachio Cookie Recipe:
  • 1/2 cup Crisco shortening
  • 1/2 cup real butter
  • 1 3/4 cup sugar (you can use raw sugar if you prefer)
  • 2 eggs
  • 4 tbs. heavy cream or milk (or water)
  • 2 1/2 c. gluten free flour blend (see recipe below). If you don't have a gluten allergy then you can just use regular flour.
  • 2 tsp. baking soda
  • 1/2 tsp. salt
  • 2 boxes (3.4 oz. each) instant Pistachio Pudding mix, dry (if you are using a sugar free pudding mix then you will need to add about 1/3 cup additional flour)
  • few drops of green food coloring, optional
  • additional chopped pistachio nuts or almonds, optional
This is the type of dry pudding mix I used

Beat the shortening, butter and sugar until fluffy. Then add the dry Pistachio Pudding mixes, eggs and cream (or milk or water). Gradually add the flour, baking soda and salt. Stir in food coloring and additional nuts if you are adding them. (I did not add additional nuts to this batch today). Refrigerate for at least 1 hour before placing dough chilled dough balls onto un-greased cookie sheets. The dough had a beautiful mint green color that reminded me of mint chocolate chip ice cream! I like to use my cookie scoop to get my cookies fairly even in sizes. You can make the dough ahead and keep in the refrigerator for about a week or the dough balls in the freezer for 6 months. Bake the slightly chilled dough balls in preheated 350 degree oven for 8-10 minutes. The tops should just barely be getting lightly golden in color. You want to remove them before they get over-baked and lose their green color - unless of course you like a crispy cookie. These cookies will be soft and slightly chewy.

Gluten Free Flour Mix (that I used today)
  • 1/4 c. soy flour 
  • 1/4 cup corn starch (you can substitute tapioca starch)
  • 1 cup brown rice flour
  • 1 cup rice flour (I used sweet rice flour)

Gorgeous mint green dough

Chilled dough balls

Baked Cookies

Ready to eat!

I hope you enjoyed my journey of experimenting for the perfect pistachio cookie recipe!

Tanja
Gluten Free Casually

Sunday, November 25, 2012

Sweet Potato Souffle (Gluten Free)

Sweet Potato Souffle. My mouth is watering just thinking about it! The first time I tasted this little bite of heaven, I was pregnant with my first child (25 years ago) and was at a Dinner Theater in Southwest Ohio. I had never been a fan of sweet potatoes before this recipe. This is a fantastic side dish paired with just about anything. It wouldn't be a holiday at our house unless this side dish is served but it also is a great way to dress up the traditional steak dinner on a casual weeknight. I would rather have this with a cup of coffee for dessert than many of the other dessert options. Yes, it is that good! :) The bottom is fluffy with sweet crunchy topping. It just melts in your mouth. It is also makes a great dish take to a party because you won't feel cheated if there is not a gluten free dessert available. This will satisfy your sweet tooth! (by the way...leftovers are fabulous the next day with a cup of coffee!)

It was a very easy recipe to tweak just a little bit to make it gluten free. I love these old recipes and would be very disappointed if I couldn't have them at the holidays. (The original recipe called for more butter but I never add it and it tastes just fine without it!)  My sister-in-law makes a similar recipe but she adds shredded coconut on top which I also really like. If you are a coconut lover like me...go ahead and add the coconut to the topping!

Sweet Potato Souffle Recipe:

  • 1 (29 oz) can sweet potatoes, drained
  • 1/2 cup sugar (can substitute raw sugar or sugar substitute)
  • 2 eggs
  • 1/3 cup milk (or if you can substitute the juice from sweet potatoes)
  • 1 tsp. vanilla extract


Topping:

  • 3/4 cup brown sugar (or substitute raw sugar or sugar substitute)
  • 1/2 cup rice flour or finely ground oats
  • 1/2 cup melted butter
  • 1 cup chopped pecans or walnuts

Mash the sweet potatoes. Gradually add the sugar, eggs, extract and milk. Mix until fairly smooth. Pour into a greased 8x8 or 9x9 pan. Combine the melted butter with sugar, rice flour (or ground oats) and nuts. Sprinkle on top like a crumb topping. Bake uncovered in a pre-heated oven for about 45 minutes or until center is slightly set and top is golden brown and slightly crispy.


Enjoy this easy and scrumptious recipe this holiday season or whenever you feel like dressing up a casual dinner or brunch!

Enjoy!
Tanja
Gluten Free Casually