My youngest son & me

My youngest son & me

About me

Hi!
My name is Tanja (Sater) Miller and I'm excited about sharing my journey of converting my favorite recipes to gluten free! I am not a fancy cook - I prefer just a casual, fun meal. I am married with grown children (and have small grandchildren) & 3 dogs. I work full time as a registered nurse & I am a geek. Yes, I love Star Trek, Star Wars, Fringe, Firefly, Farscape and most of the other Scify shows. You will probably see a little of my geek side come out once in a while! Please join me on my journey of cooking, baking & converting every day recipes into yummy gluten free meals that everyone can enjoy (not just those with a gluten allergy!) Don't be shy about checking out my recipes....I have the gluten free version along with the regular recipe that I adapted from!

Monday, September 1, 2014

Peanut Butter Balls (no bake treats!)


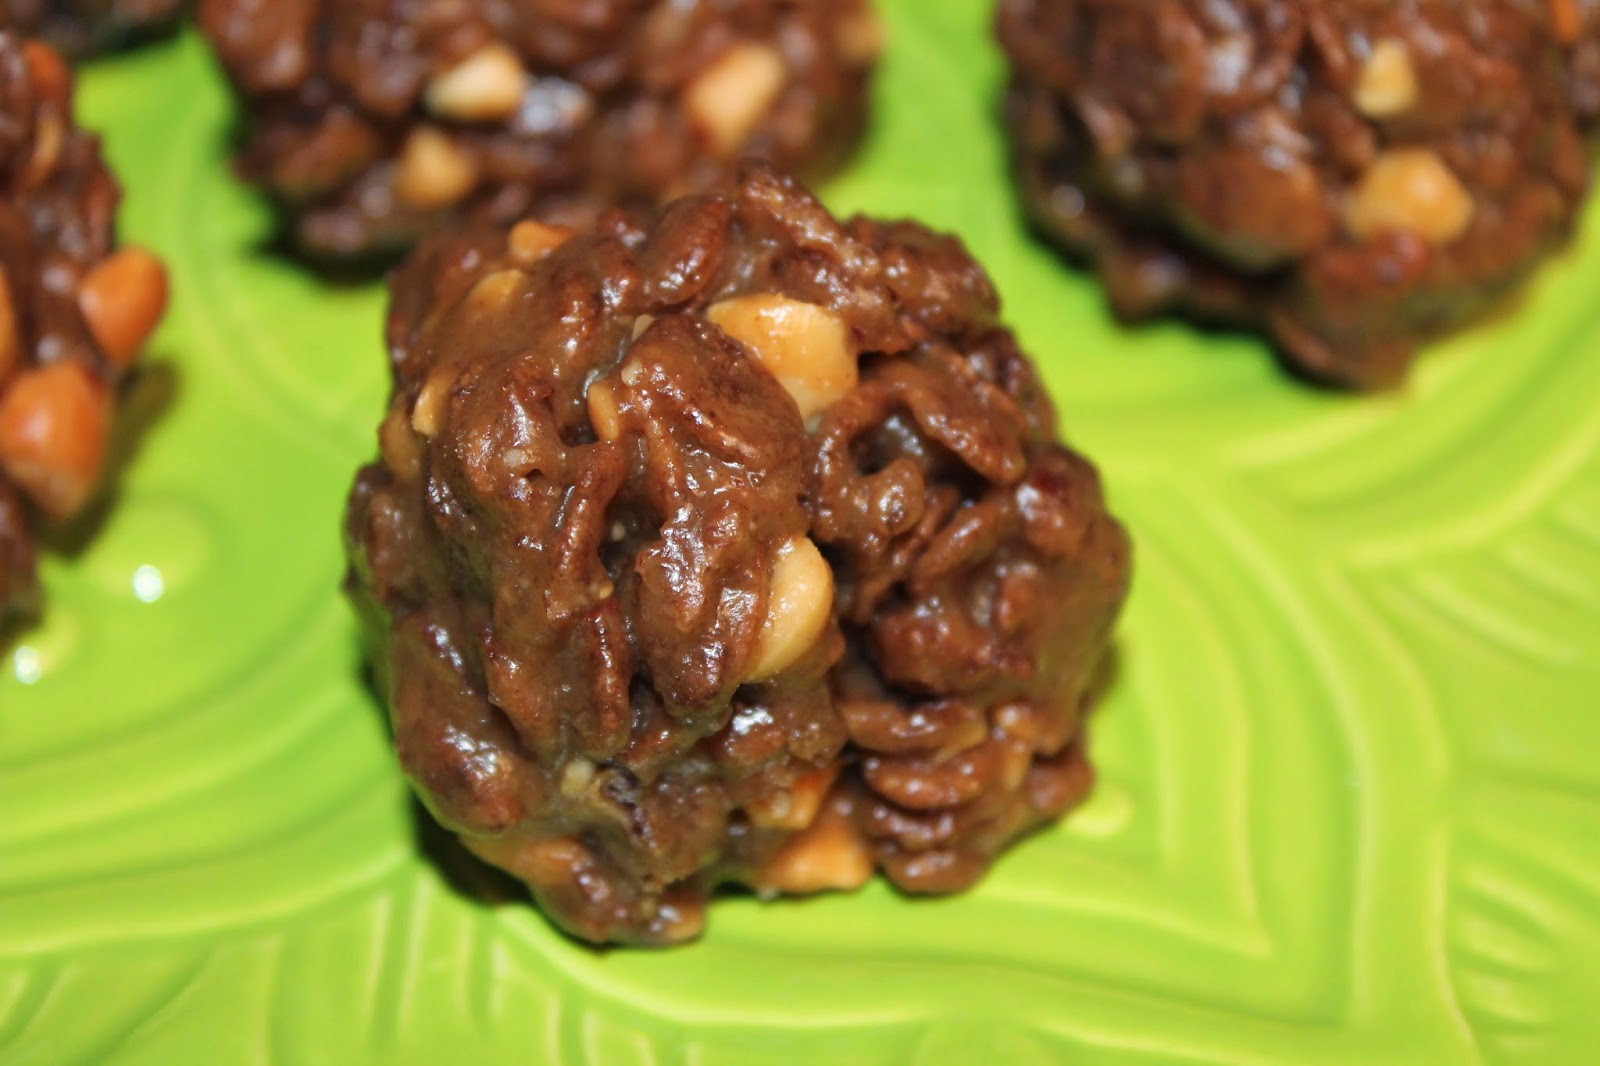
Peanut Butter Balls. I love this no bake recipe! It is very flexible. You can change up some of the ingredients easily if you need to use what you have available in your pantry. You can also cut back or eliminate the sugar entirely in this recipe. You can use Cocoa Pebbles instead of Gluten Free Rice Krispies cereal or gluten free corn flakes cereal. You can use almond butter in place of peanut butter. It all works! (I used Cocoa Pebbles for the recipe in today's photo that is why they have a chocolate brown color. If you use gluten free crisped rice cereal or corn flakes then they will have a pale peanut butter color instead. They have a chewy caramel like texture when you bite into them. They taste like you spent a lot of time on them but they are super easy to throw together and it makes a bunch so it is economical too! The recipe can be cut in half if you want a smaller batch or doubled for a huge crowd.

This recipe goes together fast and is easy enough the kids can help. I let them cool down a little bit before I roll them into balls. You can make them in advance. You can also add extra items like chocolate chips, M&Ms, dried fruit, coconut, colored sprinkles, chia seeds or whatever else you like. I usually just keep it simple and add the basic ingredients in the recipe. I prefer using organic honey but you can use agave nectar, maple syrup or corn syrup instead.

These are great for road trips, tailgating, game day, holiday cookie plates, pot luck, picnics, sweet treat for brunch or even just a quick snack craving. They are great on the patio on a cool evening with a cup of coffee or hot chocolate and they are easy enough that you can make them while camping! This is a recipe must have if you like easy recipes!

Peanut Butter Balls Recipe:
  • 1 cup honey (or you can use corn syrup, agave nectar or maple syrup)
  • 2 cups peanut butter (or you can use almond butter). I like to use crunchy so I have little nut pieces in the balls but you can use creamy if you prefer. I am also thinking these would be good with Nutella but I haven't tried it yet! Maybe next time!
  • 1/2 cup sugar (I use the non-bleached organic non-GMO sugar but you can use regular sugar or brown sugar if you prefer. You could probably use a sugar replacement like Splenda but I have never tried it. I have left the sugar out entirely and it worked fine but the sugar does make it slightly chewier and my family prefers them extra chewy so I do add the sugar.
  • 4 cups gluten free cereal (I like to use Cocoa Pebbles or Malt-o-meal cocoa dyno-bites cereal which are both gluten free but you can use gluten free crisped rice cereal or gluten free corn flakes).
Melt the sugar, peanut butter and honey (or agave nectar or syrup) in a saucepan on medium heat until it comes to a slow boil. Remove from heat and stir in your gluten free cereal. If you are adding any extra items like dried fruit, sprinkles, chocolate chips, M&M candies, etc. then add them now. Let it cool slightly before you roll it into balls so you don't burn your fingers! Place on waxed paper to set slightly. These will remain slightly chewy like a rice krispie type treat but they will have a richer flavor! My family prefers these over rice krispie treats! I make mine about the size of golf balls. You can make them larger or smaller depending on how you like them.


They aren't perfectly shaped balls but they are delicious!

These are cooling down a little bit. They are still slightly warm

These are my hubby's stash!

Ready to wrap up for my friend

Mmmmm.....my mouth is watering!

Golf ball sized peanut butter balls

See the up close view of the cocoa pebbles cereal and chunks of peanuts from the crunchy style peanut butter?

Ready to give away to a friend

Up close view of the chewy inside of the peanut butter ball

Yummy! Biting into the peanut butter ball
I hope you enjoy another one of my family's favorite no-bake easy recipes. We like easy, inexpensive and casual foods for get-togethers. I can whip these up faster than it takes me to run over to the grocery store to pick up a store-bought treat and they taste waaaaay better....not to mention they are gluten free. I like to make affordable gluten free treats that everyone enjoys but easy enough that I can make with my grand-daughter.

The next time you need a quick, affordable snack....give this recipe a try. You will be glad you did!

Tanja
Gluten Free Casually

Saturday, August 30, 2014

Gluten Free Dog Biscuits

Gluten Free Dog Biscuits. Yes, everyone at our house gets gluten free baked goodies. I can't touch regular flour anymore without getting hives plus I have one dog that has a gluten allergy. How do I know he has a gluten allergy? He lost ALL of his hair (he ended up looking like a Chinese Crested dog), was irritable, itchy and grouchy. We had him tested for just about everything and all the blood work came back normal. Then I decided to put him on a gluten free diet. Within 6 weeks he was feeling much better, less itchy and his beautiful hair grew back. That was over a year ago. He now is a happy little dog with a beautiful silky coat! (I also have another dog that is allergic to cheese so I don't add cheese to my biscuits but you can add it if you prefer). If your dog does not have a gluten allergy then feel free to use regular or whole wheat flour. I use whatever gluten free flour I have on hand....sometimes it is a combination of different gluten free flours I want to use up. It will all work just fine. This dog biscuit recipe isn't as finicky as normal human baked gluten free treats so you don't have to use a specific gluten free flour. It is a good way for me to use up flours I don't use often or ones I don't like much! I am picky when it comes to gluten free flour blends in my baked goods. You can also make your own rice flour by grinding either brown or white rice in your blender until a fine powder. You might want to to this in small batches because it can over heat your blender. You can also grind up your oats for a fine powder if you prefer.

Gluten free dog biscuits are difficult to find and very expensive. I have 3 dogs that love treats. It gets rather pricey to purchase enough for all 3 dogs. They act like little kids...if one gets something different....they pout. Needless to say...they all get the gluten free diet. Nina (my youngest dog) is by far the pickiest of them. She only likes certain flavors and they have to meet her high standards. If they taste "gluten free" or don't have enough flavor then she WON'T eat them! I tried a lot of different recipes and she snubbed them all (even the store bought ones) until I came up with these 3 recipes that she LOVES! My dogs really like it if I make them biscuits with tuna but I can't handle the smell of them so I avoid making them most of the time! ;)

Here is the first one: (this is my dogs' favorite biscuit recipe)

Meat & Veggie Dog Biscuits:
  • 1 1/2 cups broth (I use left over broth from cooking if possible. I include any little bit of fat, seasonings and little tiny meat scraps. Canned broth works fine too but it isn't usually as flavorful).
  • 1 tbs. paprika
  • 1 tbs. parsley or basil
  • 1 cup cooked rice (I use left over rice if I have any, otherwise I just use instant rice since it takes less time to cook)
  • 1-2 tbs. powdered beef or chicken bullion (make sure it is labeled gluten free! I used Mazola brand that I found at the Mexican market which was labeled gluten free). 
  • 2 1/2 cups of gluten free flour (any gluten free flour will work. I have tried a different variety of them and since these don't need to rise like regular baked goods, any of them will work. I use whatever I have on hand or whatever is on sale. Today, I used 2 cups of brown rice flour + 1/2 cup of gluten free oats). If your dog does not have a gluten allergy, you can use regular flour!
  • 1 cup finely chopped or pureed cooked vegetables (I used some leftover broccoli, cauliflower, green bean & carrot mixed veggie blend that we had leftover from dinner last night.  If I have any left over meat scraps or leftover lunch meat then I will chop them up real fine and toss them into the mix also. If I have any bacon grease or bacon bits...I have been known to add it for some extra flavor. I did not add bacon today since I didn't have any on hand. (poor doggies!)
Mix all ingredients together. If you have a heavy duty mixer (I used my kitchen-aid mixer today) then use it. Otherwise, use your hands to mix it up. The batter will be thick and could break your regular hand mixer. I am speaking from experience! If it is too dry then add a splash of water or more broth. If it is too moist then add a little more gluten free flour. You don't have to mix it perfect. Just mix  it until you can spread it out on a parchment paper lined cookie sheet. Batter should be similar to thick brownie dough. I don't roll it out and cut it into shapes at this point. To get a nice crispy dog biscuit, I bake them twice like you do a biscotti type cookie. It will keep them from molding and give you a crisp dog biscuit without burning them. Bake at 375 degrees for about 15-20 minutes. (Note: I did not cut them into shapes yet! I do it before I bake them the 2nd time!) Turn oven off but let the biscuits cool in the oven. I usually do this in the evening and let them cool overnight in the oven. I pull the parchment paper with the partially baked dough (the texture will be like a soft cookie at this point) and cut out my shapes or just cut them into squares using a pizza cutter or sharp knife. Then I toss them into a 275 degree oven for about 20-30 minutes. Let them cool completely and they should be nice & crunchy. If for any reason they are not crunchy after cool...put them back into the oven at 275 degrees for additional 10-15 minutes. Let them cool completely and make sure they are crunchy before storing so they don't mold.
 
Peanut Butter Biscuits
  • 2 1/2 cups gluten free flour or gluten free oats (or combination). I used buckwheat flour today because I had some leftover and I wanted to use it up. Buckwheat is gluten free even though it has the name "wheat" in it. I have used rice flour, oats or a combination gluten free blend and they have all worked just fine. I have also used Maseca brand gluten free corn flour. My dogs don't have an allergy to corn so I  have used it without issues. If your dog does not have a gluten allergy, you can use regular flour!
  • 1 cup peanut butter or almond butter (I like to use crunchy just because it adds texture)
  • 1 tbs. cinnamon or pumpkin pie spice (optional)
  • enough water or broth to get a brownie like texture dough (I used about 1/3 cup today but it varies depending on which type flour you use)
Mix all ingredients together. If you have a heavy duty mixer (I used my kitchen-aid mixer today) then use it. Otherwise, use your hands to mix it up. The batter will be thick and could break your regular hand mixer. I am speaking from experience! If it is too dry then add a splash of water or more broth. If it is too moist then add a little more gluten free flour. You don't have to mix it perfect. Just mix  it until you can spread it out on a parchment paper lined cookie sheet. Batter should be similar to thick brownie dough. I don't roll it out and cut it into shapes at this point. To get a nice crispy dog biscuit, I bake them twice like you do a biscotti type cookie. It will keep them from molding and give you a crisp dog biscuit without burning them. Bake at 375 degrees for about 15-20 minutes. (Note: I did not cut them into shapes yet! I do it before I bake them the 2nd time!) Turn oven off but let the biscuits cool in the oven. I usually do this in the evening and let them cool overnight in the oven. I pull the parchment paper with the partially baked dough (the texture will be like a soft cookie at this point) and cut out my shapes or just cut them into squares using a pizza cutter or sharp knife. Then I toss them into a 275 degree oven for about 20-30 minutes. Let them cool completely and they should be nice & crunchy. If for any reason they are not crunchy after cool...put them back into the oven at 275 degrees for additional 10-15 minutes. Let them cool completely and make sure they are crunchy before storing so they don't mold.


Pumpkin Biscuits:
  • 2 1/2 cups gluten free flour or gluten free oats (any type will work. I used rice flour today)
  • 1 cup pumpkin puree or sweet potato puree (or any squash puree)
  • 1 tbs. cinnamon or pumpkin pie spice (optional but my dogs like it better with this spice & it sure makes the house smell great!)
  • 1 cup finely chopped veggies or apples (I usually use either mixed vegetables, carrots or apples. (Avoid raisins or grapes because they are not healthy for your pet!)
  • enough fluid (water or broth) to get a brownie dough like consistency. 
 Mix all ingredients together. If you have a heavy duty mixer (I used my kitchen-aid mixer today) then use it. Otherwise, use your hands to mix it up. The batter will be thick and could break your regular hand mixer. I am speaking from experience! If it is too dry then add a splash of water or more broth. If it is too moist then add a little more gluten free flour. You don't have to mix it perfect. Just mix  it until you can spread it out on a parchment paper lined cookie sheet. Batter should be similar to thick brownie dough. I don't roll it out and cut it into shapes at this point. To get a nice crispy dog biscuit, I bake them twice like you do a biscotti type cookie. It will keep them from molding and give you a crisp dog biscuit without burning them. Bake at 375 degrees for about 15-20 minutes. (Note: I did not cut them into shapes yet! I do it before I bake them the 2nd time!) Turn oven off but let the biscuits cool in the oven. I usually do this in the evening and let them cool overnight in the oven. I pull the parchment paper with the partially baked dough (the texture will be like a soft cookie at this point) and cut out my shapes or just cut them into squares using a pizza cutter or sharp knife. Then I toss them into a 275 degree oven for about 20-30 minutes. Let them cool completely and they should be nice & crunchy. If for any reason they are not crunchy after cool...put them back into the oven at 275 degrees for additional 10-15 minutes. Let them cool completely and make sure they are crunchy before storing so they don't mold.


Mmmmm. I love mommy's homemade gluten free biscuits. They don't taste like cardboard! :) I am the picky eater! I approve of these recipes!


This is my dog Rico (he has gluten allergy) when he first started losing his hair. We took him multiple times to the vet for blood work and no one could figure out what was wrong with him. He was miserable. Every test came back normal.

This is Rico at his worst. He lost almost all his hair, he was pink, itchy and irritable (not to mention...hairless!)


This is Rico on a gluten free diet. His hair has grown back silky and full, no itchy skin and much happier!

Taste testing the biscuits! Yummy!
These are the meat & veggie version

Up close view of the meat & veggie version. You can see how crisp they look


Here are the peanut butter version that I got lazy and just cut into squares. My dogs actually prefer the square shape because I think they size is easier to manage. Besides, they expect two treats in the morning before work and smaller ones last longer!

Here is a small jar as a gift for my new grand puppy!

You can see the rich, golden peanut butter color.

I like to gift them up as Christmas gifts for my neighbors with dogs. I put in a clear cellophane party bag and either tie with curly ribbon, string or just close with a colored clothes pin. I usually attach a note with the flavor of the biscuits or include the recipe...so dog parents know what ingredients are in the biscuits in case their dog has allergies.

Here is a look at the pumpkin flavored biscuits
I hope you like the easy recipe for home made gluten free dog biscuits. I will say that your house will smell wonderful. My hubby thought I was making a beef pot roast or pot pie yesterday when the meat & veggie biscuits were baking and my neighbor stopped over today and asked what I was cooking because it smelled awesome. Hahahaha! Dog biscuits! Yes, all of these smell incredible while baking and I guess you could eat them if you wanted. There isn't any preservatives in them. They may not taste like your sweet biscotti but you could technically eat them if you wanted! :) I know a lot of people add eggs or milk to their biscuits but I didn't see any reason to add them and decided to just keep the recipe simple. You can substitute items to customize the recipe. The recipe is really flexible and is just a basic recipe that you can substitute with items you have on hand.

Enjoy!
Tanja
Gluten Free Casually

Monday, August 25, 2014

My Star Wars Baker's Hutch "Upcycle" Project


Although this is a cooking blog...I have been asked by so many people to share my recent "geek project".  Since it is related to cooking, I decided I would share. I love geeky items like Star Wars, Star Trek, green aliens, etc. I wanted a baker's cabinet but didn't want to spend a lot of money and I wanted something on the geeky side rather than a "girly" flower type cabinet. I found a used hutch on craigslist for a decent price then I got started on my project.

I researched a lot before I got started. I didn't want to keep the original maple color and the hutch wasn't in perfect condition. It was used, had some minor scratches and dents but was perfect for the "upcycle" project I had in mind. I wanted to go with fun, bright colors to match the kitchen chairs that I re-upholstered with the help of my friend Laura. (My friend Judi scored me the awesome Star Wars fabric!) I really loved the fun print and the bold, sassy colors in the geek fabric and I wanted to bring the same fun colors into the hutch.

Before I got started, I researched the best way to paint furniture. Although there are many great products out there and a lot of different ways to do it, I chose to clean the wood furniture really well with Dawn dish soap and water. I purchased Zinsser primer. It doesn't require you to sand the furniture or strip it first which is convenient. It got great reviews online so I decided to try it. I did two coats of the Zinsser primer (letting it dry between layers). The primer coat doesn't have to be perfect.

Since we really like the Valspar paint, I chose two colors that were a close match to my fabric. I chose the colors "pool party" which is a dark turquoise blue color and "sassy green" which is a very bright lime color. I won't tell you about the eye rolls I got from the people behind the paint counter. They asked what I was painting with bright colors. I whip out my fabric and show them how well it matches! They asked me if I was doing a kid's bedroom. Hahahahahaha! When I told them it was for a Star Wars themed hutch...for a kitchen....well....I think they were speechless. You know you are a total geek when people don't get as enthusiastic about a geek project as you do. I tend to be a bit of a chatterbox and I can get quite enthusiastic about things I love. Well...I quickly realized that my audience at Lowe's were giving me the "Crazy Lady" looks...so I grabbed my paint and hurried home. I am sure the contractors listening at the counter where thankful that I wasn't their wife! Star Wars Kitchen?! Heck, I doubt any of them even knew who Yoda was. Hahahaha! Anyway...I did two coats of each paint in the areas I used them. I used a small smooth roller on the sides and top for faster & smoother application and a brush every place else. I did not put a "sealer" top coat over the paint. I was told it would eventually turn a yellowish color and that it wasn't needed since it isn't a kitchen table and won't be getting abused.

The insides of the cabinet were just cheap particle board and I like a surface that is easy to clean up. We chose to get some inexpensive peel & stick linoleum tiles and cut to fit in each of the drawers and the bottom of the cabinet. I know I would end up spilling something eventually and I wanted it to look neat and easy to clean!

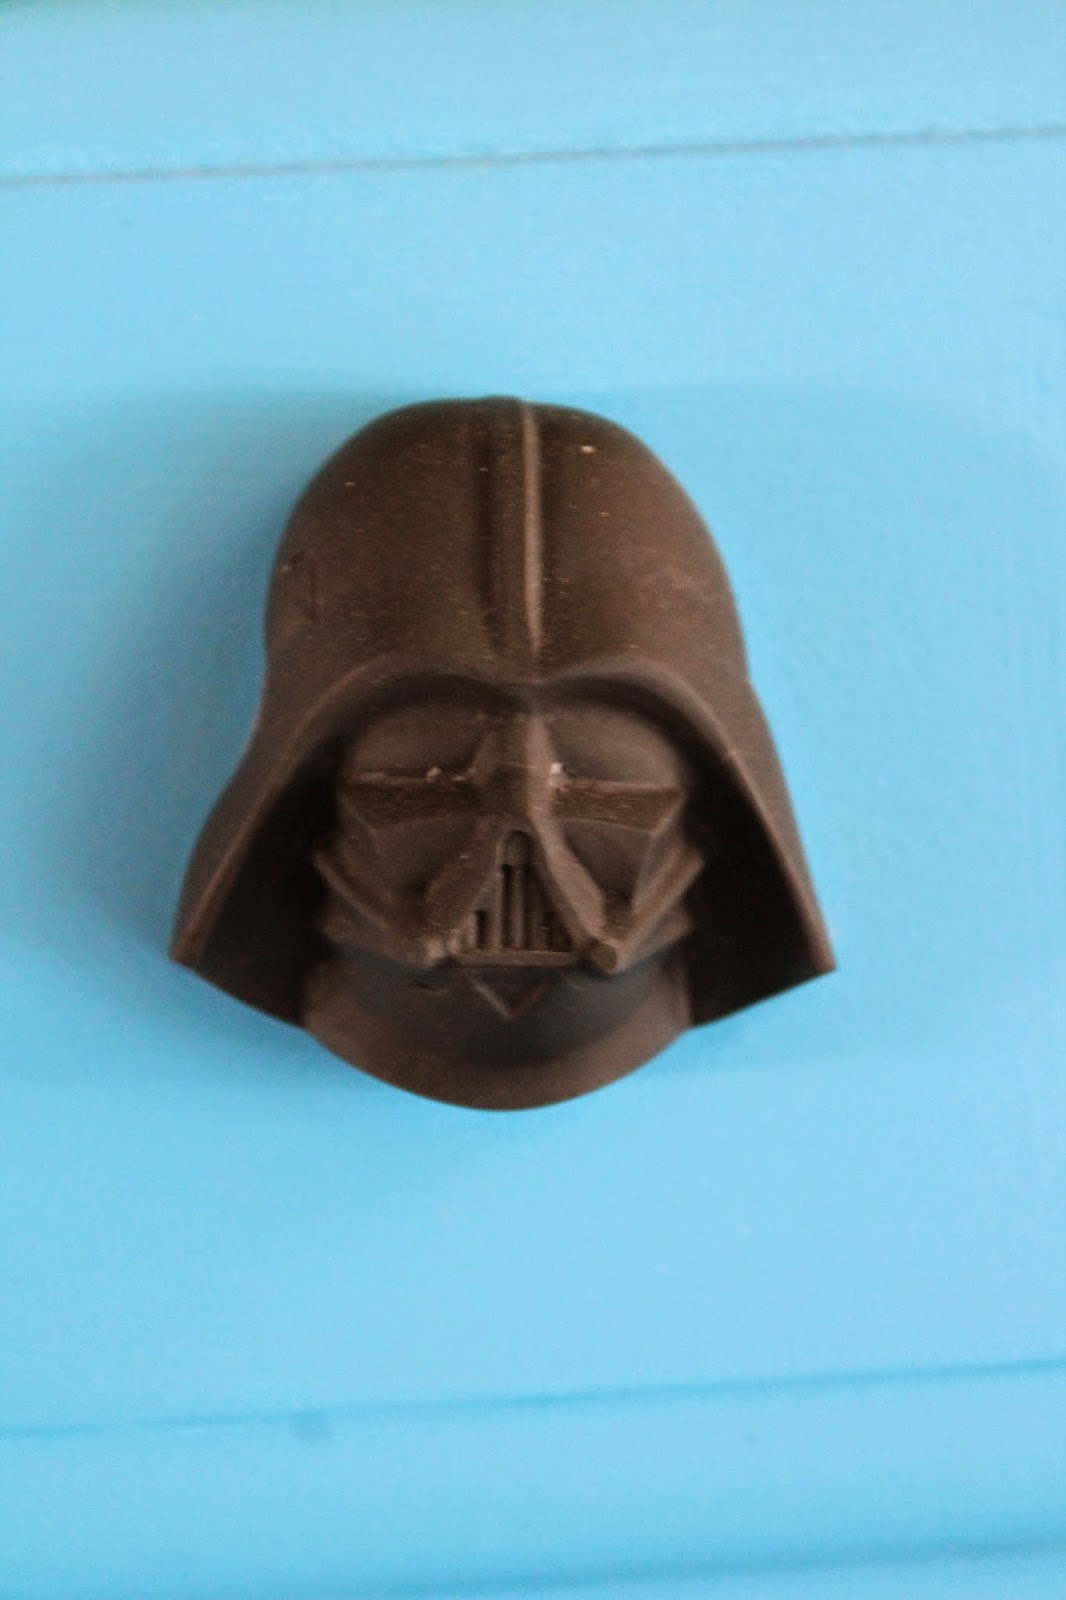
Then came the knobs. Wow...I had a difficult time finding knobs. Not only are they EXPENSIVE but I couldn't find anything geeky or modern in my price range. I needed 16 knobs and I sure didn't want to pay more money for knobs than I had for the cabinet. I also didn't want to go with cheap plastic knobs or with something girly. So I did some brain storming. I had silicone ice cube/chocolate molds that I had received as a gift. I knew that I should be able to make some type of knobs out of clay. I went to Hobby Lobby and purchased some clay that you can bake (Of course I used my 40% coupon that I found online!). If you don't have a Hobby Lobby near you, I am sure any craft store like Michael's, JoAnn Fabrics and even the craft department at Wal-Mart will have the clay. Just make sure it is the type you bake. Read instructions because each brand is slightly different. They come in colors or white that you can paint. (I bought the colored). I measured the size screws that I would need. My grand-daughter (age 2) helped me press the clay into the molds. I carefully placed the screw in the unbaked clay. Then I baked the molds with the clay & screws for 30 minutes at 275 degrees. I let them cool then I gently popped them out. BINGO! Inexpensive custom knobs! Geek alert!

After it was all assembled, I thought I needed a little more green accent. I purchased some green clay (the one you can bake) and rolled it out on parchment paper. I used a Yoda cookie cutter to cut the Yoda accent piece. I used an industrial glue to attach it.

I am pleased with the results. It isn't perfect...if you look closely I am sure you can find a few flaws but it works great for my geeky baker's hutch. It offers storage for my baking supplies. I have enclosed pictures of my project in stages so anyone that is interested in making something similar at home can do it easily.

My silicone DarthVader Molds (suppose to be for ice cubes or chocolate...but you can make knobs out of them!)

This is the base of the hutch. I had already taken the top off and started to dissemble it before I remembered to take photos. Sorry!

I took all the hinges off the doors and put them in a bag & labeled it

The drawers

After two coats of the Zinsser primer paint (it is white)

2 coats of the Zinsser primer

After Two coats of the "Pool Party" blue color from Valspar (I chose satin finish)


This is the maple top portion of the hutch. I have already removed the door and the drawer

After two coats of the Zinsser primer paint

My green clay and Yoda cookie cutter. I baked on parchment paper at 275 degrees for about 20 minutes.

Cooled off and slightly hardened. Ready to glue onto my hutch for accent color and fun!


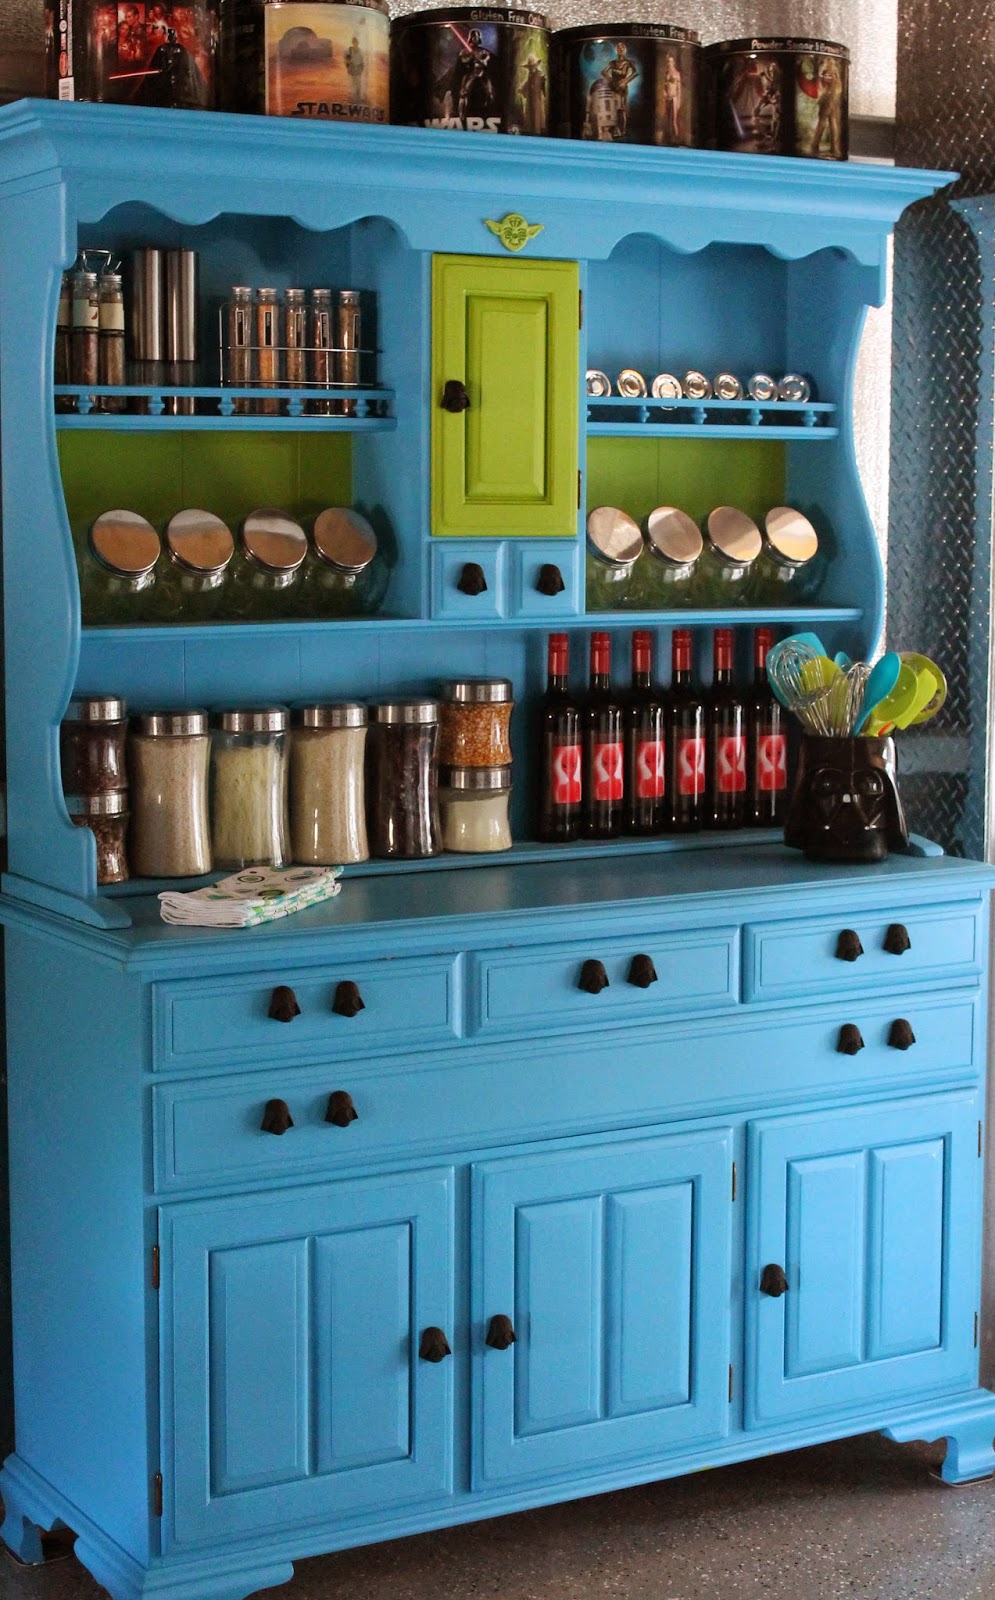
This is the hutch ready to use! (Don't mind the unfinished walls behind it. This geek kitchen is still  under remodeling!

Another view of the hutch after it is assembled


These are the kitchen chairs that gave me the idea for the colors of the hutch

Up close view of the super cool fabric!

GEEK ALERT! Star Wars Hutch!

Up close view of my Darth Vader Knobs

I am using a Darth Vader Halloween Pail as my utensil holder

My Star Wars empty popcorn tins now hold my gluten free baking flours & sugars

Inside the little door on the hutch top piece. It will store my measuring cups & spoons in addition to some spices
I hope you enjoy my little geek project. I had a lot of fun doing it and I like how it pulled together the colors from the Star Wars kitchen chairs. I would like to say "SORRY" to the lady I bought the hutch from. She was so excited that it was going to a good home. I think she was under the impression that I was going to strip it down and refinish it. I didn't have the heart to tell her that I was about to "GEEK" up her grandma's hutch. The hutch will be loved & cherished though! :)

Please don't hesitate to contact me if you have any questions. By the way, I did not get paid or compensated in any way to recommend the products I used. I am honestly telling you what I used in case someone else would like to do a similar project.

Geeky Girl
Tanja


Spinach & Cheese Stuffed Chicken

Spinach & Cheese Stuffed Chicken. I have had several requests for more quick & easy dinner recipes. Everyone loves recipes that get you dinner to the table fast without a lot of prep work. Here is another recipe that I really like because not only is it easy &  affordable but you can change the ingredients slightly for a whole new flavor. I love versatile recipes like that! You can change the flavor of the cheese you use, you can substitute boneless pork loin or thick cut boneless pork chops for the chicken and change out the spinach for any other type of thin cut veggie that will cook fast or substitute the spinach with thinly sliced ham, pepperoni or salami. It all works. Use whatever you have on hand or whatever is on sale at the grocery store. If you have leftover turkey or rotisserie chicken that is already cooked...you can just layer everything in a greased casserole dish and bake. It will turn out heavenly! It is a great way to "recycle" that leftover holiday turkey!

I like it because you just slice partway through the chicken or pork and put your ingredients in the slits, sprinkle with your favorite seasoning, cover & bake or grill (or you can even just put it in the crock pot before work so it is ready when you get home! Just be sure to add some fluid to the crock pot so you don't burn your meat). How easy is that? These freeze great too so feel free to make a big batch of them and freeze either before or after cooking for a super quick meal later. I serve with rice or gluten free pasta. Depending on what flavor seasonings and "fillings" I use in the chicken (or pork) will determine how I season my rice or pasta. Sometimes I just keep it simple and sprinkle on a light drizzle of olive oil with the same seasoning I used on the chicken.  (The Weber brand Zesty Lemon flavor seasoning is great on rice & pasta in place of sauce. You can use seasonings to season a lot of things besides meat! Think outside the box! It is a great way to make your own gluten free seasoned rice!) Most of the boxed seasoned rice contain gluten so I like to make my own. Not only is it healthier but it sure tastes great & more affordable! (I AM NOT GETTING PAID TO SPONSOR OR GETTING FREE PRODUCTS TO PROMOTE PRODUCTS. I DON'T HAVE ADS ON MY BLOG. I CAN HONESTLY TELL YOU WHAT I LIKE & USE AT HOME IN MY KITCHEN!) One of my co-workers got me hooked on the Weber seasonings & I love them! They are very flavorful, affordable & labeled gluten free!

Spinach & Cheese Stuffed Chicken Recipe:
  • Boneless, skinless chicken breasts (or pork loin or thick cut boneless chops. You could probably do this with thick cut boneless beef too)
  • handful of fresh spinach (or substitute any thinly cut vegetable that will cook fast like zucchini, onions, peppers, kale, etc.)
  • Sliced Cheese (any flavor, I just don't use processed cheese like American because it melts too fast and makes a mess)
  • Seasoning to sprinkle on top of the meat (any flavor you want. I used Weber brand Zesty Lemon flavor in today's recipe. It is labeled gluten free & it is very flavorful. It has a strong lemon flavor!)
Here is my boneless, skinless chicken breasts. I'm only making two today!

One of my new favorite seasonings. Gluten Free!

Cut the chicken or pork just a little over half way through to make slits. Don't cut it all the way through.

Stuff the slits with your ingredients & sprinkle with seasoning. Bake 375 degrees for 20-30 minutes, until chicken juice runs clear. I bake it in a covered dish to keep the chicken moist and help it cook faster. If you are putting it on the grill, I like to wrap in foil that has been sprayed with a light coat of oil to keep everything from sticking & keep the chicken moist. If you are putting it in the crock pot...be sure to add water or fluid to keep it from burning.


Here is the chicken after 25 minutes in my oven. I save the juice from the meat  and use it to make my instant rice. It adds a lot of extra flavor. It will be like using a flavored chicken broth. Since these were lean chicken breasts, it isn't fatty.

Ready to eat!

Up close view of how moist & delicious it is!

See how great the seasoning is covering the chicken? Yummy!

Looks like a fancy restaurant dish but it only took a few minutes & a few ingredients to prepare before you stuff it in the oven to bake. Whip up some instant rice or pasta if you are in a hurry & you have a quick, inexpensive dinner! :)

Inside of the chicken after it was cut. Moist & juicy!

I hope you enjoy this super affordable, quick & easy dish that looks like you spent a lot of time and money on it. It is impressive enough to serve guests but simple enough for any weeknight dinner. Yep, these are the recipes I like. Simple, affordable, casual yet delicious! Have a great day!

Enjoy!
Tanja
Gluten Free Casually