My youngest son & me

My youngest son & me

About me

Hi!
My name is Tanja (Sater) Miller and I'm excited about sharing my journey of converting my favorite recipes to gluten free! I am not a fancy cook - I prefer just a casual, fun meal. I am married with grown children (and have small grandchildren) & 3 dogs. I work full time as a registered nurse & I am a geek. Yes, I love Star Trek, Star Wars, Fringe, Firefly, Farscape and most of the other Scify shows. You will probably see a little of my geek side come out once in a while! Please join me on my journey of cooking, baking & converting every day recipes into yummy gluten free meals that everyone can enjoy (not just those with a gluten allergy!) Don't be shy about checking out my recipes....I have the gluten free version along with the regular recipe that I adapted from!

Sunday, December 18, 2016

French Mints (Microwave Two ingredients!)

French Mints! Creamy, minty deliciousness! This recipe is so super quick an easy but looks sensational on a cookie plate or in a gift tin during any holiday or special occasion. I like to make these to give to my friends and family during the holiday season (I also like to make these at Valentine's day and Easter too!). They are a treat you can whip up really quick and they look elegant for any occasion. The French Mints are a creme de menthe flavor of mint....similar to an Andes mint rather than peppermint.

I love this recipe because you can make them weeks in advance and do it all in the microwave. I like to make several batches and keep them during the busy holiday season. These are elegant enough for a wedding, anniversary party, bridal shower or any other fancy affair! You can use this as a filling layer in your brownies instead of making it into individual mints. This will really dress up the brownies for the holidays!

If for any reason you can't find the mint flavored chips in your baking aisle (or if you want a different color than green for a special occasion....you can use white vanilla baking chips and add creme de menthe flavored oil that you can purchase at Hobby Lobby, Michael's or Joann Fabric or online from Amazon. I have used the Loraine brand oils and they work great. You can also add a different color. They sell specialty food colors also right next to the flavors. For this recipe today, I kept it simple and just used the Guittard green mint chips (which are gluten free) along with the can of of sweetened condensed milk. Yep, that's it. You melt them together in microwave for 1-2 minutes and stir every 30 seconds until smooth. If you want to be really fancy....you can dip them in green colored vanilla coating or chocolate coating which gives them a shiny elegant coating! Yep, I did that to kick it up a notch today!

I find that with each passing year, I am just as busy as the year before and I want to cut back on baking and gift shopping so I can spend quality time with people that are important to me. I don't want to spend hours and hours in the kitchen or have a messy kitchen the ENTIRE month of December. I want to do fun things with friends and family. Life is short and I want to enjoy it. However, I also want to have homemade treats to share. This is one of the recipes that allows me to compromise and have both!

French Mints (Creme de menthe candies)
  • 2 cups of Guittard green mint chips (You can substitute 2 cups of vanilla chips + 1-2 vials of Loraine creme de menthe oil found in candy department of most craft stores or pharmacies during the holidays). 
  • 1 (14 oz.) can sweetened condensed milk (not evaporated milk)
Mix together in a glass bowl and microwave in 30 second intervals (stir every 30 seconds) until smooth. Pour into a waxed lined 8x8 pan. Refrigerate until set. Cut into squares. At this point you can dip into melted chocolates for an elegant finish if desired but they are good just like this too!

These are the green mint chips I used. I found them at my local Winco grocery store in the baking aisle. 

Stirring every 30 seconds until smooth

Just removed from 8x8 square pan and getting ready to cut into squares

Cut into squares. Ready to eat or you can dip them into chocolate for a more elegant presentation

I decided to melt white and green candy coating for a mint green color to dip the chocolates.
You can use plain white or dark chocolate coating to dip them. Or do a combination of colors.

Just dipped into the green coating. Waiting for them to dry on the waxed paper

I decided to finish them off with a dark chocolate drizzle since I had some left from another holiday treat. 

Packaged and ready to give my friend

I wonder if she will notice if there is one missing?!  ;)


I hope you enjoyed this super easy, delicious and elegant treat that you can use for any celebration. Actually, I enjoy these while reading a book on the couch. No special occasion needed! Please post your pictures, comments, questions or substitutions that worked (or didn't work) below. We all learn from each other!

Enjoy each moment of the holiday season. I know it can be a hectic and stressful time of year filled with chaos but try to do 3 kind things each day. Not only will you make someone else's day more pleasant but it will make you feel better about yourself.

Love, Peace & Happiness! <3
Tanja
Gluten Free Casually

Monday, December 12, 2016

Microwave Caramels

Caramels! Chewy, gooey delicious caramels! I love this recipe because they are super easy and can be done in ONE BOWL in the microwave in about 6 minutes with ingredients you probably already have in your kitchen. Yes, they ARE that easy!

This recipe was given to me by a patient and I am thrilled she shared it with me. I love caramels and I make a lot of treats that contain caramel (cookies, cookie bars, candies, trifles, fudge, etc.) and most recipes require you to buy caramels and melt them down. This recipe is SO MUCH EASIER than that! I like to make these scrumptious caramels and dip into chocolate for individual gourmet treats! However, rather than cutting into squares you can let it thicken just a little bit and use it in your favorite cookie or candy recipe that calls for caramel.

This caramel recipe comes out creamy, soft, chewy and buttery tasting. It just melts in your mouth. If you want to kick it up a notch you can add a pinch of chipotle chile powder or garam masala powder or instant espresso powder. (Chinese 5 Spice also tastes great with caramels!) It just adds a hint of exotic flavor and makes the assortment of caramels a fun gift. If I am making them for the holidays to put on a candy plate then I like to make a few different batches with different little flavors. Nothing over powering....just a hint of exotic flavor.

I used to feel overwhelmed trying to make homemade caramels because I needed a candy thermometer, detailed instructions, heavy pots, timers, heavy duty spoons, lots of patients and pray that after all the stirring and time involved (usually about an hour) that my caramels turned out correctly. It was a lot of hassle and if I screwed them up (yes, I have done that a few times!) then I felt frustrated and wasted a lot of time and had a huge mess. This recipe is so ridiculously easy and minimal cleanup that you just have to try it. I find it much easier than unwrapping all the store bought caramel squares and melting them down. Plus....the taste of these are just amazing!

Microwave Caramels

  • 1/4 cup REAL butter
  • 1/2 cup white sugar
  • 1/2 cup brown sugar, packed (I like to use the dark brown sugar but the light brown works fine too!)
  • 1/2 cup light colored corn syrup (I have heard you can substitute honey or maple syrup but I have not tried that so I just stick with corn syrup)
  • pinch of salt (only if your butter is unsalted)
  • 1/2 cup sweetened condensed milk (I used regular not low fat). Please note this is NOT evaporated milk. 

In a large 2 quart glass mixing bowl, combine all the ingredients and give it a quick stir. It does not have to be smooth or well mixed. Set your microwave on high for 6 minutes and stop and stir the mixture every 60-90 seconds in the beginning. You may need to stir more frequently towards the end of the 6 minutes if the mixture is bubbling near the top of the bowl. You don't want it to overflow and make a mess in your microwave! I actually cooked my caramel mixture for 6 minutes + 30 seconds and that seemed to be perfect for my elevation and microwave. Pour into 8x8 buttered pan. I put into the refrigerator uncovered for a couple of hours so it could set up a little bit. It should not be rock-hard. I took a spatula and lifted it out of the pan. It stretched out of shape just a little bit but I pressed it back into a square and placed on wax paper. I scored it with a large knife into squares and then used my pizza cutter to cut the squares easily. At this point you can serve them or wrap them into waxed paper. I chose to dip mine into chocolate for holiday gifts. I put the caramel squares back into the refrigerator so they could stay chilled until I finished melting my dipping chocolate. Dip into chocolate and put onto wax paper until set. You can finish off the chocolate covered caramels by drizzling white chocolate on top or adding sprinkles, sea salt or edible glitter.

If you are going to use the caramels for another project you can store it in the refrigerator in waxed paper and put into a ziplock bag for several weeks. Then you can just melt it in microwave to soften or pinch off what you need depending on your recipe.

If you decide to add a powdered spice for a batch of the caramels then add it when you add the sugar to the mixture prior to putting it in the microwave so the flavors can incorporate into the caramel mixture when it is cooking.

Caramel Mixture in the microwave

Boiling and bubbling to near the top of the glass bowl

Creamy but still thin enough to pour

Pour into buttered 8x8 pan

After Cooling, it is ready to cut into squares

Ready to cut

Ready for taste test!

Ready to box up!
Ready to give to my friends!

Inside the caramel


Please share any of your versions or substitutions or pictures of your caramels! I enjoy your comments and hearing about how you made your recipe!

Happy holidays!
Tanja
Gluten Free Casually

Wednesday, November 23, 2016

Cherry Chocolate Cake Trifle

Cherry Chocolate Cake Trifle! This recipe is by far a great show stopper yet it is super easy and delicious. It is one of the oldest chocolate recipes I can remember from my childhood. We used to go to our dear family friend's house (we called  her  Grandma Deible) for Thanksgiving every year during my childhood and this was ALWAYS on her dessert table for any holiday. However, she used to make it as a regular layered cake and serve it on a beautiful glass plate. I improvised and make it in a trifle (I will tell you why in a bit!)

We loved going to Grandma Deible's house for holiday meals. The food was always hearty and it was ALWAYS a full house. Anyone that needed a place to go for a holiday meal...they got an invitation. Grandma Deible left no one all alone on a holiday. She was such a big hearted person. It was always an interesting mix of people and a good time! (The ONLY thing I hated was helping with ALL the dishes after the meal! She made EVERYTHING from scratch and no paper plates!)

Grandma Deible passed away many years ago but whenever I make this recipe, I always think of her and Thanksgiving. This year we are going to a friend's house for Thanksgiving and she is a little like grandma Deible. Everyone is welcome so they won't be alone. Holidays are about family, friends and making happy memories. Since her crowd of people is growing, I added a dessert to the list of food I am taking to share. What better recipe than this one? The recipe reminds me of all of those things that are important: family, friends, food and being thankful for what we have. Rest in peace Grandma Deible, your Thanksgiving traditions live on in many of our lives.

Anyone that knows me well....I will improvise recipes in a pinch to fit my needs or if something doesn't turn out quite right but is still edible...it gets "recycled" into a different dish. For instance...the trifle layering of this cake was a necessity one time because it was a requested dessert at a party. That particular day was not going right. I slightly over cooked the cake and it was slightly dry and the cake rounds were not perfect so I didn't think it was going to stack properly and we were driving a distance so I was concerned of it collapsing. Hmmmm.....No time to bake another cake or change my mind on something else. What is a busy lady going to do? Oh yeah....my favorite way to recycle a dessert! TRIFLE! I just took the same ingredients and layered them in a glass bowl and it turned out perfectly. The moisture from the Cool Whip and cherries made the cake moist and delicious plus it made transportation of it a breeze! You can use an elegant trifle bow but I used an inexpensive glass bowl from Ikea (I think they are around $3) instead. That way I can leave my bowl with the hostess. This makes a great hostess gift as well.

The other thing I LOVE about this recipe is it can be made up to two days ahead! Yep, that takes away the holiday stress and mess in the kitchen. Just put some plastic wrap over the top and pop it in the refrigerator (or if you live in the midwest and it is super cold then you can store it in your garage! Everyone knows I have done that before in the past!).

The OTHER thing I LOVE about this recipe is that it is very forgiving and you can substitute items or use a boxed cake mix. You can make homemade cherry pie filling or use the canned from the grocery store. I honestly just prefer it the traditional way with basic ingredients but my oldest son doesn't like chocolate so he prefers it done with yellow or white cake. My son-in-law prefers strawberry pie filling over the cherry one. No problem, you can switch it up. You can also substitute brownies in place of the chocolate cake or you add a no bake cheesecake filling layer. You can use regular yellow or white cake and apple pie filling. I have done it all those different ways depending on what was requested and what I had in my cupboards. Honestly, I still prefer it the way I remember it...Chocolate cake layers, Cool Whip and Cherry Pie filling.

After my years of baking and hosting parties....I tell the younger people "KEEP IT SIMPLE". Presentation is everything! I love to bake from scratch BUT I have plenty of experience with being stressed at the holidays. Why? I would try to over achieve and make EVERYTHING from scratch which meant I was up at the crack of dawn cooking then had a messy kitchen to deal with on top of working full time, going to college (back in the day) and trying to manage a family of 3 kids. It was beyond insane at my house. I managed but I wish I would have taken a few shortcuts and made it a little less stressful. As I have aged, I have learned that the holidays is about family, friends and having a great time. If you are an exhausted hostess, it shows. Take a short cut when you can! There is absolutely NOTHING WRONG with using a great cake mix or canned pie filling for your holiday dessert. Just present it elegant and with a smile. (You can even "cheat" and use a store bought prepared cake and slice or chunk it up for the layers. That of course is easier if you don't have a gluten allergy. Finding a prepared gluten free chocolate cake is more difficult but I am sure it can be done. I just go with a good GF cake mix. If you don't have a gluten allergy then of course you can use a regular cake mix!)

Cherry Chocolate Cake Trifle Recipe:

  • 1 box of cake mix, prepared according to the box instructions. I used Pillsbury Gluten Free Devils Food cake one for today and it worked perfectly. You can also make your cake from scratch or buy a store bought and cut into chunks for layering. (If you do not have a gluten allergy then you can use a regular cake mix!)
  • 2 cans of cherry pie filling (if you want to be an over-achiever you can make it from scratch but then you will have to wash more pots and who needs more dishes at the holidays?!) Read your labels. Most pie filling is gluten free but some may not be!
  • 1 large tub or two smaller 8 oz. tubs of Cool Whip or any non-dairy topping. (I have substituted the Coconut one that is dairy free from Sprouts for someone with a dairy allergy and it worked fine) You can certainly use fresh whipped cream but it will not hold up as well as Cool Whip, especially if you are traveling with it or making it two days in advance. 
  • Chocolate shavings for garnish, optional

Prepare the cake according to instructions and let it cool. I chose to bake mine in two round 8" pans so that I could just slide them into the bowl. My bowl is narrow on the bottom so I had to gently push the cake to fit a little bit. Layer one can of cherry pie filling and try to get it to the edge so you can see the cherry layer a little bit. It makes for an elegant presentation. Then layer the Cool Whip topping. It really doesn't matter which layer you start with but I like to end with the cherry pie filling on top for presentation and then I sprinkle some shave chocolate on top for garnish. I just take a chocolate bar and grate a little chocolate on top.

How easy is that? Yeah....simple elegance that tastes FANTASTIC!
This is the cake mix I used for today's recipe. I found at Walmart next to regular cake mixes

Canned Cherry Pie Filling


My cakes baking in the oven according to directions on box

Press the cake layer into bottom of my bowl

This is the cake after I have layered it into the bowl


This is a view from the top of the trifle

View of the layers from the side

ready to serve

Yes, Holidays can be easy, delicious and elegant. Keep it simple and don't stress. Please feel free to post photos and tips of your cake trifle and any changes that you made. We all learn from each other.

Happy Thanksgiving!
Tanja
Gluten Free Casually

Thursday, September 22, 2016

Pumpkin Pie Bars (Gluten Free)

Pumpkin Pie Bars are great anytime of year....not just for Thanksgiving! This recipe is something I came up with many years ago to take to a potluck when I had limited ingredients in my cupboard and a sick kid at home so the option of running to the store was not there. I love this recipe because it is very flexible with substitutions and always turns out great. One thing I learned from my mom is that sometimes you need to make do with what you have in your cupboards. We lived about 20 minutes from the closest town growing up and in the winter with bad weather it just wasn't feasible to go to the store for one ingredient. Use what you have!

In this instance, I did not have enough flour to make the pie crust so I dug through my recipes and came up with an oat bar recipe and used it for my crust with a few modifications. Another time I made these, I was short on flour and oats but I had graham cracker crumbs and nuts. Each time the recipe turned out great. Keep in mind with modifications, the flavor and texture might be slightly different but this particular recipe is VERY FORGIVING! I personally prefer using real butter but I do have some friends and family that are dairy free so I have used butter flavored Crisco (Vegetable shortening) and once I even used lard which I know is not heard of much these days. Every time it turned out just perfect! (Avoid using reduced fat margarines because they contain too much water and will leave you with a soggy crust. Make sure it contains at least 65% or more fat!)

I love this recipe because they taste even better a couple of days later after the flavors have had time to mingle but just keep them in the refrigerator. Pumpkin Pie Bars are easier for the holidays than making most other desserts because you can make them a few days ahead and take the last minute holiday stress out of baking desserts! These also freeze great so make a double batch and freeze them in individual freezer bags for lunches or desserts for a later date! I love grab and go desserts! I like to have "emergency" desserts in the freezer that my grand-daughter and I can have for last minute snacks!

I have a very old, very worn hand written recipe book for some of my favorite recipes from long ago (pre-computer days!) and I hand write little notes next to the recipe for substitutions that worked. That way years down the road, I can whip out the book and check to see what I have done in the past. I also sometimes do this with my good cookbooks so I know in the future if it the recipe was good or not. Cooking is an art and something that must be cultivated.

Most of my recipes were originally "normal" recipes and I have converted them to gluten free so if you don't have a gluten allergy then you certainly can substitute REGULAR FLOUR in place of gluten free flour. Regular flour is easier to work with.....it is not as particular as the gluten free flours so substituting it is not the problem. However, sometimes trying to substitute gluten free flour for the regular flour....does not always turn out well! There are times I will play with a recipe for days or even years to get it perfect. It is trial and error. Any recipe that I put on here are recipes I personally tried, tasted and approved!

Pumpkin Pie Bars Recipe:
  • 1 1/2 cup gluten free flour* (You can use regular flour if you don't have a gluten allergy). I always try to use at least 1/2 cup of gluten free flour but I have also substituted the any of the following ingredients (or a combination of the following) to get me the 1 1/2 cup total measurement: gluten free graham cracker or vanilla wafer crumbs, finely ground almonds (also called almond flour), finely ground oats (it should have a flour texture when you are done grinding the oats in blender).
  • 3/4 cup packed brown sugar (I have substituted regular granulated sugar and it worked fine!)
  • 3/4 cup real butter (You can substitute Crisco vegetable shortening, lard or margarine as long as it contains at least 65% fat. The reduced fat margarines contain too much water and it won't make a nice crust!)
  • 1 1/4 cup Oats (I use Trader Joes Gluten free oats most of the time but I honestly have used Quaker brand without any issues). 
  • 1/2 cup finely chopped pecans or walnuts or almonds, optional (I like the nutty flavor this adds to the crust & topping but if there are nut allergies or you don't have nuts on hand, you can leave them out. You can also add up to 1/2 cup more if you like extra nuts! If I am not adding the nuts, I add an extra 1/2 cup oats so I get the same measurement for my crust. 
  • 1 pkg. (8oz.) cream cheese, optional (This makes the pumpkin filling have a silky texture but if you have a dairy allergy you can certainly leave it out and it will still be great! I have made this recipe with and without the cream cheese).
  • 3 large eggs
  • 1 can (15 oz) pumpkin (do not use the pumpkin pie mix). If you can't find canned pumpkin you can substitute 16 oz of peeled cooked & mashed cold sweet potato instead. Sweet potato will give you a similar flavor and texture of pumpkin. 
  • 1 tbs. pumpkin pie spice (This gives the pumpkin filling a richer flavor but if you don't have it on hand you can substitute cinnamon. You can add a little more if you like extra spice flavor).
Line a 9"x13" pan with foil with extra hanging over the edges so you can easily lift it out after it is done baking. Grease the foil with butter or non-stick cooking spray. Mix the flour (or the ingredient(s) you are substituting for the flour, 1/4 cup of the sugar (save the rest for the filling) and the room temperature butter. You can cut the butter in small chunks if it is cold and work it in that way but I find it easier when the butter is slightly soft but not melted. Stir in the oats and nuts if you are adding them. It should look like a coarse crumb mixture. RESERVE 1 CUP OF CRUMB MIXTURE for the topping and press the remaining crumb mixture into the bottom of the 9x13" greased foil lined pan. Press it tightly into the corners and bottom so it forms a crust and not loose crumbs. Bake in a pre-heated 350 degree oven (I use the middle oven rack) for 15 minutes then remove from oven but leave your oven on. 

My chopped walnuts that I added for the crust (they are optional)

My crumb crust & topping mixture

The crust after it is baked
While the crust is baking, I mix the filling: Beat the pumpkin, cream cheese (if you are using it), remaining 1/2 cup sugar, eggs, and pumpkin pie spice or ground cinnamon. Pour over warm crust. Sprinkle with remaining crumbs evenly over the pumpkin filling. You will have areas of the pumpkin filling showing through which is normal. This is only a crumb topping and not a crust on top! If you are a nut lover you can add additional chopped nuts to the topping (I generally do not). Bake 25 minutes in the pre-heated 350 degree oven. Cool completely before serving.

Pumpkin filling

Pumpkin filling spread onto the warm bars before adding the topic

Pumpkin bars
Cutting into squares

Ready to eat! Where is my Star Wars Coffee mug full of coffee?

Ready to serve up on a plate to take to my friend

The pumpkin pie bars will slice and serves best when chilled in the refrigerator. They actually tastes BEST a couple days after it is baked because the flavors have had a chance to mingle. These can be made up to 5 days before a big event and I like to freeze any left overs (okay, there are rarely any left overs so I usually just make a double batch!). I like to freeze in individual serving slices in freezer bags for a quick dessert. Okay, sometimes on my days off work I will poke in the freezer and sneak a sweet treat for breakfast with my coffee! Now that we are "empty nesters" I don't have to set a good example for kids. I can eat sweets for breakfast on occasion! 

This is the perfect dessert for any holiday or potluck because you can make it when you have time and put it in the refrigerator for a few days so you don't have the last minute hassle and mess in the kitchen. If you are like me, I always have a ton of last minute things to do before the holidays and having a dirty kitchen from baking is something I don't like! These are beautiful if you cut them into squares or triangles (cut them into squares and then half them diagonal to get them in triangle shapes) on a glass or crystal platter or tiered cookie plate. These make a great hostess gift too! (You can even make it easy on yourself and put them in a cookie tin or holiday container in your refrigerator so you can grab & go last minute! Canned pumpkin is available pretty much year around now in the USA so don't just make these for Thanksgiving! These could be your "signature" dessert bar! Be creative! Customize them!

Who says you have to make them pumpkin flavored? Yeah, that's right! You can easily leave out the pumpkin and make them cheesecake bars instead or add a different pie filling. Like I said before...this is a fantastic recipe that you can easily adapt to use your favorite fillings or use what you have in your cupboard. 

Please feel free to leave any comments, suggestions or substitutions that you have tried. We all learn from each other and sharing tips and suggestions is very helpful! Please don't be afraid to ask me questions! I am not a professional chef or writer so if my descriptions or instructions are not clear to you, please ask for clarifications! 

Enjoy your pumpkin season!

Tanja 
Gluten Free Casually


Sunday, June 26, 2016

Cheesecake Dip

Cheesecake Dip! (also called dessert cheeseball). I LOVE THIS RECIPE! I started making this many years ago when I had tons of cream cheese in my refrigerator and I was planning on making a cheesecake but had nothing to make a cheesecake crust. At the time I had young kids taking naps so I couldn't run to the store to pick up extra ingredients. (Those days are long gone....kids are all grown now!) I made a dessert cheeseball that day instead which is basically a no bake style cheesecake without a crust....rolled into a ball and rolled in nuts, chocolate chips, coconut, cookie crumbs or whatever you want. You can change the flavor just like you do for a regular no bake cheesecake. Pumpkin, Chocolate, Peanut butter, etc. The possibilities are endless! Honestly, my favorite is making it into a dip and instead of rolling it into a ball....I pour cherry pie filling over the top. Today, I made my own cherry pie filling using frozen black cherries, water, a sprinkle of sugar and tapioca starch and cooked until thick but you can just purchase canned pie filling. Just make sure to read the label if you have a gluten allergy!

This is also fantastic with lemon curd poured over the top instead of pie filling. Since my mom left for the summer....there is no one here to make her scrumptious lemon curd. I don't make lemon curd. EVER! I don't seem to have the knack for it. I end up walking away frustrated with a burnt pan in hand. So today it will be cherry cheesecake dip! Next year I will sweet talk my mom into making me a few jars of her scrumptious lemon curd before she leaves so I have enough to get me through the summer while she's off globe trotting! ;)

You can serve the cheesecake dip (or if you decide to roll it in a ball) with just about anything. I usually do a combination of gluten free pretzels (the sweet and salty combination is great!), gluten free cookies, mini flavored rice cakes and apple slices but you can use whatever you have on hand or whatever preferences you have. I really like to add Cinnamon sugar flavored corn tortilla chips (also called Churro Chips) if I can find them in the potato chip aisle. It's a rare find! If we are having a large crowd over then I will usually make two different flavors of cheesecake dip or dessert cheeseballs.

Cheesecake Dip (Dessert Cheeseball) recipe: Makes 1 dessert cheeseball or small bowl of dip
  • 1 package 8 oz. cream cheese, softened
  • 1/2 cup powdered sugar
  • 1 tsp. of milk or flavored coffee creamer, flavored extract or lemon or lime juice (depending on flavor you want)
  • 1/2 cup of Cool Whip (only if you are using as a dip. If you are rolling into a ball then omit this because it will be a little too soft to form into ball shape. You can leave the Cool Whip out of the recipe all together but I like the creaminess it adds to the dip version).
  • Any gluten free crushed candies or 1 tsp. cinnamon or instant espresso powder (or anything you want), optional. I used 1 tsp. of ground cinnamon today but you can substitute a different spice or leave it out altogether. If I am making a Cappuccino flavor, I like to add a tablespoon of espresso powder or instant flavored cappuccino powder.
For Dessert Cheesecake Ball: Mix the cream cheese, powdered sugar and your one teaspoon of liquid (milk, flavored coffee creamer, lemon or lime juice, coffee, flavored extract or whatever flavor you are adding) with mixer or spoon until smooth but stiff. It should not be runny. If you want to add crushed candy pieces, sprinkles or gluten free cookie pieces to the batter portion, stir in now. Roll into ball. If you want to dress up the ball from the outside then you can roll into nuts, crushed candies, crushed cookies, sprinkles, chocolate chips, crushed pretzels or anything your heart desires! Refrigerate until you are ready to serve. If I am making this a day or two ahead of the party then I will wrap in plastic wrap to avoid the cheeseball taking on flavors from the refrigerator!

For the Dip Version: Mix the cream cheese, powdered sugar and your one teaspoon of liquid (milk, flavored coffee creamer, lemon or lime juice, coffee, flavored extract or whatever flavor you are adding) with mixer or spoon until smooth but stiff. It should not be runny. If you want to add crushed candy pieces, sprinkles or gluten free cookie pieces to the batter portion, stir in now. At this point I like to add the Cool Whip if I am making it into a dip but it is completely optional. Stir until well combined. It just makes the dip a little creamier with a fluffier texture. Spread into a bowl or serving dish. Top with your favorite topping(s) like pie filling, lemon curd, caramel sauce, chocolate sauce, melted peanut butter, nuts, crushed gluten free cookies, chocolate chips, M&Ms, pretzels, sprinkles or whatever you want.

Mixing the ingredients for the dip version

It should be spreadable but still thick and firm

Perfect texture for the dip version. Creamy and fluffy.

The cheesecake dip in spread into a bowl ready for topping

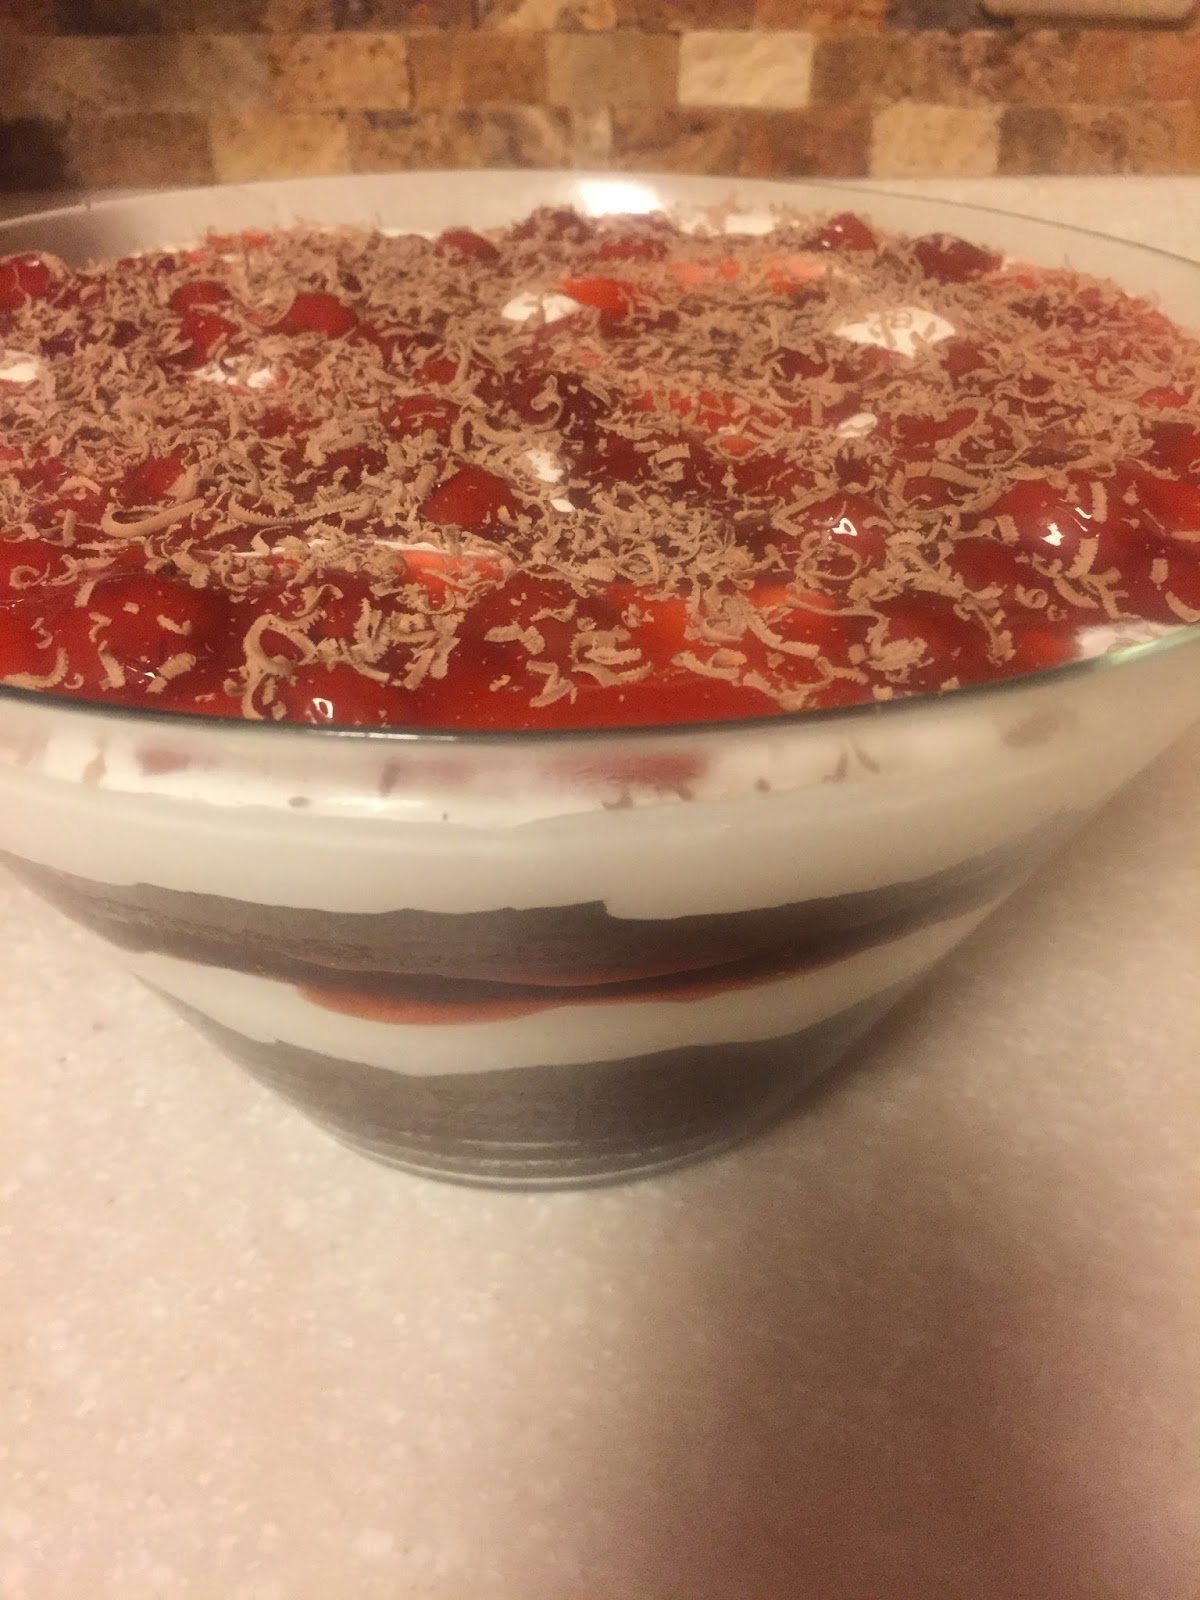
I chose a cherry topping (one of my favorites!)

Rich and creamy dip. Ready to eat!

Up close view of the dip. I am eating it with gluten free pretzels.

Side view of the layers
View of the dip being eaten with gluten free wafer cookies

Ready to eat! 

Some of our family favorites: Cherry Cheesecake Dip, Lemon Curd Cheesecake Dip, Butterfinger Dessert Cheeseball (I add a couple of tablespoons of creamy peanut butter and crushed butterfingers candy bars and roll it in additional crushed butterfingers), Reese Peanutbutter Dessert Cheeseball (I add a couple of tablespoons of creamy peanut butter and roll in chopped Reese cups and if I want chocolate then I add a 1/4 cup of unsweetened cocoa powder to the cheesecake mix), Caramel Macchiato Cappuccino flavor (I add a couple of tablespoons of instant caramel or french vanilla cappuccino powder to the cheesecake mix and roll in chocolate chips and drizzle with melted caramel sauce, Margarita flavor (I add tablespoon of lime juice, lime zest and roll in gluten free crushed pretzels), Chocolate Coconut (I add 1/4 cup unsweetened cocoa powder, mini semi sweet chocolate chips to batter and roll in sweetened shredded coconut), and turtle Cheesecake Dessert Ball (which I just drizzle with chocolate sauce, caramel sauce and toasted pecans).  This recipe is super easy and very flexible especially if you are spreading it in a bowl or serving dish as a dip! This is also a great recipe for the summer festivities because it doesn't require baking.


Chocolate Cheeseball version

Dark Chocolate Bacon Cheeseball Version

Dark Chocolate Bacon Cheeseball served on Churro Chips (Cinnamon Sugar Tortillas)

If you have decided to add more like 1/3 cup of something creamy like peanut butter or Nutella and you want to roll into a dessert cheeseball, you may want to increase your powdered sugar to 3/4 cup or add 3 tbs. of tapioca starch or corn starch to get it to stay firm enough to roll into a ball. Another option if  you don't want it sweeter is to add 1/4 cup of cocoa powder. Like I said...this recipe is ridiculously flexible and you can add or delete just about any of the items. Specialty stores even carry a cream cheese substitute for those that are vegan or have dairy allergies. Trader Joe's carries a Goat Cheese cream cheese for those allergic to Cow's milk. 

I love these Walmart chips. Great for dessert cheeseballs. However, not every Walmart carries them :(
I love easy recipes like this that doesn't require baking. It is a recipe that even an inexperienced cook can make easily! It is a recipe that you can take to a party that everyone will enjoy and doesn't taste "gluten free". It can be made several days in advance so if you are rushed for time or planning a holiday party....this is a great option for dessert. You can make a couple different flavors to appeal to everyone. Another really fun option for a buffet style party is to make a large bowl of the basic cheesecake dip and have toppings on the side so everyone can customize their own cheesecake dip! How fun is that? It is the same concept as an "ice cream bar" dessert table but this is even better because it is CHEESECAKE!

I hope you have fun experimenting with this basic recipe and customize it to fit with your favorite flavors. Feel free to post any comments or pictures of your cheesecake dip dessert. We all learn from each other and I always love hearing from people.

Enjoy!
Tanja
Gluten Free Casually