My youngest son & me

My youngest son & me

About me

Hi!
My name is Tanja (Sater) Miller and I'm excited about sharing my journey of converting my favorite recipes to gluten free! I am not a fancy cook - I prefer just a casual, fun meal. I am married with grown children (and have small grandchildren) & 3 dogs. I work full time as a registered nurse & I am a geek. Yes, I love Star Trek, Star Wars, Fringe, Firefly, Farscape and most of the other Scify shows. You will probably see a little of my geek side come out once in a while! Please join me on my journey of cooking, baking & converting every day recipes into yummy gluten free meals that everyone can enjoy (not just those with a gluten allergy!) Don't be shy about checking out my recipes....I have the gluten free version along with the regular recipe that I adapted from!

Friday, August 31, 2012

Cilantro-Ginger Baked Fish

Cilantro-Ginger Baked Fish. My husband loves fish. Me...well...it depends on how it is cooked. (I used to really like it battered and fried but not only is it unhealthy that way, it is messy to make that way. I hate cleaning up greasy dishes. Yuck. I have to be creative cooking fish so that I can find flavors I can enjoy (because most of the time I would rather be eating beef!) This is one of the few recipes that I really like for fish. You can use any white fish for the recipe (or if you don't like fish you can substitute chicken). This fish also tastes great on tostadas or tacos which is the way I prefer it most of the time.

Cilantro-Ginger Baked Fish Recipe:
  • 1 pound of fish fillets, boneless (I used Blue Hake Fish but you can use Tilapia, Orange Roughy or whatever fish you prefer)
  • 3 tsp. of minced garlic
  • 1 tbs. grated or minced ginger 
  • 2 tbs. lime juice
  • chile pepper flakes - optional (If you don't like spicy then leave them out)
  • sea salt & pepper (you can use regular salt or a salt substitute if you prefer)
  • 1/3 cup chopped cilantro leaves (not stems!)
  • 1/4 cup white wine OR chicken broth
  • 2 tbs. soy sauce (I use Tamari Gluten Free Soy Sauce)
  • 1 tsp. sesame oil
  • green onions, chopped for garnish - optional
  • additional cilantro leaves for garnish - optional
Heat oven to 425 degrees. Pat the fish dry. Season fish with salt & pepper & place in a 9x9 or 8x8 baking dish. Mix the garlic, ginger, soy sauce, wine (or chicken broth) & sesame oil together until well blended. I like to mash my ginger, garlic, pepper flakes & cilantro with a mortar & pestle to crush it all together to blend flavors before adding to the liquids but you don't need to.

Pour the cilantro ginger mixture over the fish. Bake 15-20 minutes or until fish flakes easily and is cooked through. ( I cook it for 10 minutes with a lid/foil and the remaining time uncovered). I usually serve it over cooked rice but these are also really tasty if you flake them with a fork and serve in tacos or tostadas - most brands of the corn version are gluten free but be sure to read your labels if you have a gluten allergy. (I know....I NEVER would have eaten fish tacos when I lived in Ohio but moving out west...fish tacos are served everywhere. I never realized that seafood + tacos = yummy!)

If you don't care for fish or if you only have chicken on hand...this is good with chicken also but you may need to cook longer unless your chicken is cut into strips.

Cilantro-Ginger Fish with Rice


Fish Tostada


Enjoy!
Tanja
Gluten Free Casually

Wednesday, August 29, 2012

Stuffed Burgers

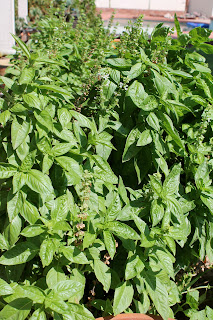
Stuffed Burgers. This is one of the ways I like to dress up an everyday burger. The "stuffing" can be whatever ingredients you like. For today's dinner, I made two types: Provolone Cheese, Fresh Basil & Mushroom with smoked sea salt AND Provolone & Pepperoni with fresh basil.

I have an herb garden that has tons of fresh basil so I like to use fresh basil whenever I get a chance. You can also substitute ground chicken, ground turkey or ground pork, or ground game meat in place of hamburger. I will eat any of the ground meat but I personally prefer beef. You can also make these patties ahead of time and freeze them with wax paper between the layers so they separate well when you take them out of the freezer.

Stuffed Burger Recipe: (Makes 4 burgers)
My Basil

  • 1 1/2 pounds of ground lean hamburger (I use 90-93% lean)
  • 1 small can of sliced mushrooms, drained 
  • 4 slices of your favorite cheese (I used Provolone today because that is what I had in my refrigerator but I have used just about any type of cheese), you can use shredded too.
  • fresh basil, sliced thin, optional
  • sea salt or your favorite seasoning
  • Pepperoni or crumbled cooked bacon, optional
Mix sea salt or seasoning into hamburger (or whatever type of ground meat you are using). I use wax paper and press into 8 very thin patties, try to get them as equal as you can in proportions. Take 1 slice of cheese (I fold mine so it doesn't hang over the edge of the patty) and put in the middle of 4 of the uncooked patties (the other 4 patties you don't put ingredients on because they will be placed on top to cover the ingredients). Top the cheese with basil, mushrooms or pepperoni if you are using them but try not to get too close to edges or else all the stuff with run out when the burgers are cooked). Top with remaining uncooked burgers and pinch edges to seal & then very gently push the burger so it doesn't have a huge hump in center. This will gently push some of the cheese & other ingredients closer to the edge but not causing it to leak out of the edges. (Should make a total of 4 stuffed burgers). Grill or cook in cast iron skillet (medium heat) or broiler until meat is cooked to your liking and cheese is melted. (If you are finding that your burgers aren't cooking fast enough in the middle, you can put them in the microwave for 60-90 seconds to finish the cooking without drying up the meat). Be careful with young children since the cheese filling can be hot!

I have also used green chiles (or salsa) and cheese as a filling which is also delicious if you like spicy. Basically anything shoved inside a burger with melted cheese is going to be delicious, right? Be creative.

My Basil-Mushroom-Cheese Stuffed Burger (No bun)

My son Andrew's Pepperoni-Cheese-Basil Burger  (on a gluten free bun)


My Basil in my herb garden


Tuesday, August 28, 2012

No Bake Cookies

 No bake cookies! These are so quick and easy to make plus they just melt in your mouth. I LOVE these cookies. I remember eating a no bake cookie in grade school that tasted just like these. I have tried many, many recipes over the years and none of them had the same taste & texture as the ones from grade school....until Alicia Hawley surprised me with a batch for my birthday several years ago. I was in heaven! Not all no bake recipes are exactly the same. My mom's recipe isn't as good as this one (sorry mom). Thankfully Alicia was kind enough to share her recipe with me. I make these a lot at our house. They are my quick....I NEED A CHOCOLATE FIX treat! Plus I only have one pot & a spoon to clean when I am done. No cookie sheets! No heating up my oven in this Arizona heat to bake them either. YAY! Just a quick cook on the stove and drop spoonfuls of this heavenly stuff onto wax paper to set up & cool. Not only are they gluten free but they can be made dairy free too!

I will admit that I have burned my tongue more than once licking the hot chocolate goo off the spoon (when I was done spooning out cookies of course!). These yummy little guys just melt in your mouth. They have a fudge-peanut butter-chocolate thing going on. I guess you get the picture that I absolutely LOVE these cookies. They are also flour-less (gluten free) without me having to change the recipe at all. I use Trader Joe's Gluten Free oats now but I have also used Quaker brand Oats (which are not marked gluten free but I have not had any problems or rash from them unlike the generic store brands where my lips swelled double size!). You can use certified gluten free oats from specialty stores if you prefer. (Of course if you don't have a gluten allergy you can use whatever brand of oats you want!)

Alicia's No Bake Cookie Recipe:
  • 2 cups sugar
  • 1/2 cup milk
  • 1/4 cup unsweetened cocoa powder 
  • 1 stick (1/2 cup) real butter (not whipped) OR margarine (use margarine that has at least 65% fat, like Kroger brand). I found that if you don't use either real butter or a margarine with a high enough fat content, they will not set properly! Some margarines have too much water content. I am finding it harder & harder to locate margarine that you can actually bake with - Kroger brand works great (you can find it at either Kroger or Fry's Stores). For today's recipe I used 1 stick real butter, unsalted. You can also use Crisco vegetable shortening or Coconut Oil in place of the butter if you have a dairy allergy. 
  • 1/2 cup peanut butter, I use crunchy because I like the nut pieces in my cookies
  • 2 cups Oats (I use Trader Joe Gluten Free brand), it doesn't matter if you use quick cooking or old fashioned (either will work just fine!). I have also used Quaker oats in the past without any problems although they aren't marked gluten free. I avoid generic brands of oats...had major issues with them!
  • 1 tsp. vanilla
Mix the sugar, milk, cocoa powder & butter or margarine (or Crisco or Coconut Oil) in a decent sized sauce pan. I cook on medium high temperature and stir until smooth & begins to boil. BOIL ONE FULL MINUTE stirring constantly. Remove from heat and stir in peanut butter & vanilla extract until well blended. Then stir in the oats. (I have all my ingredients ready to go so I can add ingredients right away. Drop by spoonfuls onto wax paper to cool & set. 


(They normally look just a smidge darker than this...must be the lighting when I took my picture)


Enjoy!
Tanja 
Gluten Free Casually


Monday, August 27, 2012

Bulgogi (Korean BBQ)

Bulgogi is a Korean BBQ marinade. We really like it at our  house. It is thinly sliced beef that is put in marinade and then either grilled or quickly pan fried. You can serve it over rice or wrapped in lettuce leaves. I also make the "lazy version" in the crock pot. I know it isn't traditional but it is SO EASY, super yummy & it cooks itself.  I like dishes that do most of the work for me!

For today's dinner & photos, I did the LAZY version. I mixed the ingredients for the marinade and threw it in the crock pot with a beef roast. (You can substitute chicken or pork if you prefer).

The sauce has a slightly sweet/sour flavor - more similar to teriyaki than BBQ - at least in my opinion. Our friend, Katy Chavez shared this recipe with me a few years ago and I make it frequently. I usually just serve with steamed oriental vegetable mix & rice. Occasionally, I serve this as an appetizer wrapped in lettuce leaves.

Bulgogi Marinade Recipe:
  • 1/2 cup sugar (can substitute with raw sugar)
  • 1/4 cup soy sauce (I use Tamari Gluten free & reduced sodium)
  • 1 tsp. ginger (I use fresh ginger but you can substitute ground ginger from the spice isle or ginger that you find in the refrigerated section of the vegetable/fresh herb department that comes crushed in a tube - similar to a toothpaste tube)
  • 1 tbs. minced garlic (I use the minced one in a jar)
  • 1/4 cup Rice Wine Vinegar
  • 2 tsp. Sesame Oil
*The original recipe does not call for chili flakes but if I am feeling a little sassy...then I add a sprinkle of them for some kick!

Mix all ingredients together and marinade meat. (If you are putting it in the crock pot like I did today, just dump it over the meat & cook on low.  My crock pot quits cooking when it has reached 10 hours and then just keeps it warm. Just make sure you cook it on a low setting. The best way for tender meat is low heat & cook for a long time. I never cook my roast under 10 hours in my crock pot). If you want to thicken the sauce to pour over meat/rice then remove liquid from crock pot + add 2-3 heaping tbs. cornstarch and cook liquid on stove until thickened and not lumpy. (NOTE: For my crock pot I do not add any additional water and I have never had a problem. My old round crock pot, I would have to add 1 cup of water so it didn't burn. If you aren't sure, just add the 1 cup of water & just add additional cornstarch if you are making the sauce and you have a lot of liquid. Keep in mind you don't have to cover the meat entirely in liquid! You are NOT BOILING the meat! )

If you are grilling or pan frying the thinly sliced beef, marinade meat for at least a couple of hours or overnight. Then remove from marinade (throw away the marinade) & cook meat in skillet, wok or on your grill. Serve over cooked rice, rice noodles or wrapped in lettuce leaves. 


Enjoy
Tanja
Gluten Free Casually


Sunday, August 26, 2012

Scalloped Potatoes

Scalloped potatoes: Believe it or not, before I had to adhere to a gluten free diet, I wasn't overly crazy about potatoes. I ate them sometimes & made them for my family but I wasn't crazy about them. Amazing what I will eat when you take away my bread & pasta. Potatoes are now kind of a staple at our house.

My mom used to make scalloped potatoes with ham chunks when I was a kid growing up. I don't think she had a recipe. Years ago I decided to make them for my family and she was out of town (no cell phones back in those days!). So I scoured the library (yep - that was before internet!) in recipe books. I found a recipe that was easy and adjusted it some. It is a great recipe because it never had flour or gluten in the recipe to begin with so I don't have to adjust the sauce ingredients. YAY! I use it as my basic recipe and will jazz it up depending on what we are having for dinner.

Oh...by the way, these taste great in the morning re-heated and served with eggs for breakfast. :)  I also like the recipe because it can be made ahead of time and cooked a day or two later which makes it great for the holidays! (Mushrooms or broccoli can be added if you really like them. Some of our family members don't like mushrooms or broccoli so I don't add them unless they aren't coming for brunch/dinner!)

Scalloped Potatoes Recipe:

  • 2 pounds of potatoes, any type will work. I don't peel them - just wash them well & slice thin. Or if you are pressed for time, use the shredded or cubed potatoes from the refrigerator or freezer section at your grocery store. It's okay to let someone else do the dirty work! :)
  • 3 shallots, peeled & thinly sliced or use 1/2 small onion or chives, you can leave out if you don't like them!
  • 1 tsp. garlic, minced (I used the garlic in the jar)
  • 6 slices of bacon, cooked crispy & crumbled (if you don't like bacon or are a vegetarian you can leave out the bacon. This is just the original recipe. Change it up. You can add ham or if you want to make it into a one-dish meal instead of a side dish...add chicken, cooked hamburger or whatever you want!
  • 2 1/2 cups shredded cheese, whichever type of cheese you like. For this recipe I used a combination of muenster & cojack cheeses. We really like the Chipotle or Pepperjack cheeses also but not all of our guests like spicy potatoes! My family loves the Chipotle potatoes so that is what I usually make for Christmas brunch! Smoked gouda cheese is also delicious! 
  • 2 1/2 cups of half & half cream (if you don't have half & half cream, just use milk + 1 tbs. butter and 1 tsp. cornstarch mixed well until not lumpy). I used fat free half & half for this recipe today.
  • 1 tsp. salt (I like to use smoked sea salt but you can use any type of seasoning you like)


Preheat oven to 350 degrees. Grease a 9x13 dish (or a large casserole dish) - or spray with cooking spray. Layer the bottom of the baking dish with 1/3 of the sliced potatoes. Sprinkle with a little salt or seasoning. Sprinkle some of the sliced shallots, garlic & bacon. Then top with 1/3 of cheese. Repeat layers two more times, ending with cheese. Then pour the half & half cream over all. Cover with foil or casserole lid. Bake 75 minutes. Remove from oven and take off the foil/lid and then put back into oven for additional 30 minutes or until top is golden brown and potatoes are cooked but not mushy & liquid was absorbed. If you like your potatoes crispier, cook additional 15-20 minutes. 


Be creative with my basic scalloped potato dish. You can pretty much add/delete whatever you want to customize it or to use up leftovers in your refrigerator. Use it as a side dish or as a main dish casserole. Any way you serve it up...it is quite tasty!

Enjoy
Tanja
Gluten Free Casually

German Pancakes (Crepes)

German Pancakes
When I think of comfort food...I think of German Pancakes! They are actually a crepe but our family makes them slightly thicker than the traditional crepe. We grew up eating these at our house. I never knew any other sort of pancake existed until I spent the night at a friend's house in grade school and their mom served pancakes. They were so THICK and had a baking powder taste. I did not like them at all and had a really hard time choking them down. (I got accustomed to the taste of traditional pancakes but I still prefer my family's version of pancakes better!)

This is the one food I missed the MOST when I had to adhere to a gluten free diet. Life without my favorite comfort food was difficult. I can do the gluten free diet pretty easily but I really missed German Pancakes! After many, many attempts experimenting to recreate them gluten free...I finally got them right! It is all about the texture and how they melt in your mouth! (I am also including the original recipe for those of you that would like to make them but don't require a gluten free version). This recipe was made for generations without a recipe. I learned from watching my mom make them over the years. I never used a recipe....until my kids were grown and moved out. They wanted a recipe! So I "eyeballed" the amounts and then measured & wrote it down for them. 

I love German Pancakes because you can be creative with them! You can top with traditional butter & syrup OR you can top with cooked apples, applesauce, peanut butter, nutella, fresh fruit, etc. You can even make an elegant dessert out of them if you put topping in them and then roll them up. Possibilities are endless! Instead of a sweet treat, these can be rolled up with eggs, bacon, etc for breakfast or tuna salad, egg salad, etc for an appetizer. Think outside the box! 

German Pancake (Crepe) Recipe:
  • 2 cups flour (if you don't have a gluten allergy you can use regular flour. For this recipe today (in photo) I used 2 cups gluten free flour blend. See recipe below for the gluten free flour blend)
  • 2 eggs
  • 3 1/2 cups milk (I start off with this amount of milk but sometimes I will need to add a little more depending on how thick the batter is). In a pinch if I was low on milk, I did add a little water mixed with milk and they still turned out just fine!
  • 1/8 cup of sugar (raw sugar can be substituted)
Beat with a whisk all the ingredients until smooth. If the batter is thick, add additional milk until it is the consistency of runny cake batter. If you want very thin crepes then your batter will need to be thin! I actually like these just slightly thicker than traditional crepes so I add just a little more batter to my skillet.

Batter
Stove top temperature should be on medium heat and the skillet should be already warmed up before you put your batter in. I spray my non-stick 10" skillet with cooking spray but you can use melted butter or oil like my mom does. I use a ladle full and spread into skillet. I gently tilt the skillet around so the batter thins out and reaches the edges of the skillet. I put a lid on my skillet so it cooks more even and faster but you don't have to do that.


When there are little bubble holes in the pancake and it has firmed up a little bit, time to flip it over. The second side will cook much faster so you barely flip it and then wait 30-50 seconds and remove it. Top it and enjoy it. (I even like these without a topping!)


GLUTEN FREE FLOUR BLEND:
  • 2 1/2 cups Brown Rice Flour
  • 3/4 cup potato starch
  • 3/4 cup sweet rice flour
  • 1/4 cup glutinous rice flour (made from sticky rice - doesn't contain gluten)
  • 2 tsp. xanthan gum
Stir well. I store mine in a glass jar to use for baking sweet breads & cakes.


I hope you enjoy my favorite comfort food as much as my family does!

Enjoy
Tanja
Gluten Free Casually


Friday, August 24, 2012

Caramel Oat Bars

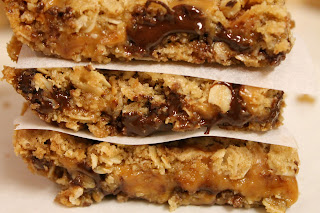
Gooey caramel bars...Need I say more? I have always loved these buttery caramel oat bars. So I experimented around in the kitchen until I got them right. This was my first successful recipe that I re-vamped into gluten free last summer that was a hit. How do I know that it was a hit? I took them to work and didn't say anything about them being gluten free. These bars were completely gone by 9am. Yep, they were a hit! The other thing I like about this recipe is that you don't HAVE to purchase special gluten free flour or xanthan gum for the recipe and the recipe is very versatile. If you don't like caramel....you can substitute your favorite jam or cheesecake filling, custard, dates/raisin filling, pumpkin pie filling, etc. I use the basic oatmeal base for a lot of my gluten free desserts because it tastes good with about anything! I still think the caramel is the best one though! (Just for the record...I have had a LOT of experiments converting recipes into gluten free that were NOT a hit!  NASTY!)

We are having some friends over for dinner tonight and although I promised myself that I was going to break free of junk food...I just have to make dessert. No dessert at my house? That sounds like a punishment! What would my friends think if I didn't serve dessert? I ALWAYS have dessert. They know I love to bake! I just promised myself that I would not keep left overs tonight! I know this probably isn't considered a fancy dessert to most people...but I am a very casual cook. I like just chilling out on the patio with friends. I am not a gourmet chef nor do I pretend to be. I don't entertain with china...we do things very casually here at our house.

Caramel Oat Bar Recipe:
  • 1 bag (11 oz.) of Kraft Caramel bits or 32 individual soft caramels, unwrapped
  • 5 tbs. of half & half cream or milk (I usually use half & half because I normally have it on hand for coffee but I have substituted milk and it worked fine too)
  • 2 cups gluten free Oats (I prefer using Trader Joe's Gluten free oats but I haven't had any rashes from Quaker brand even though they aren't labeled as gluten free - I use them sometimes. Doesn't matter if you use old fashioned or quick cooking. I used old fashioned in this batch today)
  • 1 1/2 cup ground oats (put oats in blender or food processor to make it into a powder then measure after ground). If you don't have enough oats on hand to do that, you can substitute either regular flour (if you don't have a gluten allergy) or brown rice flour (gluten free) or finely ground nuts (like pecans, almonds or walnuts)
  • 1 1/4 cups brown sugar OR raw sugar (Either version will work for this recipe. I am TRYING to be healthier and switch to raw sugar since my buddy Mike is on me about using healthier sugar!)
  • 1 tsp. baking soda
  • 1/2 tsp salt
  • 1 1/2 cups real butter, melted (I know some of my friends have used margarine in this recipe and it will work - you just don't get the intense buttery flavor that only real butter provides. I recommend using a margarine or Crisco containing at least 65% fat or else they contain a lot of water and may result in a soggy cookie crust!). 
  • 1 cup chocolate chips (you can leave this out but we like the dark chocolate with the sweet caramel. They offset each other nicely. You can also substitute or add chopped nuts if you want. I just don't bother. Too many of my friends have nut allergies and nuts aren't very economical right now so I just don't add them. 
Preheat oven to 350 degrees. Melt caramel & cream or milk in microwave (or double boiler) until fairly smooth. If you have a few little lumps in there, don't worry about it. It just has to be spreadable. Set it off to the side. Stir together the melted butter, sugar, oats, ground oats (or flour/nuts or if you are substituting), baking soda and salt. It should resemble a crumble mixture. (If crumble mixture feels too dry then you can add another half stick of melted butter. If it feels too wet then you can add a sprinkling more of oats. (Different brands will you give you slightly different results so you may need to tweak it a little!) Spread just a little more than half of the mixture into a greased (or spray with cooking spray) 9x13 pan. I just press it down really good with my clean hands but you can do it with a spatula. Bake in the oven for about 8-10 minutes. Remove from oven and let it "rest" for about 5 minutes then sprinkle with chocolate chips and/or nuts if you are using them. Pour the soft caramel over the chocolate chips. Then crumble the remaining oat mixture on top. Put back in the oven for additional 12-15 minutes, depending on your oven. The top and edges should be a light golden color. Cool for at least an hour before cutting. (Seriously this is the hardest part! I admit that most of the time I can't wait an hour or more so I scoop them out and burn my tongue with the hot caramel! Ouch!)  

 Before putting the oat crumbled topping on
 Just before sticking it in the oven
Just removed from the oven to let it cool 

An hour after cooling. Still warm & slightly gooey. They will set up just a little more in another hour or so. Yummy! 


Enjoy!
Tanja
Gluten Free Casually
Thursday, August 23, 2012

Butter Pound Cake (Regular & Gluten Free Version)

Butter Pound Cake. Need I say more? This is one of my favorite cakes. It is basic, super easy to make (takes about the same time as a cake mix!) and it is always moist and buttery tasting. You can do so much with pound cake. I like mine just plain with a cup of strong coffee but you can use it in a trifle, as a layer cake, cupcakes, strawberry shortcake, cobbler batter, chocolate fountains, etc.

My first memories of Butter Pound Cake was as a child. My mom used to make cute little train cakes for our birthdays...until we outgrew them. She used empty soup cans and small loaf pans to bake the pound cake for the train shape and decorated with frosting and candies & little toys. Whenever I eat a really good butter pound cake....I think of train birthday cakes and it makes me smile :)

There are a lot of different recipes for pound cake. I like the old fashioned basic butter recipe. Simple. It doesn't have a bunch of ingredients in it which makes it an awesome "go-to recipe". It is quick, easy and you probably have the ingredients at home already. And it always tastes even better the next day!

Photos are of my gluten free butter pound cake 

I took the original recipe (cut it in half for just one 9x5 loaf) and made it gluten free. Life without butter pound cake? Not in this house! Here is how you make the butter pound cake (regular & gluten free instructions!)

Butter Pound Cake Recipe:
  • 2 sticks (1 cup) real butter, I used unsalted. If you are using margarine instead, you may miss out on the extra butter flavor but the recipe will still work - just make sure it has at least 60% fat or it won't bake up as well!
  • 1 cup sugar (granulated, nothing fancy, plain white sugar)
  • 4 large eggs (I personally prefer using brown fresh eggs when I can get my hands on them for baking my cakes & breads but I used store bought white ones today)
  • 2 cups flour (you can use regular flour if you don't have a gluten allergy. If you have a gluten allergy, substitute 2 cups of a gluten free flour blend - see below for the gluten free flour mix I used in this recipe)
  • 1/4 teaspoon baking powder (If you are using a gluten free flour mix you will needs this so it will bake up nice and fluffy!) - you can leave out baking powder if you are using regular flour.
Beat the softened butter (not melted, just soft!) with sugar until fluffy and smooth. Beat in eggs, one at a time until well mixed and fluffy. Gradually add in the flour & baking powder. 

Pour into a greased (or use cooking spray) 9x5 loaf pan. Bake in preheated 300 degree oven for approximately 65-80 minutes. (Cooking time will depend on your oven and altitude - check after 65 minutes). If you are making cupcakes or layered cakes then you will need to shorten the cooking time - check after 18/20 minutes for cupcakes & 25 minutes for cake pans. You know it is done when toothpick inserted comes out clean. Cool in pans for about 30 minutes before removing to a wire rack to finish cooling. 

GLUTEN FREE FLOUR BLEND:
  • 2 1/2 cups Brown Rice Flour
  • 3/4 cup potato starch
  • 3/4 cup sweet rice flour
  • 1/4 cup glutinous rice flour (made from sticky rice - doesn't contain gluten)
  • 2 tsp. xanthan gum
Stir well. I store mine in a glass jar to use for baking sweet breads & cakes. 

OPTIONS: (There are many options and you can be creative). Here are our favorites:

Lime Pound Cake: Add juice from 1 lime with some lime zest to batter before baking. Top with a glaze made with 1 cup powdered sugar, lime zest & 1-3 tbs. of lime juice; stir until smooth. Pour over cake.

Lemon Pound Cake: Add juice from 1 lemon with some lemon zest to batter before baking. Top with a glaze made with 1 cup powdered sugar, lemon zest and 1-3 tbs. lemon juice; stir until smooth. Pour over cake.

Almond Pound Cake: Add 1 tbs. Almond Baking Emulsion to batter before baking. Top with a glaze made with 1 cup powdered sugar, 1tsp. almond baking emulsion + 1-2 tbs. water or milk.


Gluten Free Butter Pound Cake Topped with Cool Whip & Sprinkle of Cinnamon

Enjoy!
Tanja
Gluten Free Casually

Wednesday, August 22, 2012

Beef Stroganoff

I will be honest. I am not usually a huge fan of beef stroganoff. I am not generally a big fan of gravy. I think a lot of them taste like flour and salt paste. Yuck. If I am going to smother my food with calorie laden sauce then it better be AWESOME. Otherwise...just give me dessert instead. I am not going to waste calories on sauce/gravy.
However, I was at work and one of my patient's was talking about how they were making beef stroganoff for their spouse's birthday because it was his favorite meal. With lots & lots of mushrooms. She said it was all about the sauce. She makes it from scratch and NEVER uses flour. Uses just a touch of cornstarch and a splash of heavy cream. Mmmmm. Now my mouth was watering.

Driving on my way home from work, I was getting really hungry. (Okay, it is only about a 5 minute drive but my stomach knows it is dinner time!)  I had just purchased some thin trimmed steak originally meant for stir fry.....CHANGE OF PLANS! I am going to attempt making some Beef Stroganoff without a recipe. I figure if it tastes crappy...I will just rinse off the gravy and the dogs will be delighted with their dinner & we will hit the local Del Taco for a quick bite! Ha! Ha!

The dogs never got to taste the Beef Stroganoff. It turned out really good and I am really glad I tried making it. Got it to the table in 20 minutes!


Beef Stroganoff Recipe:
  • 1 pound of thinly sliced beef (boneless), the type you buy for stir fry
  • 1 heaping tablespoon of minced garlic (I used the one from the jar)
  • 2 shallots, thinly sliced (I used them because I already had them on hand but you don't have to add them. (Shallots remind me of a cross between garlic and an onion)
  • 1/2 tsp. smoked sea salt (I really like the flavor of smoked sea salt in some of my food but you can certainly just use regular salt). My husband loves different sea salts so we have a huge assortment of them at our house! 
  • 1 heaping tsp. of Better Than Bouillon Mushroom Base (this is the BEST stuff!) I absolutely love it for gravies or soup bases. They have quite a few different flavors available. You can get it at most supermarkets and specialty stores or online at Amazon. It isn't cheap but you don't use a lot and it lasts a LONG time.  My boss, Dr. Carroll-Chen got me hooked on this stuff! It sure makes cooking savory gluten free dishes much more flavorful. 
  • 1-2 small cans of mushrooms (I didn't drain mine), I used two cans because I wanted lots of mushrooms! (You can use fresh mushrooms instead, just saute with meat)
  • 3 tbs. cornstarch
  • 1/2 tsp. of steak seasoning 
  • 1/4 cup water
  • 1/4 cup heavy cream (if you have it, if not just add a tablespoon of butter to 1/4 cup milk)
  • 3/4 cup milk (I used fat free because that is what was in my refrigerator)
  • 2 cups of Instant Rice (I made instant rather than the long cooking kind because I was really hungry and didn't want to wait for the rice to cook very long!)
I cooked the rice according the the directions on the box. While it was cooking, I put the sliced beef in my old stand by cast iron skillet on medium heat along with the garlic and thinly sliced shallot. I cooked until the meat was barely pink then I added the smoked sea salt & steak seasoning. In a separate bowl, I combined the cornstarch & bouillon with water and mixed to make a paste. Then I added the heavy cream & added milk. Stirred with a whisk until no clumps. Poured into the cast iron skillet with the meat. Turned the skillet on low. Added the mushrooms including the fluid. Gave it all a gentle stir. Then I let the mixture warm up. The cornstarch will thicken into a gravy when it gets warm. Once the sauce becomes thickened then you can remove from heat. Time to serve it up over the rice. Yummy. (I served this along with a salad for a serving of veggies). Didn't want you guys to think that because I didn't photo the salad that I was just serving meat & starches! 

You could make this with fresh mushrooms and just saute with the meat. I didn't have any on hand and was trying to get a quick dinner to the table without having to run to the store for extra ingredients. This turned out fine with the canned mushrooms. Better than fine actually. It was really good. Of course...hunger is the best condiment! :)


Sunday, August 19, 2012

Chocolate Covered Tater Stix (4 ingredients!)

This is another one of those recipes that just happens to be gluten free without having to alter it. I LOVE these types of recipes because you can take them to a party and even those with a gluten allergy can enjoy them & they don't require any special ingredients. Of course if you announce that they are "gluten free" no one will touch them. For some reason Gluten Free has the stigma as being "nasty tasting". I want to prove that wrong.

This particular recipe was brought home by my youngest son, David. When he was about 6 years old, they had a party at school and a mom had brought these in for a treat. (That was in the days when parents still sent in homemade treats) Anyway, they were such a big hit with the kids that the mom sent home the recipe with each kid.

This is a really easy recipe and we make them pretty much every year at the holidays and sometimes just because we crave them. I like it because it doesn't require baking....it can be brutal when the temperature gets to 115 degrees in the summer here in Arizona! I refuse to turn on the oven when it is that hot! Yes, I know that it is a dry heat but honestly when it gets above 110 degrees...it is just HOT! Dry heat or not...it can be miserable!

Since we are going to visit some friends today, I am taking these as a treat for all of us. I know these are one of their favorites & I just happened to have all the ingredients + I didn't have to turn on the oven!

They are out of this world! (Geek alert!) I just couldn't pass up using some of my Trekkie stuff! I'm a geek...can't help it :)


Chocolate Covered Tater Stix:

  • 1 bag (4 oz.) potato sticks (I found mine at Dollar General Store....just about the only little store that is available in the remote NW Arizona area where we go for some of our weekends to escape the heat!) I found them for $1/bag which I thought was a great deal. Just make sure you read the labels to make sure they don't contain gluten! I find these usually in the cracker section at the store...sometimes with the chips. Just ask your grocer if you can't find them.
  • 1 (12 oz.) bag of semi-sweet chocolate chips (I used Trader Joe brand because that is what I already had in the cupboard but I honestly use whatever brand is on sale, I am not a chocolate snob most of the time! Just make sure they are gluten free! Some chocolate chips will use wheat flour to keep it from sticking to machines during processing. You can also use candy coating (also called almond bark). I find that when it is very humid, the candy coating (almond bark) will set up faster and stay firmer. You can find candy coating (almond bark) usually in the baking section of grocery stores or Hobby Lobby, Michael's, JoAnn Fabrics & Walmart.
  • 1 cup (about 1/2 bag) of butterscotch baking chips (In a pinch I have used peanut butter chips instead and they work also but we personally prefer the butterscotch chips. Just don't tell my husband because he swears he doesn't like butterscotch and he really likes these treats. I sure don't want to ruin it for him! :)
  • 1 heaping cup of dry roasted peanuts. I have tried peanuts that weren't dry roasted and I just didn't think they were as good. The flavor just isn't the same. If you prefer almonds or any other type of nut, I am sure it can be substituted. I love dry roasted peanuts so that is what I use.
DIRECTIONS: Melt the chocolate chips & butterscotch chips in a glass bowl in the microwave, stirring every 30 seconds until smooth (Or you can cook in a double boiler on the stove until smooth). Dump the potato sticks and the peanuts into the melted chocolate. Stir well to try and coat most of the pieces so that you get that heavenly flavor on each piece. Drop onto wax paper. Let cool & they will set up. (If you want them to set up quicker, pop them into the refrigerator for a little while)

You can substitute white chocolate chips in place of the semi-sweet chocolate chips. My oldest son doesn't like semi-sweet or milk chocolate so if he is home for the holidays then I make a batch of white chocolate ones for him. You can also fancy them up & put colored sprinkles on them when they are still not set up yet OR you can drizzle melted white or dark (or colored) chocolate on them, etc. Be creative. I just like mine plain. Nothing fancy. I love the simplicity of the crunchy dry roasted nuts with the salty crunchy potato sticks and the bold taste of the semi-sweet chocolate with a hint of butterscotch. 
YUMMY!                 
I DARE YOU TO EAT JUST ONE! 
It is like potato chips...you can't eat just one! :)


These are out of this world! I am eating one as I type this blog and have to stop and keep licking my fingers so I don't get chocolate on my keyboard...but it is so worth it!

And these were enjoyed by our friends today and kid approved too! (As you can see Mia is enjoying her out of this world Chocolate Covered Tater Stix).


Enjoy!
Tanja
Gluten Free Casually