My youngest son & me

My youngest son & me

About me

Hi!
My name is Tanja (Sater) Miller and I'm excited about sharing my journey of converting my favorite recipes to gluten free! I am not a fancy cook - I prefer just a casual, fun meal. I am married with grown children (and have small grandchildren) & 3 dogs. I work full time as a registered nurse & I am a geek. Yes, I love Star Trek, Star Wars, Fringe, Firefly, Farscape and most of the other Scify shows. You will probably see a little of my geek side come out once in a while! Please join me on my journey of cooking, baking & converting every day recipes into yummy gluten free meals that everyone can enjoy (not just those with a gluten allergy!) Don't be shy about checking out my recipes....I have the gluten free version along with the regular recipe that I adapted from!

Sunday, November 15, 2015

Hawaiian Chicken (Gluten Free)

Hawaiian Chicken is a super easy, very moist and delicious main dish. I love it because it has a slightly sweet (from the pineapple) yet slightly salty flavor (from the ham and cheese) and the combination is delightful. I like to pair it with coconut rice for the extra sweet flavor but you can pair it with any side dish. Of course if you want true authentic Hawaiian style you can use SPAM instead of ham! ;)

Hawaiian chicken is great served not only for a quick dinner after a busy day at work but if you cut the pieces (or use chicken finger sized chicken) it makes a great appetizer or brunch recipe as well.

I came up with this recipe because I had some chicken in my refrigerator and I was tired of the "same old chicken recipes". I didn't have the ingredients to make my traditional pizza chicken recipe but I did have ingredients to make a "Hawaiian pizza" chicken. Therefore....Hawaiian chicken was born at our house! You can use any type of pineapple that you have on hand. I only had crushed pineapple and I love it because you get a little bit of pineapple in every bite. You can use pineapple rings for a more elegant presentation. You can also make extra chicken and freeze them for future use on a night that you are really busy. You can cook the pineapple and chicken in the crockpot for convenience and then just add the ham and cheese just before serving.

Hawaiian Chicken Recipe:
  • 4-6 chicken breasts
  • 4-6 slices of ham (you can use gluten free deli ham or sliced ham like I did today or for true Hawaiian style you can use thinly sliced SPAM)
  • 1 can pineapple (I used a 15 oz can and let the extra cook in the bottom of pan for extra juice and flavor)
  • 4-6 slices of  cheese (any type will work. If you only have shredded cheese that will work too!)
Put the chicken in an oven safe pan (or in your crockpot on low so it doesn't burn). Spoon the pineapple on top of the chicken. Cover the oven safe pan with foil. (If you are using the crock pot then put the lid on and set temperature on low and cook 4-6 hours until chicken is done and no pink is showing in center or until juices run clear). If you are baking in the oven, set the temperature on 375 degrees and put the foil covered chicken in the oven for approximately 30-45 minutes (depending on how thick your chicken is) until the juices run clear and chicken is no longer pink in center. Remove from oven and place the ham on top of the pineapple and place a slice (or handful of shredded cheese) on top of the ham. Return to oven until the cheese melts. (If using the crockpot just remove the lid and place the ham and cheese on top of the chicken and return the lid. Keep covered until the ham is warm and cheese is melted. I like to save any leftover juice and put it with any leftover chicken in the refrigerator for extra flavor and to keep the chicken moist until I re-heat it for a left over meal!

Prior to covering with foil and baking in 375 degree oven for 30-45 minutes

This is the gluten free sliced ham I used for today's recipe

Any type of sliced or shredded cheese will work with this recipe

Ready to eat! Extra Cheesy!

Yummy!

Up close view of the Hawaiian Chicken. See the layers?

Delicious!
This is a very easy recipe and can be changed to use what you have in your cupboards. If you have a dairy allergy then you can certainly use a dairy free cheese substitute. I like this recipe because it tastes really fancy but it goes together pretty quick and is budget friendly. It is simple enough for a casual weeknight dinner yet elegant enough for a holiday dinner or brunch! You can also make ahead and freeze them or make a few days ahead and refrigerate until ready to cook. This is great for those crazy schedules! Of course if you really want "traditional Hawaiian then you can substitute SPAM instead of ham!)

Enjoy!
Tanja
Gluten Free Casually


Saturday, November 14, 2015

Bacon Wrapped Jalapeños

Bacon Wrapped Jalapeños are great for a very casual appetizer. This recipe is great for people that are gluten free, low carb or if they love bacon! I love this recipe and I can eat several of them and make it a main meal! They are elegant enough to serve at the brunch or holiday table but yummy and fun enough to serve at a super bowl party or tailgating!

This is my youngest son David's recipe and he changes it up depending on his audience. He is known for this recipe and is always asked to bring it to potlucks and family gatherings. (He will be making these for our Christmas family get together this year for the appetizer! Yummy!) This is his basic recipe but he has also added crushed pineapple to the cream cheese mixture or chipotle chiles or cooked chorizo....depending on what people like. We also had a fantastic idea this past week. We could stuff the jalapeños with my dad's cheese ball recipe since it is a cream cheese base and has soooooo much flavor! This is a fantastic recipe and you can customize it to what you have on  hand or what flavors you prefer. You can also make several varieties if this is your main appetizer so people can try different flavors!

David and his friend Megatron did this batch for the blog just for me since I have been insanely busy. They not only made the recipe but did the photo shoot too! :) If you would like to be a "guest" baker on the blog and feature your recipe....please feel free! We all learn from each other and I appreciate the help! The past few months have been super crazy busy and I have just not had the energy to do the blog. I am getting back into the swing of things now and hopefully will be updating the blog again every week. If anyone has a recipe they would like converted to gluten free...let me know and I will see what I can do with featuring the conversion on the blog!

If you have a dairy allergy then check Trader Joes, Sprouts, Whole Foods or specialty section in your grocery store for a dairy free cream cheese. Trader Joes also carries a goat milk cream cheese which is very tasty or you can substitute a slice of a different style of dairy free cheese.

David cooks these on a baking rack on top of a cookie sheet or piece of foil with the edges rolled up to catch the grease drippings. You can also use a wet toothpick or skewer and place across a pan to catch the drippings. They can be cooked in the oven or on the BBQ grill. We love this recipe because you can make them in advance and freeze them (uncooked or cooked) and just pop them into the oven the day you need them. These have so much more flavor than the store bought ones with the gluten infested bread crumb coating!

Bacon Wrapped Jalapeños Recipe:

  • Jalapeños (however many you need. Each half of the jalapeño will make one appetizer). Wash and dry them well.
  • Cream cheese (or you can substitute a dairy free cream cheese or any cheese of your choice. Feel free to use flavored cream cheese or add other items to your cream cheese. Cheese balls or cheese spreads will work also. As will pimento cheese spreads, cooked sausage or chorizo, etc.)  
  • Bacon (You will cut the bacon slices in half to make it go further. Freeze any leftover bacon, if there is any....for future use). If you have a gluten allergy then make sure you get gluten free bacon!

See the steps below for instructions!

Ingredients you need


Slice the jalapeños length wise and remove the seeds


Remove seeds after slicing them in half. I suggest wearing gloves or using a spoon. Wash your hands well and don't touch your eyes! The seeds are hot! You can leave the stems on for decoration or remove them. Personal preference.


Stuff with your cheese (or  whatever mixture you prefer)

Wrap in bacon and place on a rack and then put something below to catch grease drippings


Just removed from the oven and ready to eat!
David places his prepared jalapeños on lettuce leaves for color and decoration. You can use fancy toothpicks instead


I hope you enjoy this fun yet delicious recipe from my son's recipe box! I enjoy cooking and I am glad that my kids can get around the kitchen on their own! I am proud that they can put together an impressive appetizer, dessert or meal and watch other people enjoy it. It sure makes my holidays easier now that they can each bring something fantastic to the table!

I learned how to cook out of necessity and then realized that I enjoy it. When my kids were young, I was on a tight budget and couldn't afford to eat out so I learned to cook yummy but healthy food at home. I had a group of friends that would "treat" the birthday guest to dinner out. I couldn't afford to return the favor so I would invite them to my house, make an impressive table decoration with stuff I had on hand and make a homemade meal with an impressive dessert. At first I was worried that people would think I was cheap or that I didn't care about their special day. However, to my surprise....they were touched that I went out of my way to find their favorite recipe and cook it along with an impressive dessert at my home where we could visit and relax much easier than the restaurant. The same goes for holidays. I would become stressed at the holidays because I couldn't afford to buy gifts for each of my friends....but I sure could bake! I would bake cookies, candies, fudge, etc and give as gifts to my friends. They loved it because many of them didn't bake or didn't have time with traveling. They looked forward to my cookie plates and my homemade banana bread for the holiday festivities. One year when I worked overtime, I bought gifts instead and they were all disappointed because they were counting on my holiday cookie plate for entertaining!

I think people these days stress too much about buying the perfect gift. Gifts come from the heart. It doesn't have to be fancy or expensive. If you have a special talent.....cooking, baking, painting, crafts, landscaping, cleaning, woodworking, photography, babysitting, etc....then give the gift of LOVE. Trust me....it will be appreciated much more than the ugly sweater that gets shoved into the closet! If you are too busy during the holidays to make something....give a homemade hand written or computer typed "gift certificate" for the service to be redeemed at a future date. There is nothing better than getting a thoughtful, useful gift....a homemade dessert, a cooked casserole that a busy person can pop into the oven or for a chore or service to be redeemed in January or February! Make your holidays as stress free as possible and don't sell yourself short on your skills!

Happy Holidays! Turkey Day is just around the corner. Make some of these delicious jalapeños as an appetizer and if you have any left over (or make a double batch)....freeze them for the Christmas or New Years holidays for an easy dish! Even better....make a batch for your busy friend or neighbor and put in a rubbermaid container they can freeze and bake on a day they are busy! How thoughtful! My little neighbor lady Billie Jean always sends us over some Tamales at Christmas and I really appreciate them. They are great served as an appetizer (Slice in 3 pieces and put a toothpick in center) or added to my buffet table. They also freeze great! I am sure she would love a batch of these spicy little jalapeño poppers!

Tanja
Gluten Free Casually

Wednesday, August 5, 2015

Berry Buckle Brunch Cake


Berry Buckle Brunch Cake. This is a slightly sweet, moist cake with lots of berries and a slightly tart lemon glaze. It goes perfect with brunch (or make for a casual dessert!). Most of my recipes are very flexible and this one is no exception! You can use any type of berries (or actually any type of fruit you have on hand!). I prefer the lemon glaze but you can certainly make it with a hint of vanilla or almond instead. I was hungry for a buckle brunch cake and decided on making a blueberry version....until I opened up the freezer and realized I only had a handful of blueberries. I did find a package of mixed berries so I used that along with the blueberries. I actually prefer the berry mix that doesn't include strawberries. I don't care much for frozen strawberries. Unfortunately, this berry mix had a LOT of strawberries. The strawberries get a little mushy and will turn the batter a darker color when they cook so I suggest cutting strawberries into small pieces so you don't get a bite of mushy strawberry! It tastes perfectly fine, I just prefer blueberries, blackberries or raspberries. I am not a strawberry kind of girl. (The version I made today is a mixed berry version and does have strawberries so that is why the cake is a little darker in color).

This cake recipe is also very flexible with the type of flours you can use. I used a little bit of coconut flour, gluten free flour blend and some ground almonds for my "FLOUR" mixture. You can substitute finely ground oats or corn flour for the coconut flour and ground almonds. You can also just use all gluten free flour blend. I also used milk in my recipe today but you can substitute a non-dairy milk substitute like almond milk, coconut milk, soy milk or even unflavored coffee creamer. I love recipes that you can use whatever ingredients you have on hand or tweak the recipe so you can adjust it for people with allergies. Of course, with all my recipes...if you don't have a gluten allergy you can certainly use regular flour. My recipes were all originally made with regular flour and I have converted them to gluten free. I also think this recipe would taste great with some shredded coconut and chopped nuts in the crumb topping!

The girls at work have been raving about a local European style bakery that has scrumptious danishes and pastries. I was so afraid they would go get some today and bring to work...and I would be drooling because they don't make gluten free items. So...I decided to stay up a little late last night and make this berry buckle brunch cake so we all could enjoy a sweet treat this morning! Nothing puts a smile on our faces like pastries and breakfast cakes! :)

Berry Buckle Brunch Cake Recipe:
  • 1/2 cup butter (or use Crisco, Coconut Oil or margarine that contains at least 70% fat. Do not use reduced fat because it contains too much water and will not cook properly!)
  • 3/4 cup sugar 
  • 2 eggs
  • 1 cup gluten free flour blend (I used Pillsbury brand today since that is what hubby bought at the store. If you don't have a gluten allergy then use regular flour)
  • 1/2 cup finely ground almonds (you can substitute additional flour instead)
  • 1/2 cup coconut flour (you can substitute additional flour instead or finely ground gluten free oats)
  • 2 tsp. baking powder
  • 1/2 tsp. baking soda
  • 1/2 tsp. salt
  • 3 oz. softened cream cheese or plain yogurt or sour cream. You can substitute a non-dairy version or if you don't have any of these items, I have used additional butter or Crisco. This recipe is pretty versatile.
  • 3/4 cup milk + 1 tsp. white vinegar (stir and let stand for a few minutes so it starts to curdle). If you have a milk allergy then you can substitute coconut milk, soy milk, almond milk or any non-dairy milk substitute. They may not curdle with the vinegar but add it anyway
  • 2 cups fresh or frozen berries or chopped fruit
Beat the butter (or Crisco, Coconut Oil or margarine), cream cheese, eggs and sugar until smooth and creamy. Beat in the baking powder, baking soda, salt until combined. Gradually add the flours and ground almonds alternately with the milk. Stir in the berries or fruit. Pour into a greased 9" round springform pan (easier to remove if you are putting it on a platter or giving as a gift) or you can bake in a 9x9 pan or casserole dish. Sprinkle with crumb topping. Bake in a pre-heated 350 degree oven for about 50-60 minutes or until toothpick inserted comes out clean. Cool and drizzle with lemon glaze.

Cake batter before adding the crumb topping


Crumb topping:
  • 1/3 cup softened butter (or you can use coconut oil, margarine that contains at least 70% fat, crisco or vegetable oil). 
  • 3/4 cup sugar (brown sugar will work too)
  • 3/4 cup gluten free flour blend (you can add some finely ground nuts to this if desired!)

Stir until it is crumbly. If it is too powdery then add a little additional butter or oil. If it is too moist then add a little more flour blend.

Crumb topping added & ready to bake!

Lemon Glaze:
  • 1 cup powdered sugar
  • zest from 1 lemon (optional but I really like the flavor it adds)
  • 3-4 tbs. lemon juice 

Whisk until smooth and texture that you can drizzle onto the cake. If it is too thick then add a little more lemon juice or water. If it is too thin then add a little more powdered sugar until you get the correct consistency.  Drizzle over cooled cake.


Lemon Glaze
Fresh from oven and cooling before adding the glaze

Glazed and ready to serve


Up close view before serving


Inside view


Ready to eat! Where is my coffee?!


Up close view before I demolish it!

I hope you enjoy this super versatile recipe!

Enjoy your week!

Tanja
Gluten Free Casually


Sunday, July 19, 2015

Un-stuffed Cabbage Rolls

Un-stuffed Cabbage Rolls. Yeah...the lazy girl's version of American style cabbage rolls which is great for a busy weeknight! My mom makes the best cabbage rolls in the world...German style that don't contain rice and have a brown sauce. They just melt in your mouth. This un-stuffed version is a friend's recipe for her cabbage rolls (American style)....except I converted it to a busy mom version that you don't have to roll up. Just cook it all in a large skillet.....and dinner is done. Quick, easy and one pan! I like simple recipes in the summer that don't require much effort and don't heat up my kitchen!

You can also stretch this out by adding broth or tomato juice + water and make into a soup. This recipe is so easy and very flexible. I keep mine simple but you can add peppers or anything else you want. I don't care much for peppers so I don't add them although they add a beautiful color! You can serve it over rice or gluten free pasta, fried potatoes or baked potatoes for a complete dinner. If you are doing a low-carb diet then you can just eat it plain.

I looked in my refrigerator and realized I had some lean hamburger, fresh tomatoes and a bag of shredded cabbage that needed used up. We were talking about cabbage rolls recipes with friends the other night and so I whipped out my recipes to see if I could modify one to make it "un-stuffed" to use what I already had in my refrigerator. You can substitute ground turkey, chicken, pork or sausage for the hamburger. You can use fresh or canned tomatoes. I also thought about adding some frozen roasted corn to add color but chose not to do that today. (However, I think I will do that next time for some added color and sweetness!) I cooked a large batch so we would have leftovers for tomorrow night's dinner but you can certainly cut the recipe in half for a smaller batch (or freeze half for later!)

Un-Stuffed Cabbage Rolls Recipe:
  • 2 pounds lean meat (I used hamburger but you can substitute ground chicken, turkey, pork or sausage if you prefer)
  • Onion, chopped (I used half of a large onion but you can add more or less)
  • 3 garlic cloves, chopped fine (or use 1 tbs. minced garlic in a jar) OR 1 tbs. garlic powder
  • 2 pounds of shredded cabbage (I used the pre-cut coleslaw blend in a bag)
  • 1 can or fresh diced tomatoes (about 12-15 oz), you can add more if you like a lot of tomatoes. If you like it a little spicier then you can add chunky salsa! Use what you have on hand!
  • 3-4 tbs. tomato paste (or just use a gluten free ketchup for a slightly sweeter flavor or if you don't want to open a can of tomato paste. My mom always did this because I don't think we ever had tomato paste in our house growing up). If you like it really saucy then feel free to add the entire can of tomato paste.
  • 1 envelope of gluten free onion soup/dip mix OR 2 tbs. gluten free beef bouillon granules (optional but I really like the extra depth of flavor it adds)
  • salt & pepper to taste (add this last because you may not need to add very much)
Cook your meat in a large skillet along with garlic, onions and beef bouillon or gluten free onion soup mix (if you are adding it). I used my heavy duty "Paella pan" (I received it as a gift and I love it! I use it a lot for many meals besides Paella!) If your meat is extremely lean then you may need to add a tablespoon of olive oil. (The original recipe calls for 2 tbs of olive oil but I just leave it out if my meat has a little bit of fat. I just don't drain the meat fat if there is about 1 tablespoon left in the skillet because it has more flavor than the olive oil. However, if your meat contains more fat then you will need to drain some off to prevent having greasy food!). Add the shredded cabbage and cook until almost tender but not soggy. Stir in diced tomatoes and either tomato paste or ketchup. Cook until warmed through. Salt & pepper to taste. Serve over cooked rice, gluten free noodles, baked potatoes, fried potatoes or quinoa. If you prefer a soup then add either some beef broth, vegetable broth or vegetable juice (like V-8 juice) plus some water to thin it down. You can add rice, pasta or potatoes to the soup too. The recipe is very, very flexible!

Cooking the meat, onion, garlic & beef bouillon

Added the cabbage and will cook until tender but not soggy

Added my chopped tomatoes. You can add more if you want!

Ready to serve up!

Ready to eat. Served it on white rice today!

See the beautiful colors?!

Grab a fork and eat! 

I hope you like my lazy Sunday version of Un-Stuffed Cabbage Rolls using ingredients that I already had in my refrigerator. My mom still makes the BEST cabbage rolls that I have ever had....but these are an easy, lazy alternative. I promise I will have my mom make her German version of cabbage rolls and I will post on the blog this fall. PROMISE! Until then....you can make the lazy version of the American style cabbage rolls.

Friday, July 10, 2015

Gluten Free Banana Cream Cheese Stuffed Bundt Cake

Banana Cream Cheese Stuffed Bundt Cake. Two of my favorite things = Banana cake + cheese cake. Oh my! The sweet, moist cake pairs well with the slightly tart cream cheese layer...especially paired with a nice cup of coffee! That is what weekends are for! :)

I had a huge bunch of very ripe bananas that needed to be used + 1 had some cream cheese. I didn't want to make just a loaf of banana bread. I saw a recipe online for an apple bundt cake that had a layer of cream cheese in the center. Hmmmm.....my brain went into overdrive designing a gluten free banana bundt cake that has a cream cheese layer in the center. Bundt cakes are always moist. They're relatively easy and no fancy decorating required! They also freeze well and last a long time in the refrigerator (not that they last long at our  house!). I had thought about doing a banana roll (similar to a pumpkin roll) but cake rolling intimidates me. I always do it wrong and get frustrated! I took my grandma Goldie's old banana cake recipe and tweaked it a little to be baked in a bundt pan + made it gluten free.

Yes, I relax on the weekend in between movie marathons, swimming and whatever other plans we have....baking. Mainly because I can't sit still for long! (I just wish the kitchen cleaning fairy was close by!) I don't think I am normal. (No comments on that please!) I enjoy looking at recipes and figuring out how I can change it up to use what I have in my kitchen + tweak it to make it gluten free. I consider it a hobby. Am I crazy or what?! (Please, please don't answer that!) So basically....I saw a recipe for a regular apple bundt cake with cream cheese filling & ended up with a banana bundt cake with cream cheese filling....gluten free! Yeah...that's how it works at my house! (If you don't have a bundt pan you can cut the recipe in half and bake in a 9x5 loaf pan but you will need to adjust cooking time since it won't need to bake quite as long).

I know a lot of the recipes and gluten free flour blends brag that you can turn a regular recipe into gluten free and you can't tell the difference. It is "sort of" true. I convert my regular recipes into gluten free ones all the time but I always have to adjust them slightly to get the EXACT texture and flavor of the original recipe.  The gluten free flour blends have a tendency to be a little more powdery in texture which can result in crumbly results. A few tips if you want to convert a favorite recipe: add at least 1 extra egg, consider adding a teaspoon of vinegar to the batter, I add slightly more baking powder or baking soda to the recipe and consider a gluten flour blend with assorted gluten free flours. I also like to add coconut flour for a small portion of the recipe if possible. I don't add it to a recipe if the flavor will be noticeable because I don't want to change the flavor of the recipe. Coconut flour has a silky texture similar to regular wheat flour so if you mix it into your gluten free flour blend, the results are very nice! However, I never use only coconut flour because the flavor is different than regular flour and slightly sweeter. Another option is adding ground almonds which will give you moisture and stability to cakes but I only do this if I know my guests don't have nut allergies. A lot of gluten free recipes increase the sugar and fat content which I try to avoid. Again, I don't want to alter the flavor or texture of my dessert recipe. I don't want a soggy, greasy cake. I like to mix my own flour blend but sometimes I just don't have the time or if I am traveling then it isn't convenient. Some of the brands that I have had good luck with are: King Arthur, Pillsbury, Betty Crocker, Cup4Cup and Trader Joe's. Some of the other brands contain a lot of sorghum flour which I do NOT like in my sweets or they are so powdery that my results are crumbly. Also always check to see if your gluten free flour blend contains either xanthan gum or guar gum. If not, you will need to add about 1/2 teaspoon to your baked goods to give it the elasticity that wheat flour contains. If it is really important that your cake or baked goods turn out fantastic and you are unsure about your flour blend...I highly recommend adding 3-4 oz of cream cheese (or non-dairy version cream cheese) to your batter for best results. (Good luck and feel free to post any tips or suggestions you have in comments below!)

Banana Cream Cheese Stuffed Bunt Cake Recipe:
  • 5-6 ripe bananas (bananas should have dark spots on peels but shouldn't be real mushy)
  • 4 large eggs
  • 1 1/4 cups sugar (I used unbleached, non GMO but you can use white sugar)
  • 2 cups gluten free flour blend (I like to use the type without sorghum because it leaves a weird aftertaste in my sweets).  If you don't have a gluten allergy then you can use regular flour.
  • 1/2 cup finely ground almonds (if you have a nut allergy or don't have these then you can just substitute additional 1/2 cup gluten free flour or regular flour if you don't have gluten allergy)
  • 1/2 tsp. xanthan gum or guar gum (only add this if your gluten free flour doesn't contain it. Do not add if you are using regular flour).
  • 1 tsp. baking soda
  • 1 tsp. baking powder
  • 1/2 tsp. salt
  • 1/2 cup + 2 tbs  Crisco (or substitute butter, coconut oil, olive oil or vegetable oil)
  • 1 tbs. white vinegar (optional but I like to add it to make the cake extra moist) 
  • NOTE: If you are experiencing your gluten free flour being too powdery and the texture of your baked goods are too crumbly (try a different brand in the future) but in the meantime beat about 3-4 oz of softened cream cheese to the cake batter and it will keep it from being crumbly. You don't need to do this but I have found that not all gluten free flour blends are equal and they can be expensive so you don't want to waste them! If you are afraid your cake might turn out crumbly then add the cream cheese because it will give the cake moist, silky texture. 
 Cream Cheese Filling Recipe:
  • 8 oz. cream cheese, softened
  • 1/2 cup sugar (I like to use gluten free powdered sugar for an extra smooth texture but you can use regular white sugar or unbleached sugar)
  • 1 large egg
  • 4 tbs. corn starch or tapioca starch or gluten free flour (or regular flour if you don't have a gluten allergy)
  • *I also like to add one tsp. of lemon or lime zest if I have it on hand but it is purely optional or you can substitute 1 teaspoon of ground cinnamon but it is optional. Leaving it plain is just fine.
For the cake batter: Beat the ripe bananas, sugar, Crisco (or oil) and eggs until fluffy and smooth. If you are adding cream cheese to your batter then add it now also and beat until smooth. Add the baking soda, baking powder, salt, vinegar, flour (and nuts if you are adding them). Mix until well incorporated but don't over mix.

For the Cream cheese filling: Beat the cream cheese, sugar, egg, corn starch (or tapioca starch or flour) & lemon or lime zest or cinnamon if you are adding it.

Bananas should be ripe with brown spots on peels


Half of cake batter on bottom then I added cream cheese layer and will top with remaining cake batter 

Grease a bundt pan. Pour half of the banana cake batter into bundt pan or angel food cake pan. Spoon the cream cheese filling layer on top of the cake batter trying not to touch the edges of the pan so the cheese layer stays thick. Pour the remaining cake batter over the cream cheese layer. Bake in a pre-heated 350 degree oven for 60-75 minutes or until knife inserted comes out clean. Do not under-bake or your cake texture could be mushy in the center. The cream cheese layer will not be gooey. Oven temperatures and altitudes can vary cooking times. If you are baking in a loaf pan then adjust cooking time to 40-55 minutes. I let it cool in the pan for about 30 minutes before removing it so it holds the shape and doesn't want to collapse. You can drizzle with a light glaze of powdered sugar and water or milk OR make a thin cream cheese drizzle using a few tablespoons of soft cream cheese or butter, powdered sugar and drizzle of milk or juice or coffee + 1 added a teaspoon of instant espresso powder (or you could use instant coffee) and a pinch of ground cinnamon. I think the espresso/coffee flavor keeps the glaze from being too sweet and adds a depth of flavor. Just make sure it is thin enough to drizzle but not watery. You can dust with powdered sugar instead of glaze....or just leave it plain. This cake is fantastic left undecorated. The flavors tell the story. You don't need to dress it up!
 

I think I will have to try my hand at baking a few other flavors of bundt cakes with the cream cheese layer. It would be delicious with just about any type of bundt cake....even the original apple bundt cake that I got the idea from! Just think.....carrot cake, red velvet cake, strawberry cake, spice cake, pineapple cake, mango cake, chocolate fudge.....the list just goes on and on! :) It makes a great bundt cake for a brunch or dessert. The slices freeze well too so that is convenient for a breakfast on the go!

I am seriously considering making cream cheese filled bundt cake for Thanksgiving (in addition to pies) for a nice change. I like that they can be made a couple days in advance (flavors are even better a couple days later!) and that gives us leftovers for breakfast on the go for Black Friday Shopping!

Unglazed, fresh from oven. I let it cool in pan about 20-30 minutes before flipping onto rack to cool!

Glazed and ready to slice & eat! You can add chopped nuts or coconut for decorations too but I didn't do it today
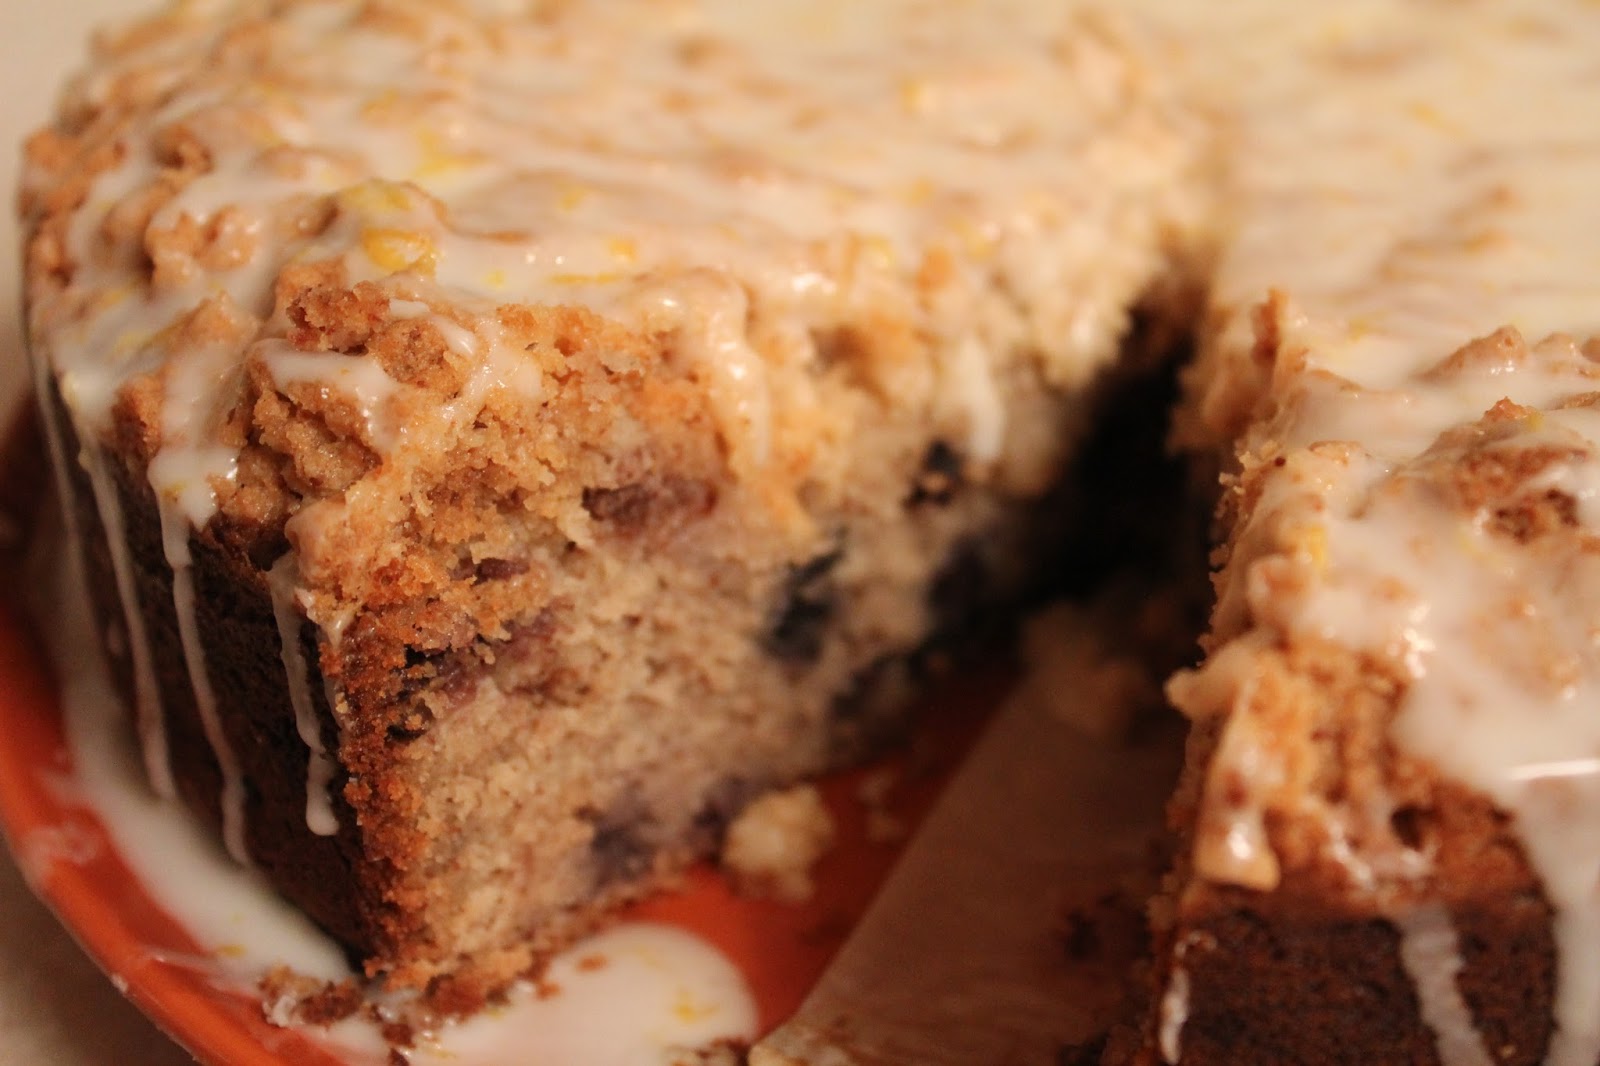
Up close view of the cake slices

See how moist? The flavor is incredible!

It is a very simple recipe, casual enough for a BBQ but elegant enough for holiday brunch or dessert!

I hope you enjoyed my cooking adventure this week. Feel free to comment any tips, suggestions, substitutions that you have tried in the comments below. We all learn from each other!


Happy snacking!
Tanja
Gluten Free Casually


Friday, July 3, 2015

Gluten Free Zucchini Coconut Lime Loaf

Zucchini Coconut Lime Loaf. I love the moist loaf with the tart lime glaze. It just melts in your mouth. The only downside is that you are tempted to go back for seconds because it is really yummy. I had a patient that gave me a couple of gigantic zucchinis so I wanted to design a gluten free zucchini loaf that wasn't dry or overly sweet. I like coconut so I added about 1/2 cup of shredded sweetened coconut (but you can obviously leave that out if you don't like it) and I added a slightly tart lime glaze that compliments the sweet loaf. It is kind of a cross between a sweet bread and a cake. You can serve it for breakfast or dessert. This also freezes very well...if you have any leftovers! I will also freeze some shredded zucchini so I can make some of these scrumptious loaves later in the winter! (Winter here in Arizona means breakfast on the patio!)

I couldn't find a recipe that I thought would work for a gluten free version so I took a regular zucchini cake recipe and a zucchini bread recipe and added a few extra things (and substituted gluten free flour) to it to make it a customized loaf recipe to meet my needs. You can substitute lemon or orange in place of lime if you prefer. You can leave out the coconut. You can leave out the finely ground almonds and substitute flour instead. It is a very flexible recipe which is what I like about it! Since zucchini doesn't really have much of a flavor....it is a great way to get moisture (and vegetables!) into your loaf. You can make this recipe using regular flour if you don't have a gluten allergy!

Zucchini Coconut Lime Loaf:
  • 2 cups of gluten free flour blend (I used my recipe below but you can use any gluten free flour blend that you prefer. I prefer the ones without the sorghum because it leaves a weird after taste in my sweets). I have also used 1 cup GF flour blend + 1 cup coconut flour and had great results too. Of course if you don't have a gluten allergy then you can use regular flour.
  • 1/2 cup finely ground almonds (or substitute additional 1/2 cup of gluten free flour)
  • 1 cup sugar (I used unbleached non GMO sugar but you can use regular white sugar)
  • 1/2 tsp. salt
  • 1/2 tsp. xanthan gum or guar gum if your gluten free flour doesn't contain it. Leave out if you are using regular flour or if your GF blend already contains it.
  • 1 tsp. baking soda
  • 1 tsp. baking powder
  • 1/2 cup milk + 1 tbs. vinegar (let stand until it starts to thicken. This resembles buttermilk). You can substitute almond milk, coconut milk or any dairy free milk.
  • 1/2 cup oil (I generally use olive oil or avocado oil but vegetable oil will work too!)
  • zest of one large lime (or a couple small limes)
  • about 1/8 cup of lime juice
  • 3 eggs (I used brown, organic eggs)
  • 1 1/4 cup shredded, uncooked zucchini (I shred with peel on after I wash it real well)
  • 1/2 cup shredded, sweetened coconut (optional)
Lime Glaze:
  • 1 cup powdered sugar
  • 3-4 tbs. lime juice
  • zest of one lime

 For the loaf: Mix flour, salt, baking powder & baking soda in a medium bowl and set aside. In a larger bowl, beat the eggs, oil, sugar, lime juice & zest and milk-vinegar mixture. Slowly add in the flour mixture with the ground almonds if you are using them. Fold in zucchini and shredded coconut. Pour into greased 9x5 loaf pan. Bake in pre-heated 325 degree oven for approximately 45-55 minutes or until toothpick inserted into center comes out clean. Cool slightly before pouring glaze over top. I chose to keep my loaf simple but you can decorate the top with slivered almonds and coconut if you want to dress it up!

For Lime Glaze: Mix powdered sugar, lime juice & zest until smooth consistency to pour over loaf.

You can double the recipe and bake in a large bundt pan but you will need to increase the baking time slightly. If you choose to bake in muffin cups then you will need to reduce the baking time to approximately 18-22 minutes. Keep in mind that oven temperatures and altitudes can change the baking time! Always check at the soonest baking time and adjust as needed.


My Homemade Gluten Free Flour Blend Recipe:
  • 1 1/2 cups brown rice flour
  • 1 cup white rice flour (I used sweet rice flour for this batch)
  • 1/2 cup glutinous rice flour (made from sticky rice, gluten free)
  • 1 cup potato starch (not flour)
  • 1/2 cup nonfat dry milk or dairy free milk powder, make sure it is very fine in texture
  • 1 cup corn starch or tapioca starch (I used tapioca starch for this batch)
  • 3 tbs. xanthan gum
Combine all ingredients together well. You can put it in the blender for an extra smooth texture if desired. I store mine in a glass container and use it in place of regular flour in all my recipes. This particular blend I really like for baked sweet goods and breads. (Note: if using my homemade gluten free flour blend you will not need to add additional xanthan gum to your recipe since this batch already contains it!)

Prior to baking

Slightly cooled & just glazed

Glazed and ready to put on a decorative plate

Up close view of the lime glaze

Ready to eat!
 I hope you enjoy this very moist, slightly sweet & slightly tart zucchini loaf. I will be making this recipe again this weekend so I can share with my co-workers since I have another zucchini in my refrigerator.  So the next time someone gives you a bag full of zucchini.....try this recipe and see how scrumptious it tastes! :)

Happy Baking!
Tanja
Gluten Free Casually

Monday, June 15, 2015

Gluten Free Chocolate Fudge Cake (Star Wars)

Gluten Free Chocolate Fudge Cake. I've tried a lot of different gluten free chocolate cake recipes and I found that most of them were really crumbly or too sweet....or didn't really have much of a chocolate flavor so I have been experimenting over the years and I came up with this recipe that I designed. You can frost it with whatever type of frosting you prefer. I chose a chocolate buttercream frosting on the outside and a cappuccino flavor buttercream for the inside frosting layer. (I had some leftover cake batter and frosting so I made my grand-daughter a mini version of this cake but used store-bought frosting in the center of hers since I didn't think she would like the cappuccino flavored frosting). This cake was for a friend of mine since she was having a dinner party celebrating a couple of birthdays. Since she didn't want anything "girly" and there were no restrictions on the decorations....I "GEEKED" it up using my silicone molds.  I had a lot of fun making this cake. I love to bake and I am learning how to decorate. No formal classes....just practicing! I will definitely invest in some decent frosting bags after this! (I struggled with the disposable bags rupturing so I couldn't get even pressure for my swirls and made a big mess! My kitchen smelled like a bakery but looked like a war zone when I was done!) Although this isn't as easy as a box cake mix...I think it is worth the effort.

Gluten Free Chocolate Fudge Cake:
  • 1 3/4 cup sugar (I used unbleached, GMO free sugar but you can use regular white sugar)
  • 1 1/2 cups gluten free flour blend (I used Betty Crocker Gluten Free Flour Blend in today's recipe)
  • 1/4 cup gluten free coconut flour (If you don't have this then you can use gluten free flour or finely ground almonds instead. I like the silky texture of coconut flour in this cake. You can't taste the coconut flavor because the dark chocolate will be high lighted)
  • 3/4 cup unsweetened gluten free cocoa powder (I used a German brand but you can use any good quality cocoa powder)
  • 1 1/4 teaspoon baking soda
  • 1 1/4 teaspoon baking powder
  • 1 teaspoon salt ( I just use the regular table salt since it is finely ground)
  • 4 eggs (I used large sized organic brown eggs)
  • 1 cup milk + 1 teaspoon white vinegar (let stand 2 minutes to thicken. It gives the texture and flavor of buttermilk. You can substitute dairy free milk)
  • 3/4 cup black coffee (you won't taste the coffee but it will give the chocolate a depth of flavor that isn't too sweet. If you don't have coffee then you can substitute water or additional milk).
  • 4 oz. cream cheese, softened (you can substitute a dairy free cream cheese or shortening. I like the texture that the cream cheese gives this cake. It keeps it moist and makes the chocolate flavor more intense. I have substituted shortening but I do prefer using cream cheese when possible)
  • 3 oz. semi-sweet chocolate, melted and slightly cooled
  • 5 tbs. softened real butter or margarine that contains at least 65% fat. Do not use light! (You can substitute shortening or coconut oil). I always prefer using real butter when possible.
Preheat oven to 325 degrees. Grease two 8" cake pans or one 9x13 pan with butter or gluten free cooking spray. Beat the cream cheese, butter, melted chocolate and sugar until creamy and smooth. No lumps! Add eggs one at a time. Add the milk & vinegar mixture. Gradually add the baking soda, baking powder, salt and flours alternately with the coffee. Beat for 2 minutes until mixture is smooth and well incorporated. Bake in pre-heated oven for about 26-40 minutes or until toothpick inserted in center comes out clean. Baking time may vary depending on your oven and altitude. Check at 26 minutes and adjust accordingly. Cool in pans for about 30 minutes prior to removing to a cooling rack. Frost when cooled or sprinkle with powdered sugar if you decide not to frost cake.

Cake batter. It is slightly thick

Frosted in chocolate buttercream

My chocolates that I made in silicone mold

Up close view of cake topped with Star Wars chocolates

Ready to eat!

Side view

My grand-daughter's cake slice
50 birthday cake for a friend using same recipe
50 Birthday cake using same recipe and melted sugar & chocolate garnish
Another friend's birthday cake using same recipe and edible garnish

My gluten free cake taste tester!


If you are a geek like me or if you have a Star Wars fan in your family, you can purchase the silicone Star Wars molds (which can be used for a variety of things including melted chocolates to decorate cakes, brownies, etc) can be purchased online. I have purchased them on Ebay and Amazon. The molds are fantastic because they are silicone and can be used for other items like clay or melting crayons. (Yes, my grand-daughter and I will take broken crayons and break them up into pieces and put assorted pieces in the molds and bake them. You will get a rainbow crayon in the shape of your favorite character!) I did see the Han Solo silicone mold at Hot Topic Store and they had it in stock if you just have to have your mold NOW and can't wait for shipping! ;) Oh yeah....if you aren't a Star Wars fan....you can find silicone molds in other shapes online too including Marvel comic characters, Doctor Who, Star Trek or boring stuff like flowers, animals or holiday molds. They are fun to use!

Hope you enjoyed my favorite version of gluten free chocolate cake!
Tanja
Gluten Free Casually