My youngest son & me

My youngest son & me

About me

Hi!
My name is Tanja (Sater) Miller and I'm excited about sharing my journey of converting my favorite recipes to gluten free! I am not a fancy cook - I prefer just a casual, fun meal. I am married with grown children (and have small grandchildren) & 3 dogs. I work full time as a registered nurse & I am a geek. Yes, I love Star Trek, Star Wars, Fringe, Firefly, Farscape and most of the other Scify shows. You will probably see a little of my geek side come out once in a while! Please join me on my journey of cooking, baking & converting every day recipes into yummy gluten free meals that everyone can enjoy (not just those with a gluten allergy!) Don't be shy about checking out my recipes....I have the gluten free version along with the regular recipe that I adapted from!

Saturday, March 23, 2013

Gluten Free Waffles


Gluten Free Waffles! My granddaughter was coming over early this morning so I knew she would be hungry for breakfast. I decided to convert my old waffle recipe into a gluten free version. We all liked them! I have tried several of the pre-made gluten free waffle mixes and they were too powdery in texture and flavorless. I wanted homemade waffles.

I whisked all the ingredients together and then let it sit for about 15 minutes before I used it. The batter thickens up and the waffles are fluffier. These can be served with butter & syrup or fresh fruit or pie filling or I like mine with applesauce and cinnamon. I have also used left over waffles in place of bread for an egg sandwich.

Leftover waffles can be frozen in a ziploc freezer bag and then either put in the toaster to heat them up nice and crispy or you can defrost in the microwave if you like your waffles on the softer side. You can also prepare the batch less crispy then put all of them on a cookie sheet and bake in 350 degree oven for about 5-10 minutes or until warm & slightly crunchy. That way everyone gets a warm waffle at the same time!

And if you want to be REALLY,  REALLY naughty and have these waffles as a dessert....well you can drench them quickly in melted butter and dip in cinnamon sugar for a "churro waffle". Only do this on a day that you aren't counting calories! :)

Of course if you don't have a gluten allergy...you can just use regular flour and omit the xanthan gum!

Waffe Recipe:
  • 2 cups of gluten free flour (see my recipe below or you can use a prepared flour mix like Trader Joe's. I won't use the flour mixes with sorghum flour in it for my sweets or baked goods. It gives them an aftertaste that I don't like)
  • 1/2 cup corn starch or tapioca starch (it gives the waffles a nice texture)
  • 1/2 tsp. salt
  • 1/2 tsp. xanthan gum (leave this out if your prepared flour mix already contains it or if you are using regular flour)
  • 1 tsp. baking powder
  • 1/2 tsp. baking soda
  • 1 1/2 cups milk (or you can use almond milk, coconut milk or seltzer water)
  • 1/2 cup water (I like to add seltzer water if I have it. It gives the waffles a super fluffy texture. I didn't use it today because I didn't have any on hand)
  • 8 tbs. melted butter or oil
  • 2 large eggs
  • 1/4 cup sugar (you can substitute raw sugar or splenda if you prefer)
  • 1 tsp. vanilla or almond extract (I prefer the almond extract or almond baking emulsion)
  • 1-2 tsp. of ground cinnamon, optional. I like to add it for the extra flavor but you don't need to.

Combine all the ingredients together. (I just dump it all in the mixing bowl and beat by hand with a whisk). Let it stand in bowl for about 10-15 minutes before using and the batter will become thicker. Pour into your heated waffle maker and follow instructions on your waffle maker. (I have a very basic, cheap waffle maker but it works fine. I think it was under $5 around Christmas time and I also have a Star Wars Darth Vader Head waffle maker that I absolutely adore! It makes the most perfect waffles and doesn't drip. I found it on sale at Kohls).

My gluten free flour mixture:

  • 1 1/2 cups brown rice flour
  • 1 cup white rice flour (I used sweet rice flour for this batch)
  • 1/2 cup glutinous rice flour (made from sticky rice, gluten free)
  • 1 cup potato starch (not flour)
  • 1/2 cup nonfat dry milk, make sure it is very fine in texture
  • 1 cup corn starch or tapioca starch (I used corn starch for this batch)
  • 3 tbs. xanthan gum
Combine all ingredients together well. You can put it in the blender for an extra smooth texture if desired. I store mine in a glass container and use it in place of regular flour in all my recipes. This particular blend I really like for baked sweet goods. *If you have a milk allergy then just substitute powdered non-dairy coffee creamer or additional brown rice flour in place of the powdered milk.

Ready to eat!

Up close view

Taste testing for the blog!

Mmmmm good! 

Approved by the cutest critic! <3

My geek waffle maker! Worth the investment!

My favorite waffle maker

I love this waffle maker because it doesn't drip batter. It has a nice ridge

Two Vader Heads ready to eat!!! Geek Alert!!


I hope you enjoy this easy & casual breakfast recipe. (Breakfast is also great for dinner on busy nights!) 

Enjoy!
Tanja
Gluten Free Casually


Tuesday, March 19, 2013

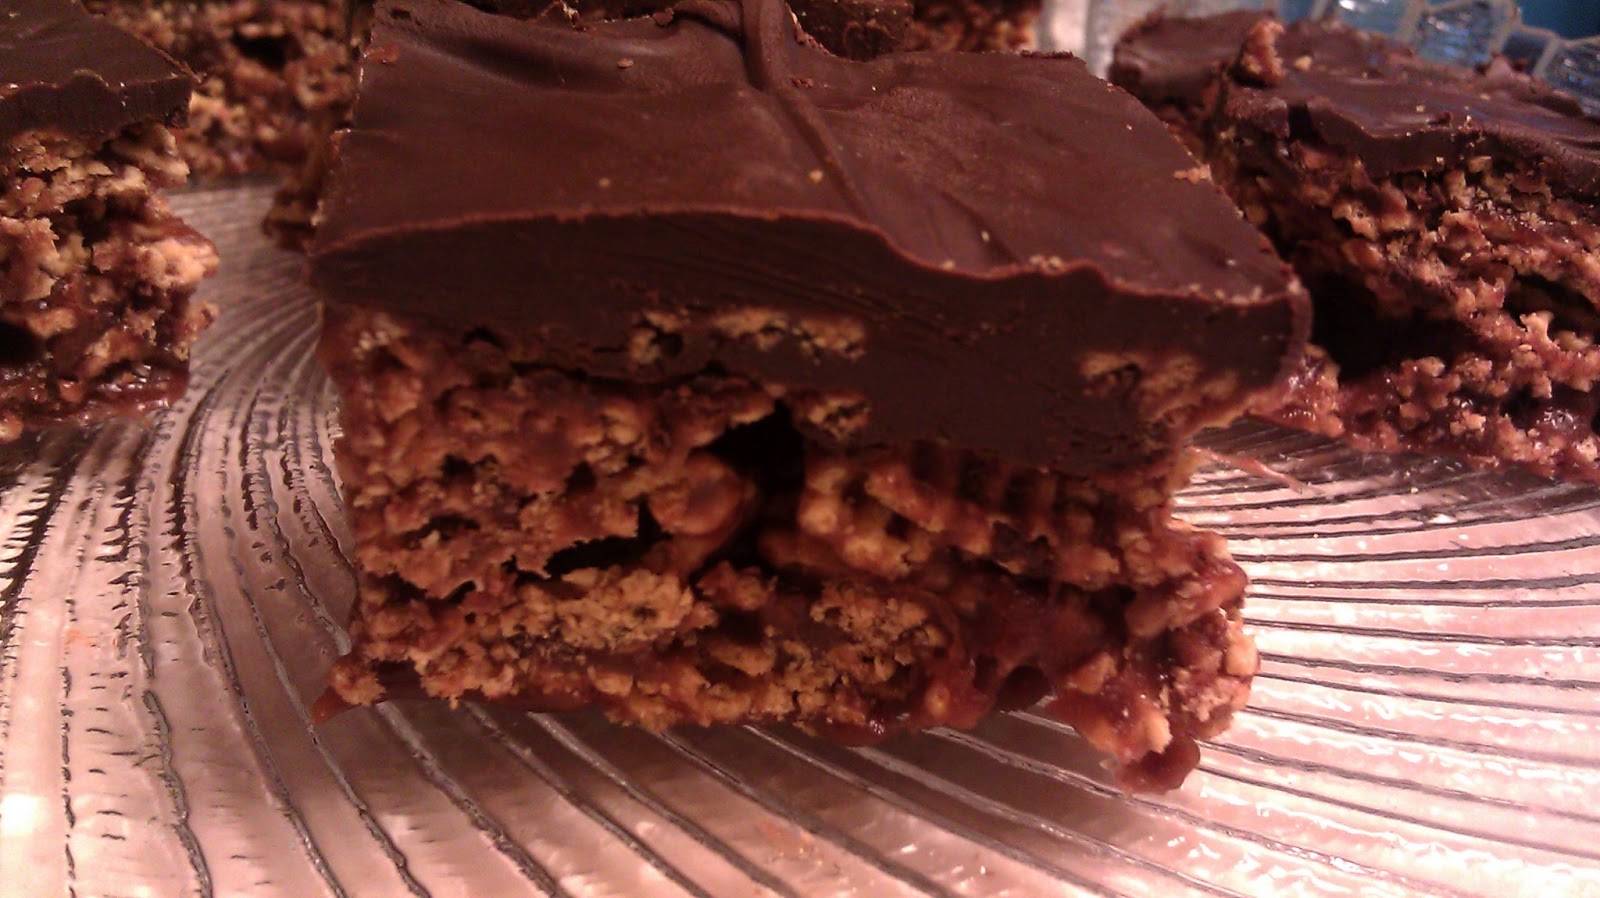
Nutella Chex Bars

Nutella Chex Bars. I came up with this recipe when I had originally planned on making Chex Scotcharoos but realized I didn't have peanut butter....so I improvised with my hubby's Nutella instead! They turned out quite delicious. I personally think that anything that has Nutella in it is SCRUMPTIOUS! These bars are no-bake so you can make them on the stove top or microwave and not heat up your oven in the summer heat which is a bonus when you live in Arizona!

I use either General Mills Corn Chex Cereal or Rice Chex Cereal because they are gluten free. You can substitute gluten free Kellogg's Rice Krispies, Post Cocoa Pebbles (they are also gluten free). You can also use corn flakes if you can find them gluten free. Any of these will work just fine in this recipe. (Watch out for some of the generic versions of these cereals because most of them are NOT gluten free! Read the labels carefully!)

Nutella Chex Bars Recipe:
  • 6 cups of Corn Chex or Rice Chex
  • 1 cup light corn syrup
  • 1 cup sugar 
  • 1 cup Nutella
  • 2 cups semi sweet or dark chocolate chips
  • additional 1/2 cup Nutella (for topping)
Spray a 9x13 pan with cooking spray. Over medium heat, stir together the corn syrup & sugar until melted. Bring to a full boil. Remove from heat and stir in 1 cup Nutella until well combined and smooth. Pour over cereal and mix gently with a spoon until most of the cereal pieces are coated. Spoon into the greased 9x13 pan. Press down with the back of a spatula to compress them slightly. (I find that this is much easier if you spray a little cooking spray on the spatula first. It keeps the cereal from sticking to it!) Set aside. In a microwave safe bowl, combine the 2 cups of chocolate chips with the 1/2 cup Nutella and cook in 30 second intervals until melted and smooth. Pour over the cereal bars. Let stand until chocolate is set. (If I want to hurry this process along...I put them in the refrigerator for 20-30 minutes to set up faster! I don't like waiting to eat these!)

Oh...and if you want to kick it up another notch...just add some chunks of a chocolate hazelnut candy bar into the Chex cereal mix. Delicious! I love the hazelnut/chocolate combination. Mmmmm! :)

These are a great casual picnic pleaser + they are easy to make. Very similar to making Rice Krispie treats. I hope you enjoy these as much as we do!


Enjoy these super easy no-bake treats!

Tanja
Gluten Free Casually


Tuesday, March 12, 2013

Coffee Cake

Pineapple Coffee Cake
Scrumptious Coffee Cake. I love this old recipe for a simple coffee cake. My mom has been making this basic coffee cake since I was a young child. She got the recipe from a free mail order cookbook from Gold Medal flour. She varies the filling so she can customize the flavor. It is a nice, fluffy coffee cake that is not too sweet. It goes fantastic with a great cup of coffee. I have been able to tweak this recipe to make it gluten free since I really missed this particular coffee cake. I made it and took the gluten free version into work to see what they thought. It got thumbs up reviews and there were no leftovers! My boss also found me a bag of gluten free flour to try from Trader Joe's stores. I used my "homemade" version of gluten free flour in one batch and the Trader Joe's gluten free flour in the other batch. Both coffee cakes turned out perfect! The texture and flavor were great. I could not tell they were gluten free! I was impressed with the Trader Joe's gluten free flour because it is extremely convenient and bakes just like regular flour and the cost is about $3.99 for a one pound bag. It had a nice smooth texture (not gritty like some brands). Of course if you don't have a gluten allergy...you can just make this recipe with regular flour like my mom does! 

It is a fabulous recipe for a casual brunch, holiday dessert or just treat your family or co-workers to a lovely surprise. It is so simple to make but it is delicious and impressive! I am lucky that my mom is the sharing type and doesn't get upset that I share her scrumptious recipes on my blog. :)

Scrumptious Coffee Cake:
  • 1 1/2 cup sugar (you can use raw sugar if you prefer)
  • 1/2 cup margarine (make sure it is a margarine that contains at least 65% fat or it will won't work well for baking! I found that Kroger brand works well and it is cheap! It can be found at Kroger or Fry's grocery stores). Or substitute real butter (not light).
  • 1/2 cup Crisco shortening (I am becoming a stickler for certain brands. I used the generic store brand recently for some frosting and it turned out awful. I realized that some brands "whip" theirs with water to make it cheaper and reduced fat which does not work well in a lot of baking recipes. Sometimes it is worth the extra few cents for the real thing!
  • 1 1/2 tsp. baking powder
  • 1/2 tsp. salt
  • 1 1/2 tsp. almond extract or baking emulsion (I prefer the baking emulsion which I find in the food section at TJ Maxx, Ross for Less, Home Goods stores or baking supply shops. But my mom uses almond extract and it works great also!) The original recipe only called for 1 tsp. but we like the rich almond flavor so we add 1 1/2 tsp. instead. 
  • 4 eggs or you can substitute egg beaters
  • 3 cups of flour (I used gluten free flour blend. I used Trader Joe's brand in one batch and my homemade version -recipe below- in the other batch. Both worked great. If you don't have a gluten allergy then you can just use regular flour. 
  • 1 tsp. Xanthan Gum if your gluten free flour blend doesn't contain it. If you are using regular flour then you don't need to add this ingredient.
  • 2 cups of pie filling, lemon curd or custard/cooked pudding (not instant pudding) or basically whatever type of filling you like. You can also make your own filling from canned or fresh fruit by cooking on the stove with approximately 3 tbs. corn starch or tapioca starch to thicken it + a little bit of sugar to sweeten if the fruit is tart. Instructions for my pineapple filling are below. 
Combine the sugar, margarine (or butter), shortening and almond extract or almond baking emulsion together until smooth. Add eggs and beat well. Gradually add the baking powder, salt and flour. (Dough mixture will be thick  - kind of like a brownie dough). Spread 2/3 of mixture into a greased 9x13 baking pan. Spread the pie filling on top as evenly as you can. Drop the remaining 1/3 of dough mixture by spoonfuls on top of pie filling. It will leave open gaps where you can see the pie filling. Bake uncovered in 350 degree oven for 35-45 minutes or until toothpick inserted comes out with moist crumbs and top is lightly golden brown in color. (*Note: in a pinch, I have used all margarine or all Crisco instead of the combination. There are times I have either Crisco or Margarine but not both. In this recipe you can improvise a little! The only thing I would not substitute if possible is the almond flavor. It gives this recipe a rich flavor that vanilla extract can't!)

2/3 of dough spread in bottom of  greased 9x13 pan

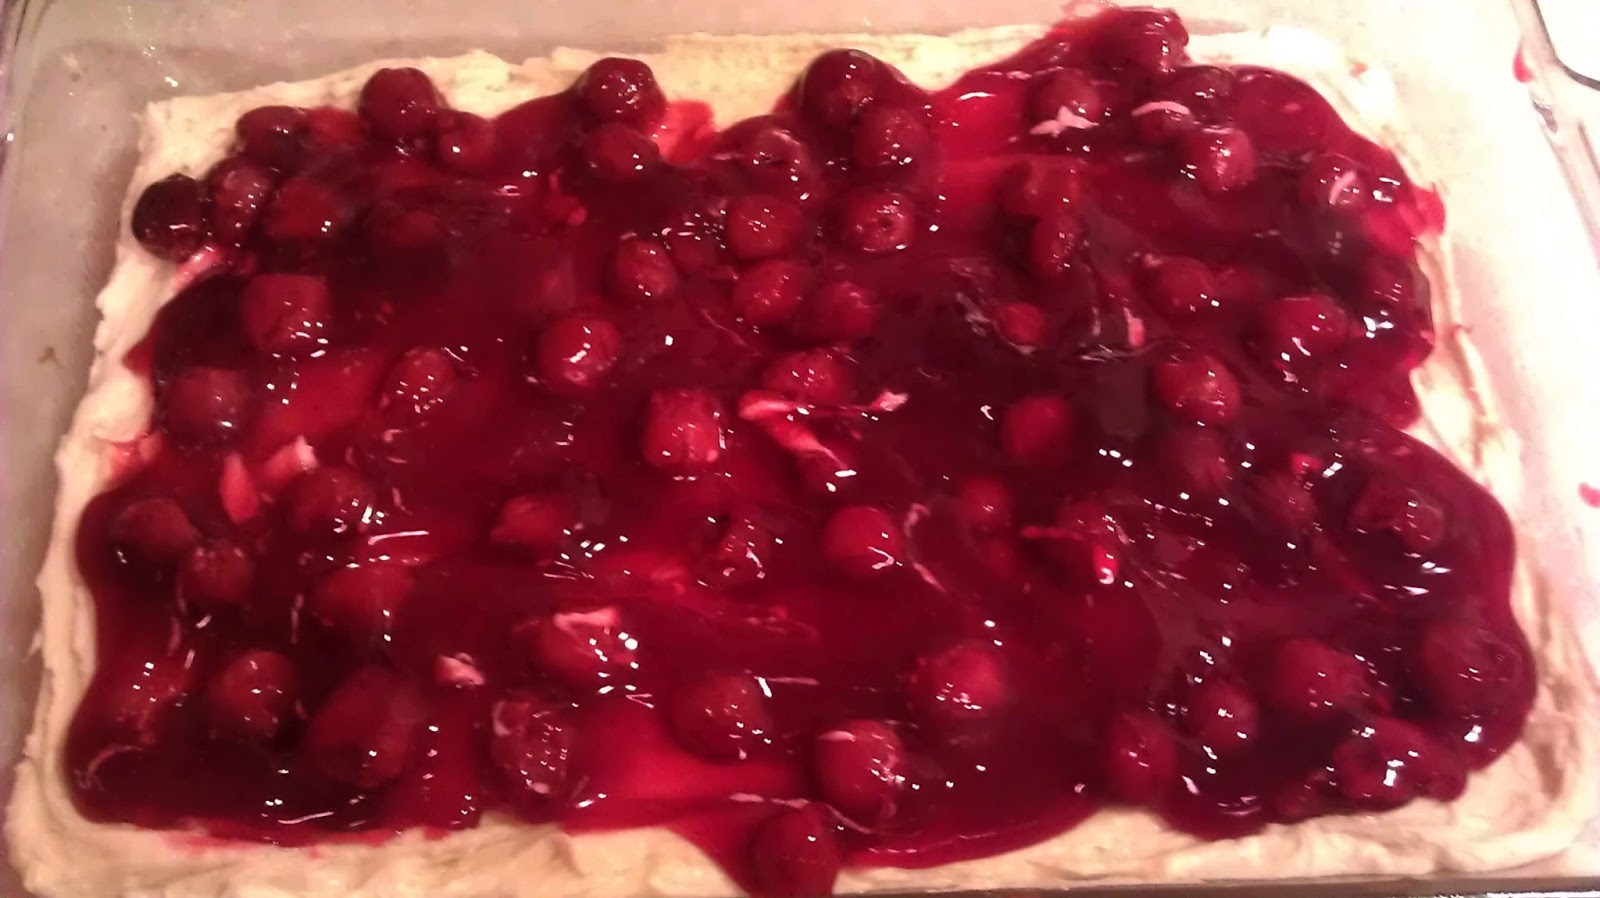
Cherry Pie Filling spread over the 2/3 dough in 9x13 pan

Remaining 1/3 dough spooned in clumps over pie filling before baking

 I usually put a piece of foil on top of the 9x13 pan after it is removed from oven to trap in the moisture and keep the coffee cake extra moist as it cools. (I leave the foil on for about 30 minutes before removing). When the coffee cake is cool then I take about 1 1/2 cups of powdered sugar and a splash of milk to make a light glaze to drizzle on top. It adds an extra sweetness to the recipe but it isn't required. The scrumptious coffee cake is great served warm or cold. 

Trader Joe's Gluten Free Flour
My Homemade Gluten Free Flour Blend Recipe:
  • 1 1/2 cups brown rice flour
  • 1 cup white rice flour (I used sweet rice flour for this batch)
  • 1/2 cup glutinous rice flour (made from sticky rice, gluten free)
  • 1 cup potato starch (not flour)
  • 1/2 cup nonfat dry milk, make sure it is very fine in texture
  • 1 cup corn starch or tapioca starch (I used corn starch for this batch)
  • 3 tbs. xanthan gum
Combine all ingredients together well. You can put it in the blender for an extra smooth texture if desired. I store mine in a glass container and use it in place of regular flour in all my recipes. This particular blend I really like for baked sweet goods. 

Pineapple Filling Cooking on Stove
Pineapple Coffee Cake Filling:
1 can (approx 15 oz) of crushed pineapple with juice
3 tbs. corn starch or tapioca starch
1 tbs. sugar, optional

If you are not using crushed pineapple then take whatever pineapple you have on hand (rings or chunks) and put it in the blender or food processor for a few seconds to puree it. You don't want huge chunks in your coffee cake. In a saucepan, combine the pineapple with juice, cornstarch or tapioca starch and the sugar. Cook on medium heat until the pineapple mixture starts to thicken. Remove from heat and spoon onto your coffee cake dough. 

Just removed the cherry coffee cake from oven. No glaze added yet!

Up close view of cherry coffee cake. See how moist it is?

Up close view of the pineapple coffee cake. Yummy!

I hope you enjoy one of our family's favorite recipes that I was able to turn into a scrumptious gluten free version. (Of course you can make it with regular flour if you don't have a gluten allergy!). We love this recipe because you can change the filling and have a different coffee cake each time! My favorites are cherry, pineapple, lemon curd or apricot. My husband prefers apple pie filling. You can use homemade or store bought filling. It all works just fine! 

I hope this inspires you to whip up a scrumptious coffee cake and sit back and relax with a cup of coffee and some friends to enjoy this recipe!

Have a great day!

Tanja
Gluten Free Casually


Wednesday, March 6, 2013

Cuban Pork Sandwich

Cuban Pork Sandwich. My husband and I first tasted this super yummy sandwich years ago in the Miami area while on vacation. Since then, you see it creeping up on the menus in places like Margaritaville. It is a good solid sandwich and pleasing to the taste buds. Simple. Delicious. Grilled. Can it get much better than that? As with any ethnic dish, there are variations depending on the region. My sandwich is the basic one that we like. You can serve it with mustard or a seasoned mayo on the side but the place we had it in Florida did not have condiments on it except for the optional dill pickles. The juices from the meat on the sandwich and cheese is a perfect blend. Why ruin that?

The traditional sandwich calls for Cuban Bread which is slightly sweet (reminds me of the King's Hawaiian bread) but since I am making mine gluten free today...I substituted Udi's bread which worked just fine. (You can also check out my recipe for homemade bread in January on the blog if you prefer making homemade bread!) I serve my Cuban Pork sandwiches with a side of coconut rice because we like the way the sweet sticky rice melts in your mouth with the pork.

I make our Cuban Pork Sandwiches with left over shredded pork roast and gluten free sliced deli ham, baby Swiss cheese, gluten free bread and dill pickles. I make ours in the George Foreman table top grill because it smashes the bread down while it grills - kind of making it into a panini. You can just grill it in the skillet on medium heat and press it down while it is cooking to flatten it. (The sandwich should flatten considerably).

Cuban Pork Sandwiches: (Makes 2 sandwiches)

  • 1/2 pound of shredded cooked pork
  • 4 slices of gluten free deli ham
  • 4 slices of Cuban Bread or substitute Hawaiian bread (I substituted Udi's gluten free sandwich bread for today)
  • 4 slices of Baby Swiss Cheese
  • real butter to spread on the bread slices prior to grilling
  • dill pickles, optional (my husband doesn't care for the pickles so I usually leave them off his sandwich!)

Shredded pork roast

gluten free ham
Udi's Gluten Free Bread


Butter the bread slices. Put a slice of cheese on one bread slice. Layer with shredded pork roast, 2 ham slices per sandwich and another slice of cheese. Add pickles if desired. Put in hot skillet or George Foreman style table top grill. Cook until bread is golden brown and cheese is melted. I serve our sandwiches with coconut rice. (Just add a handful of shredded coconut when adding your rice to the water to cook. The rice will absorb the coconut flavor and soften the coconut to give it a nice fluffy texture. No need to use expensive coconut waters/milk for this recipe. The shredded coconut will give it plenty of flavor for a fraction of the cost).

Ready for the grill!

Layering the sandwich ingredients

Getting ready to close the lid on the grill/press

Ready to eat! :)

Up close view of the yummy sandwich!
This sandwich makes a great casual dinner for nights when you don't want to spend a lot of time in the kitchen. We like to take ours out to the patio and enjoy the weather. I always save some of our pork roast so that we can enjoy these sandwiches for lunch or dinner the following day.

I hope you enjoy this casual but fun sandwich!

Tanja
Gluten Free Casually

Thursday, February 14, 2013

Quicker than a mix Peanut Butter Cookies

Peanut Butter Cookies! I can't think of a quicker way to say Happy Valentine's Day! These cookies go together soooo fast and you wouldn't guess there are only 3 ingredients (unless you add extras like M&Ms, pretzels, Chocolate Chips, etc.) I love this recipe because it is so easy and requires minimal ingredients for a cookie. My kids used to make these by themselves after school for a snack (Middle school & High school aged at the time!) This is an old family favorite. This is a great way to say "I love you" without breaking the bank or without sucking up so much time preparing and cleaning up a kitchen mess.  (you can press a Hershey Kiss in the center when they come out of the oven hot (try the Caramel Hershey Kisses for a mouth watering twist! The gooey caramel blends fabulously with the peanut butter! I didn't have any of those handy today). I love this recipe because it is awesome for a quick cookie fix. We used to make these on vacation when staying in a rented condo. I could make homemade cookies really quick without buying a bunch of ingredients or needing a mixer. Since there is no flour in this recipe....they are gluten free without altering it! If you tend to like a sweet but slightly salty cookie...you can add a pinch of sea salt for an amazing flavor! If you want the cookies to puff up slightly then you can add 1 tsp. gluten free baking powder. The basic recipe below will give you a nice, soft, slightly chewy cookie. Feel free to add chocolate chips, M&M candies, pretzel pieces or whatever you like or you can just leave them plain!

Quicker than a mix peanut butter cookie recipe:

  • 1 cup peanut butter (creamy or crunchy), I prefer Jif
  • 1 cup sugar (I used raw sugar today but you can use white or brown sugar). Note: The raw and brown sugar will make the cookies chewier than the white sugar. If you prefer a little crispier cookie then flatten these with a fork or glass and bake an extra minute or two!
  • 1 egg


Yep, that is it. No mixer necessary! Mix all the ingredients together with a spoon or fork by hand until well incorporated. If you decide you want to add extra ingredients (chocolate chips, extra peanuts, M&Ms, pretzel pieces, GF Rice Crispies, etc...you can do it now!)  I like the sweet & salty combination when adding the pretzel pieces. Sounds gross but it is quite tasty! Spoon onto ungreased cookie sheet. I flatten mine slightly with a fork or glass. These do not raise or spread much so don't be skimpy with the scoops of dough! If you are adding a Hershey Kiss or mini Reese cup in the center then roll the dough into balls and bake in ball form. Gently press Hershey Kiss or mini Reese cup in center when you first remove from oven. This will flatten the cookie slightly and make a nice little nest for the kiss or Reese cup to settle into.

Bake in preheated 350 degree oven for 10-13 minutes. Depends on how crispy you like them. Cool & eat! NOTE: If you notice that your peanut butter is a little oily then add a couple tablespoons of gluten free flour or corn starch to thicken it up. These should stay nice and chewy.

My grand-daughter wanted to help make cookies today

Helping scoop out the dough

I used a cookie scoop to keep the cookies evenly sized

She is patiently waiting for the cookies to get done baking!

Up close view of the cookies

Cooling on the rack

Taste tasting for the blog!

Close up view of the cookies today


Up close view of cookie. See the pretzel & M&M chunks we added to this batch?

Ready to eat!

Happy Valentine's Day!

I hope you have a great Valentine's Day! Take a few minutes today to bake some yummy love for your family and friends!

Tanja
Gluten Free Casually

Monday, February 11, 2013

Million Dollar Baked Spaghetti

Million Dollar Baked Spaghetti. This is a super easy and very tasty version of a baked spaghetti. The flavor resembles a lasagna without all the effort. You will need to overlook the ingredients because I ate it for years at a friend's house and when I finally asked for the recipe...I was rather shocked with the actual ingredients. Cream cheese? Sour cream? Really? I would never have guessed it to be in this casserole. Honestly, if I would have saw this recipe in a magazine and read the ingredients...I would have skipped over it. The combination doesn't sound appealing. Oh but it is delectable! It isn't a dried out version of baked spaghetti. This is also a very forgiving recipe: you can tweak it and it still tastes great!

I haven't made this recipe for quite a few years and then one of my kids requested it. I decided to make it with gluten free spaghetti noodles. Then my daughter requested that I use fat free versions of the cottage cheese and cream cheese for her new gallbladder/pancreas diet. I tried it and none of us could tell the difference. (Even my mom who is not generally a fan of any type of baked spaghetti enjoyed it. She asked for the recipe to make it when she goes back to Ohio!) If you don't have any special diet restrictions you can certainly make it with regular spaghetti noodles & regular cottage cheese & cream cheese! Either way it is DELICIOUS! (Leftovers are just as good!)

Million Dollar Baked Spaghetti Recipe:
  • 8 oz. spaghetti noodles (I used Hodgson Mill Brown Rice Gluten Free Noodles). You can use regular spaghetti noodles if you don't have a gluten allergy.
  • 16 oz. Cottage cheese (I used fat free)
  • 8 oz. cream cheese, softened (I used fat free)
  • 1/4 cup sour cream (I used fat free)
  • 1 can (24 oz.) spaghetti sauce (I used Hunt's Zesty)
  • 1 pound lean hamburger, I used 93% lean hamburger (or you can substitute ground turkey or vegetarian crumbles)
  • 1/2 cup diced onion, optional

Brown hamburger & onion in a skillet until onions are tender and meat is no longer pink; drain grease if there is any. (If you are using the vegetarian crumbles then you can omit cooking them in the skillet since they are pre-cooked! Just saute the onions if you are using them). Add spaghetti sauce and set aside. Boil noodles until done; drain. Mix the cream cheese, sour cream and cottage cheese until well combined. (I put it in the microwave for almost 1 minute so the cream cheese softened enough to mix well). Spray a 9x13 pan with cooking spray. Spoon half the spaghetti noodles into bottom of pan. Spoon half of the cream cheese/cottage cheese/sour cream mixture on the noodles then top with half of the hamburger/sauce mixture. Repeat layers. Bake uncovered in 350 degree oven for 25-30 minutes until cooked through. Cut into squares and serve. Leftovers freeze well.


It was fun bringing an old favorite dish into my gluten free world. This is one of those yummy comfort foods that brings back smiles. Although I enjoy experimenting and trying new recipes...sometimes the old comfortable ones are the best! I am sooooo glad that the gluten free (and fat free) substitutions stood up well to this recipe! It is a keeper!

Enjoy!
Tanja
Gluten Free Casually

Sunday, February 3, 2013

Brownie Cookies

Brownie Cookies. It is a brownie hidden in the form of a cookie. Double yummy! I love brownies & I love cookies. I like the individual cookies because you seem to get more for some reason when you make a batch in cookie form then when you cut brownie squares. I played around with a lot of different recipes and came up with this batch that turned out well. I added mint flavored chocolate chips to my batch because we were craving mint/chocolate combination today but you can use any flavor of chocolate chips and/or nuts you want. This is a basic recipe that can be customized to your favorite brownie preference. They can also be left plain, frosted or sprinkled with powdered sugar. By changing the chips/nuts or topping you can change up the recipe easily. Another one of our favorites is to add a pinch of Chipotle Chili powder & dark chocolate chips for a spicy sweet treat which goes great with Mexican food!

Brownie Cookie Recipe:
  • 2/3 cup margarine (Use one that has 65% or more fat or else the texture won't be right. I used Kroger brand for today's batch). You can substitute Crisco shortening if preferred. 
  • 1 cup sugar (I used raw sugar but you can use regular sugar if you prefer)
  • 1 egg
  • 1 tsp. vanilla extract
  • 3/4 cup brown rice flour (If you do not have a gluten allergy, you can just use regular flour). You can buy brown rice flour at most grocery stores OR if you have a good blender/grinder then you can grind your own brown rice flour which is less expensive. (Just do it in small batches so you don't burn up the motor in your blender/grinder!)
  • 1/4 cup corn starch or tapioca starch
  • 1/2 tsp. xanthan gum (you can leave this out if you are using regular flour). Most Walmarts sell small little packets for under 50 cents each if you don't want to invest in a large bag of it.
  • 1/2 cup unsweetened cocoa powder
  • 1/2 tsp. baking soda
  • 1/2 tsp. salt
  • 1 1/2 cups chocolate chips (any flavor) or chopped nuts, optional. (I used mint flavored chocolate chips in today's batch but you can substitute any flavor you want or just omit them if you prefer plain brownie cookies. They are good either way!
single packets sold @ Walmart

Preheat oven to 350 degrees. Beat margarine or shortening and sugar until creamy; add egg. Gradually add vanilla and beat well. Gradually add rice flour, corn starch or tapioca starch, cocoa powder, baking soda & salt until just combined. Don't over mix. Stir in chocolate chips and/or nuts if desired. Drop by rounded teaspoonful onto un-greased cookie sheet. Bake about 9 minutes or until set. Do not over-bake or they will be coffee dunkers! Cool slightly before removing from baking sheet onto cooling rack. *The dough can also be spread into a 9x13 greased pan and baked for 18-23 minutes or until toothpick inserted comes out with moist crumbs.


I hope you enjoy these little heavenly brownie-like cookies. We really enjoyed them! They would make a great Valentine's Day treat. The dough freezes well too. The dough can also be pressed into a 9x13 and baked into brownie squares if you prefer.

Enjoy!
Tanja
Gluten Free Casually